Dewalt DW088-XE Crossline Laser Instruction Manual


IF YOU HAVE ANY QUESTIONS OR COMMENTS ABOUT THIS OR ANY DEWALT TOOL, CALL US AT: 1800 444 224 (Aust) or 0800 339 258 (NZ).
Technical Data
- Voltage V 4.5
- Battery size 3 x LR6 (AA)
- Laser power mW < 1.3
- Laser class 2
- Wavelength nm 637
- Protection class IP54
- Self-leveling range ˚ +/- 4
- Operating temperature ˚C -10 to +45
- Receptacle thread 1/4″ x 20 TPI
- Weight kg 0.75
SAFETY INSTRUCTIONS
Always observe the safety regulations applicable in your country to reduce the risk of fire, electric shock and personal injury. Read the following safety instructions before attempting to operate this product. Keep these instructions in a safe place.
WARNING: To reduce the risk of injury, user must read the instruction manual.
WARNING! Read all safety warnings and all instructions Failure to follow the warnings and instructions may result in electric shock, fire and/or serious injury.
SAVE ALL WARNINGS AND INSTRUCTIONS FOR FUTURE REFERENCE.
GENERAL WARNINGS
- Keep work area
Cluttered areas and benches can cause accidents.
- Keep children
Do not let children come into contact with the tool or extension cord. Supervision is required for inexperienced users.
- Use appropriate
The intended use is described in this instruction manual. Do not force small tools or attachments to do the job of a heavy-duty tool. The tool will do the job better and safer at the rate for which it was intended.
WARNING: The use of any accessory or attachment or performance of any operation with this tool, other than those recommended in this instruction manual may present a risk of personal injury.
SAFETY INSTRUCTIONS FOR LASERS
WARNING: Read and understand all instructions. Failure to follow all instructions listed below may result in electric shock, fire and/or serious personal injury.
- Do not operate the laser in explosive atmospheres, such as in the presence of flammable liquids, gases or dust. Power tools create sparks which may ignite the dust or
- Use the laser only with the specifically designated batteries. Use of any other batteries may create a risk of
- Store idle laser out of reach of children and other untrained persons. Lasers are dangerous in the hands of untrained
- Use only accessories that are recommended by the manufacturer for your model. Accessories that may be suitable for one laser, may create a risk of injury when used on another laser.
- Tool service must be performed only by qualified repair personnel. Repairs, service or maintenance performed by unqualified personnel may result in injury. Contact your local certified service centre or visit dewalt.com.au or www.dewalt.co.nz.
- Do not use optical tools such as a telescope or transit to view the laser beam. Serious eye injury could
- Do not place the laser in a position which may cause anyone to intentionally or unintentionally stare into the laser beam. Serious eye injury could
- Do not position the laser near a reflective surface which may reflect the laser beam toward anyone’s eyes. Serious eye injury could result.
- Turn the laser off when it is not in use. Leaving the laser on increases the risk of staring into the laser
- Do not operate the laser around children or allow children to operate the laser. Serious eye injury may
- Do not remove or deface warning labels. If labels are removed, user or others may inadvertently expose themselves to
- Position the laser securely on a level surface. Damage to the laser or serious injury could result if the laser
- Dress properly. Do not wear loose clothing or jewelry. Contain long hair. Keep your hair, clothing, and gloves away from moving parts. Loose clothing, jewelry or long hair can be caught in moving parts. Air vents often cover moving parts and should also be avoided
WARNING: Use of controls or adjustments or performance of procedures other than those specified herein may result in hazardous radiation exposure.
WARNING: DO NOT DISASSEMBLE THE LASER. There are no user serviceable parts inside. Disassembling the laser will void all warranties on the product. Do not modify the product in any way. Modifying the tool may result in hazardous laser radiation exposure.
WARNING: Fire hazard! Avoid short-circuiting the contacts of a removed battery.
ADDITIONAL SAFETY INSTRUCTIONS FOR LASERS
- This laser complies with class 2 according to IEC/ EN 60825- 1:2007. Do not replace a laser diode with a different type. If damaged, have the laser repaired by an authorised repair
- Do not use the laser for any purpose other than projecting laser lines.
An exposure of the eye to the beam of a class 2 laser is considered safe for a maximum of 0.25 seconds. Eyelid reflexes will normally provide adequate protection. At distances over 1 m, the laser complies with class 1 and thus is considered completely safe.
- Never look into the laser beam directly and
- Do not use optical tools to view the laser
- Do not set up the tool at a position where the laser beam can cross any person at head height.
- Do not let children come in contact with the
Residual Risks
The following risks are inherent to the use of this device:
- injuries caused by staring into laser beam.
IMPORTANT SAFETY INSTRUCTIONS FOR BATTERIES
WARNING: Batteries can explode, or leak, and can cause injury or fire. To reduce this risk:
- Carefully follow all instructions and warnings on the battery label and package.
- Always insert batteries correctly with regard to polarity (+ and –), marked on the battery and the equipment.
- Do not short battery
- Do not charge
- Do not mix old and new batteries. Replace all of them at the same time with new batteries of the same brand and type.
- Remove dead batteries immediately and dispose of per local codes.
- Do not dispose of batteries in
- Keep batteries out of reach of
- Remove batteries if the device will not be used for several
- Young children and the This appliance is not intended for use by young children or infirm persons without supervision.
– This appliance is not intended for use by persons (including children) with reduced physical, sensory or mental capabilities, or
lack of experience and knowledge, unless they have been given supervision or instruction concerning use of the appliance by a person responsible for their safety.
- Children should be supervised to ensure that they do not play with the
Batteries
(Fig. 2)
BATTERY TYPE
This laser operates on three LR6 (AA-size) batteries.
INTENDED USE
The crossline laser DW088-XE has been designed to project laser lines to aid in professional applications. The tool can be used indoor for horizontal (level), vertical (plumb). The applications range from layout of walls and windows to installation of framing track.
DO NOT use under wet conditions or in presence of flammable liquids or gases.
The crossline laser is a professional tool. DO NOT let children come into contact with the tool. Supervision is required when inexperienced operators use this tool.SAVE ALL WARNINGS AND INSTRUCTIONS FOR FUTURE REFERENCE
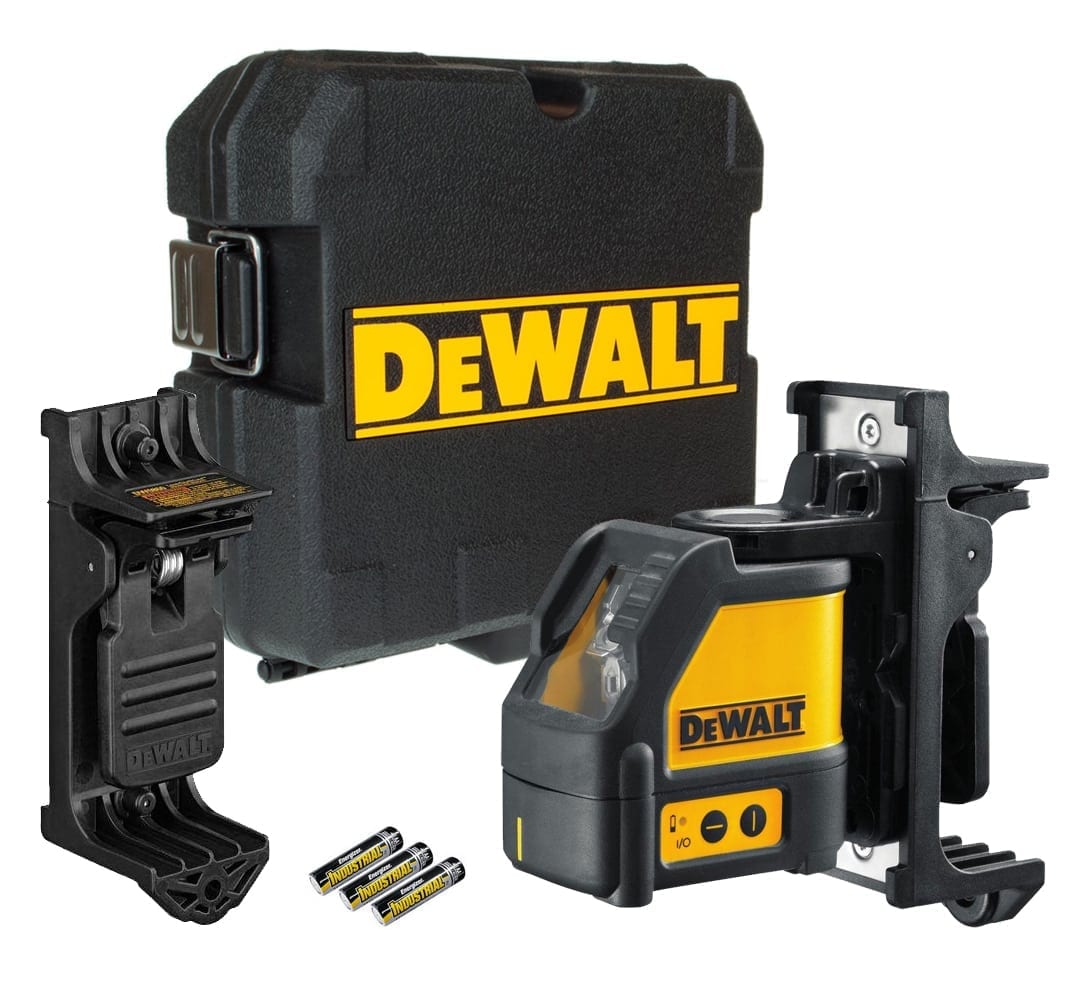
COMPONENTS
(Fig. 1)
WARNING: Never modify the power tool or any part of it. Damage or personal injury could result.
- A. On/off switch (vertical laser beam)
- B. On/off switch (horizontal laser beam)
- C. Low battery indicator
- D. Vertical laser beam
- E. Horizontal laser beam
- F. Vertical laser beam indicator
- G. Horizontal laser beam indicator
- H. Pivot bracket
- I. Wall mount
- J. Battery compartment cover
- K. 1/4” x 20 female thread

ASSEMBLY AND ADJUSTMENT
WARNING: Do not place the laser in a position which may cause anyone to intentionally or unintentionally stare into the laser beam. Serious eye injury may result from staring at the beam.
Replacing Batteries (Fig. 2)
The DW088-XE laser operates on three LR6 (AA-size) batteries.
- Open the battery compartment cover (J).
- Replace the batteries (L).
Make sure the new batteries are placed as indicated. - Close the battery compartment cover.
LOW BATTERY INDICATOR (FIG. 1)
The tool has been equipped with a low battery indicator (C) located on the control panel. The low battery indicator is lit while the tool is switched on. It will blink to indicate that the batteries need to be replaced and the tool will automatically shut down.
Switch off the tool and remove the batteries as soon as the indicator blinks.
Setting up the Tool (Fig. 3A–3D)
The tool facilitates various set-ups, making it useful for several applications.

FLOOR SET-UP
Place the tool on a relatively smooth and level surface.
The keyhole (M) in the pivot bracket (H) is used for mounting to wall constructions. Alternatively, the tool can be attached to metal studs directly using the magnets (N).
The keyhole (M) in the pivot bracket (H) is used for mounting to wall constructions. Alternatively, the tool can be attached to metal studs directly using the magnets (N).
- Drive a screw or nail into the
- Hang the tool onto the fastener by the keyhole. FITTING THE TOOL TO THE WALL MOUNT (FIG. 3A–3D)
The tool has been equipped with a wall mount (I) for mounting to wall track to aid in drop ceiling installation and other specialty leveling projects. The pivot bracket (H) has magnets to attach the tool to the wall mount.
Align the magnets (N) with the metal plate on the wall mount (I).
To remove the wall mount, pull the wall mount from the tool applying sufficient force.
To Fit the Wall Mount to Wall Track (FIG. 3B, 3C)
- Open the clamp jaws (O).
- Place the clamp jaw around the wall track and release the clamp to close the clamp jaws shut on the
To Mount the Wall Mount to a Wall (FIG. 3D)
- Reorient the wall mount so the mounting hole (P) is at the top and the clamp jaws (O) are at the
- Hold the tool at the desired position against the wall and mark the location of the mounting hole (P) on the
- Drill a hole at the marked
- Insert a corresponding plug into the
- Hold the tool in front of the
- Turn a screw into the mounting hole (P).
Adjusting the Tool
To initiate the leveling procedure, switch on the tool. The level and/ or plumb orientation is correctly adjusted as long as the laser beams remain on.
The laser beams start flashing to indicate that the tool has been set up at a slope that is beyond the self-leveling range of 4°. Switch the tool off, re-adjust the tool set-up within the self-leveling range and switch the tool on again.
Align the laser line of either one of the laser beams with the position mark. Move the tool as required.

OPERATION
WARNING: Do not place the laser in a position which may cause anyone to intentionally or unintentionally stare into the laser beam. Serious eye
injury may result from staring at the beam.

WARNING: Always observe the safety instructions and applicable regulations.
- Always mark the centre of the laser dots.
- Make sure the tool has been set up securely.
- Extreme temperature changes cause movement of internal parts that may affect the accuracy of the tool. Regularly check the accuracy while using the tool under these circumstances.
- Although the tool corrects small out-of-level errors automatically, when it is bumped, re-adjustment to balance or set-up may be required.
- If the tool has been dropped or has tipped over, check whether there is damage by performing the field calibration checks. See Maintenance.
Switching On and Off (Fig. 1)
The tool has separate switches to operate the vertical laser line and the horizontal laser line.
To switch the vertical laser beam (D) on, press the on/off switch (A). To switch the horizontal laser beam (E) on, press the on/off switch (B). To switch either laser beam off, press the on/off switch again.
Transferring a Position Mark (Fig. 4)
The tool produces two laser lines in horizontal and in vertical direction, to transfer a mark.
Align the relevant laser beam with the mark.
Rotating the Tool (Fig. 5)
When in wall set-up, the tool can be rotated manually to transfer the horizontal laser line.
Rotate the tool to the left or right as required.
Laser Accessories
DE0892-XE DIGITAL LASER
DETECTOR (FIG. 6)
Some laser kits include a DEWALT Digital Laser detector.
The DEWALT Digital Laser Detector helps in locating a laser beam emitted by the laser in bright light conditions or over long distances. The detector can be used in both indoor and outdoor situations where it is difficult to see the laser beam.
The detector is designed exclusively for use with the DW088-XE and the DW089-XE line lasers and other compatible DEWALT line lasers. It is not for use with rotating lasers.
The detector gives both visual signals through the LCD display window (Q) and audio signals through the speaker (R) to indicate the location of the laser beam.
The DEWALT Digital Laser Detector can be used with or without the detector clamp. When used with the clamp, the detector can be positioned on a grade rod, leveling pole, stud or post.

The digital laser detector is powered by a 9-volt battery. To install the battery provided, lift up on the battery compartment cover (S). Place the 9-volt battery in the compartment, aligning the battery as shown on the embossed icon.
The detector is controlled by the power button (U) and the volume button (V).
When the power button is pushed once, the detector is turned on. The top of the sensor window shows the ON icon and the volume icon.
The DEWALT Digital Laser Detector also has an auto shut-off feature. If a laser beam does not strike the beam detection window, or if no buttons are pressed, the detector will shut itself off in about 5 minutes.

To turn off the audible signal push the button again; the volume icon will disappear.
The detector powers up in the narrow accuracy setting (icon appears in the lower left corner). Press the accuracy button (W) once to change to wide accuracy setting (icon now appears in the lower right corner).
Detector Operation (Fig. 6)
- Set up and position the laser.
- Turn the detector on by pressing the power button (U).
- Position the detector so that the sensor window (Y) is facing the laser beam. Move the detector up or down within the approximate area of the beam, until you have centered the detector. For information about the display window indicators and the audible signal indicators, refer to the table below titled Indicators.
- Use the marking notches (T) to accurately mark the position of the laser beam.

Detector Cleaning and Storage
Dirt and grease may be removed from the exterior of the detector using a cloth or soft, non-metallic brush.
The DEWALT digital laser detector is rain resistant but not immersible. Do not pour water on the unit or submerge it under water.
The best storage place is one that is cool and dry—away from direct sunlight and excess heat or cold.
Detector Service
Except for batteries, there are no user serviceable parts in the Digital Laser Detector. Do not disassemble the unit. Unauth orized tampering with the laser detector will void all warranties.
Detector Troubleshooting
- The detector will not turn on.
- Press and release the power button.
- Check to see that the battery is in place and in the proper position.
- If the detector is very cold, allow it to warm up in a heated area.
- Replace the 9-volt battery. Turn the unit on.
- If the detector still does not turn on, take the detector to a DEWALT service center.
- The detector’s speaker makes no sound.
- Ensure that the detector is on.
- Press the volume button. It will toggle on and off.
- Ensure that the laser is turned on and that it is emitting a laser beam.
- If the detector is still not making any sound, take it to a DEWALT service center.
- The detector does not respond to the beam from another laser unit.
- The DEWALT Digital Laser Detector has been designed to work only with the DW088-XE and the DW089-XE and certain other compatible line lasers.
- The detector gives off a tone but the LCD display window does not function.
- If the detector is very cold, allow it to warm up in a heated area.
- If the LCD display window is still not functioning, take the detector to a DEWALT service center.
- Bright light shining on detector causes continuous “on-grade” signal.
- In the presence of very intense ambient light, the detector may give a false or erratic indication of level.
- Reposition the detector out of the intense light or shade the sensor window (Y) to resume normal operation.
MAINTENANCE
To maintain the accuracy of your work, check the laser often to make sure it is properly calibrated. See Field Calibration Check.
Calibration checks and other maintenance repairs may be performed by DEWALT service centers.
When not in use, store the laser in the kit box provided. Do not store your laser at temperatures below -20 °C (-5 °F) or above 60 °C (140 °F).
Do not store your laser in the kit box if the laser is wet. The laser should be dried first with a soft dry cloth.
Field Calibration Check (Fig. 7, 8A, 8B, 9A, 9B)
The field calibration check must be performed securely and accurately to make a correct diagnosis. Whenever an error is registered, have the tool serviced by a qualified repair

- Place the tool in an area between two vertical surfaces that are at least 9 m apart. Mount the tool exactly midway to the wall.
- Position the tool at an angle of 45° to the left.
- Switch on the horizontal laser beam.
- Mark the centre of the laser beam exactly midway on the opposite wall.
- Switch off the tool and rotate it 90° clockwise.
- Switch on the horizontal laser beam.
- Mark the centre of the laser beam exactly midway on the opposite wall.
- Switch off the tool.
- Measure the difference between the markings.
- If the difference between the markings is 3 mm or less, the tool is properly calibrated.
- If the difference between the markings is more than 3 mm, the tool must be serviced.
LEVEL CHECK (FIG. 8A, 8B)
- Place the tool in an area with a wall of at least 9 m length. Mount the tool to one end of the wall.
- Position the tool at an angle of 90° to the left.
- Switch on the horizontal laser beam.
- Mark the centre of the laser beam at one-third distance (FF) and at two-third distance (GG) on the wall.
- Switch off the tool.
- Mount the tool to the other end of the wall.
- Position the tool at an angle of 90° to the right.
- Switch on the horizontal laser beam.
- Switch on the tool, align the laser beam with the wall marking (GG) and mark the laser beam at two-third distance (HH) on the wall.
- Switch off the tool.
- Measure the difference between the markings (FF, HH).
- If the difference between the markings is 6 mm or less, the tool is properly calibrated.
- If the difference between the markings is more than 6 mm, the tool must be serviced.

- Place the tool on the floor in an area with a ceiling of at least 2,5 m height.
- Mark a line of 1,5 m length (II) on the floor. Position the tool at one end of the floor marking (II).
- Switch on the vertical laser beam.
- Align the laser beam with the floor marking (II).
- Mark the centre of the laser beam at one-third distance (JJ) and at two-thirds distance (KK) on the ceiling.
- Switch off the tool. Position the tool at the other end of the floor marking (II) facing the marking.
- Switch on the vertical laser beam.
- Align the laser beam with the floor marking (II).
- Mark the centre of the laser beam at one-third distance (LL) and at two-thirds distance (MM) on the ceiling.
- Switch off the tool.
- Measure the difference between the markings (JJ, LL).
- Measure the difference between the markings (KK, MM).
- If the difference between the markings is 3,5 mm or less, the tool is properly calibrated.
- If the difference between the markings is more than 3,5 mm, the tool must be serviced.

Cleaning
Exterior plastic parts may be cleaned with a damp cloth. Although these parts are solvent resistant, NEVER use solvents. Use a soft, dry cloth to remove moisture from the tool before storage.
Repairs
NOTE: Disassembling the laser will void all warranties on the product. To assure product SAFETY and RELIABILITY, repairs, maintenance and adjustment should be performed by certified service centers or other qualified service organizations.
Accessories
WARNING: Since accessories, other than those offered by DEWALT, have not been tested with this product, use of such accessories with this tool could be hazardous. To reduce the risk of injury, only DEWALT recommended accessories should be used with this product.
USING THE LASER WITH ACCESSORIES (FIG. 1 INSET)
The laser is equipped with a 1/4″ x 20 female thread (K) on the bottom of the unit. This thread is to accommodate current or future DEWALT accessories. Only use DEWALT accessories specified for use with this product. Follow the directions included with the accessory.
These are:
- DE0881-XE DEWALT tripod
- DE0892-XE DEWALT detector
Consult your dealer for further information on the appropriate accessories.
Recommended accessories for use with your tool are available at extra cost from your local service center. If you need any assistance in locating any accessory, please contact Stanley Black & Decker, 82 Taryn Drive, Epping, VIC 3076 Australia or call 1800 444 224 or (NZ) 0800 339 258.
Batteries
When disposing batteries, think of the protection of the environment. Check with your local authorities for an environmentally safe way of battery disposal.
Stanley Black & Decker
82 Taryn Drive, Epping, VIC 3076 Australia
1800 444 224 (Aust) or 0800 339 258 (NZ) www.dewalt.com.au
www.dewalt.co.nz
(AUG12) Part No. N411883 DW088-XE
Copyright © 2014 DEWALT