Dell Alienware Aurora R11 User Manual
Alienware Aurora R11
Setup and Specifications

Regulatory Model: D23M
Regulatory Type: D23M003
NOTE: A NOTE indicates important information that helps you make better use of your product.
CAUTION: A CAUTION indicates either potential damage to hardware or loss of data and tells you how to avoid the problem.
WARNING: A WARNING indicates a potential for property damage, personal injury, or death.
2020 Dell Inc. or its subsidiaries. All rights reserved. Dell, EMC, and other trademarks are trademarks of Dell Inc. or its
subsidiaries. Other trademarks may be trademarks of their respective owners.
Set up your computer
1. Connect the keyboard and mouse.

2. Connect to your network using a cable, or connect to a wireless network.

3. Connect the display.

NOTE:
- The DisplayPort on the back panel of your computer is covered. Connect the display to the discrete graphics card of your computer.
- If you have two graphics cards, the card installed in PCI-Express X16 (graphics slot 1) is the primary graphics card.
4. Connect the power cable.

5. Press the power button.

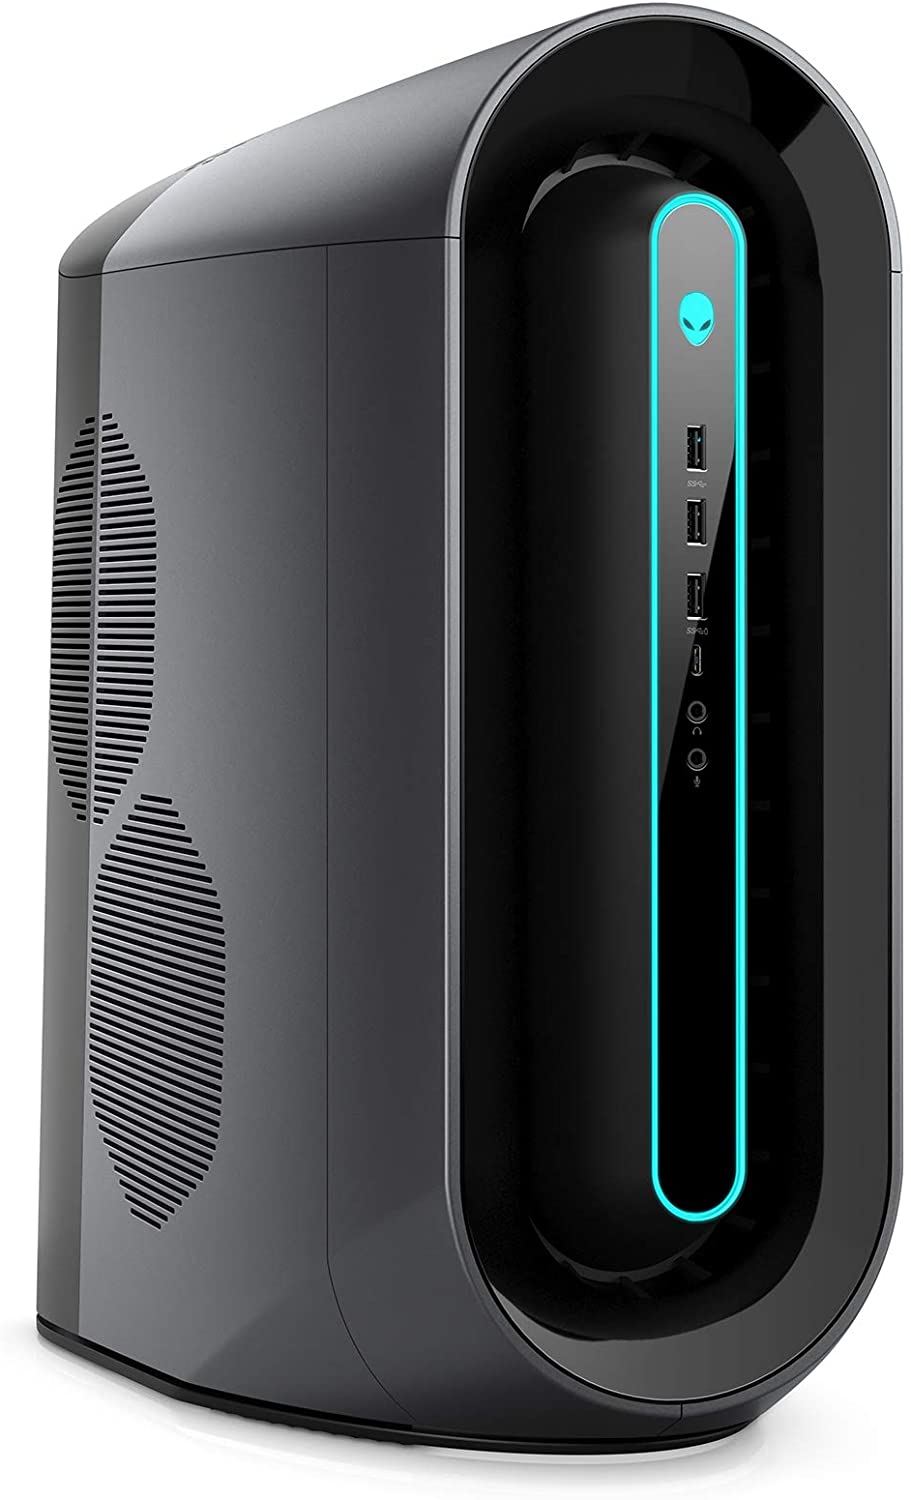
Views of Alienware Aurora R11
Front

- Power button (Alienhead)
Press to turn on the computer if it is turned off, in sleep state, or in hibernate state.
Press to put the computer in sleep state if it is turned on.
Press and hold for 4 seconds to force shut-down the computer.
NOTE: You can customize the power-button behavior in Power Options. - USB 3.2 Gen 1 ports (2)
Connect peripherals such as external storage devices and printers. Provides data transfer speeds up to 5 Gbps. - USB 3.2 Gen 1 port with PowerShare
Connect peripherals such as external storage devices and printers.
Provides data transfer speeds up to 5 Gbps. PowerShare enables you to charge connected USB devices.
NOTE: Certain USB devices may not charge when the computer is turned off or in sleep state. In such cases, turn on the
computer to charge the device. - USB 3.2 Gen 1 Type-C port with PowerShare
Connect peripherals such as external storage devices and printers.
Provides data transfer speeds up to 5 Gbps. PowerShare enables you to charge connected USB devices.
NOTE: Certain USB devices may not charge when the computer is turned off or in sleep state. In such cases, turn on the computer to charge the device. - Headphone port
Connect a headphone or speakers. - Microphone port
Connect an external microphone to provide sound input.
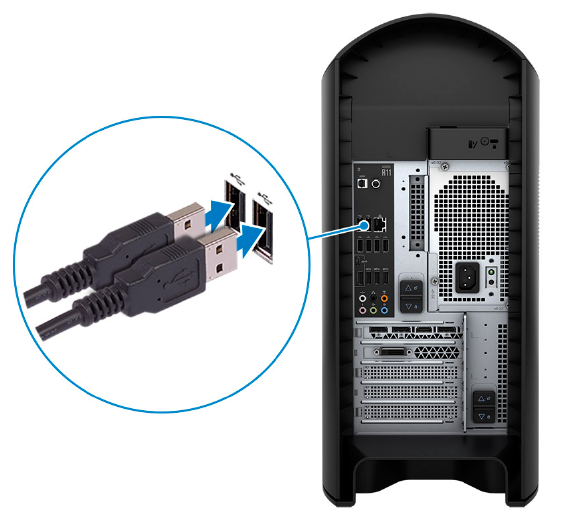
Back

- Back panel
Connect USB, audio, video, and other devices. - PCI-Express X16 (graphics slot 1)
Connect a PCI-Express card such as graphics, audio, or network card to enhance the capabilities of your computer.
For optimal graphics performance, use a PCI-Express X16 slot for connecting the graphics card.
NOTE: The PCI-Express X16 slot works at X8 lanes only.
NOTE: If you have two graphics cards, the card installed in PCI-Express X16 (graphics slot 1) is the primary graphics
card. - PCI-Express X4 slots (2)
Connect a PCI-Express card such as graphics, audio, or network card to enhance the capabilities of your computer.
NOTE: The PCI-Express X4 slot 3 works at X2 lanes only. - PCI-Express X16 (graphics slot 2)
Connect a PCI-Express card such as graphics, audio, or network card to enhance the capabilities of your computer.
For optimal graphics performance, use a PCI-Express X16 slot for connecting the graphics card.
NOTE: The PCI-Express X16 slot works at X8 lanes only. - Power-supply cage release-latches (2)
Allows you to remove the power supply unit from your computer. - Power-supply diagnostics button
Press to check the power‑supply state. - Power-supply diagnostics light
Indicates the power-supply state. - Power port
Connect a power cable to provide power to your computer. - Service Tag label
The Service Tag is a unique alphanumeric identifier that enables Dell service technicians to identify the hardware components in
your computer and access warranty information. - Side panel release latch
Allows you to remove the side panel from your computer. - Security-cable slot (for Kensington locks)
Connect a security cable to prevent unauthorized movement of your computer.
Back panel

- Coaxial S/PDIF port
Connect an amplifier, speakers, or a TV for digital audio output through a coaxial cable. - Optical S/PDIF port
Connect an amplifier, speakers, or a TV for digital audio output through an optical cable. - USB 2.0 ports (6)
Connect peripherals such as external storage devices and printers. Provides data transfer speeds up to 480 Mbps. - USB 3.2 Gen 2 (Type-C) port
Connect peripherals, such as external storage devices and printers. Provides data transfer speeds up to 10 Gbps.
NOTE: This port does not support video/audio streaming or power delivery. - USB 3.2 Gen 2 port
Connect peripherals, such as external storage devices and printers. Provides data transfer speeds up to 10 Gbps. - Side L/R surround port
Connect audio-output devices such as speakers and amplifiers. In a 7.1 speaker channel setup, connect the side-left and sideright
speakers. - Microphone port
Connect an external microphone to provide sound input. - Front L/R surround line-out port
Connect audio-output devices such as speakers and amplifiers. In a 2.1 speaker channel setup, connect the left and right
speakers. In a 5.1 or a 7.1 speaker channel setup, connect the front-left and front-right speakers. - Line-in port
Connect recording or playback devices such as a microphone or CD player. - Center/subwoofer LFE surround port
Connect the center speaker or the subwoofer.
NOTE: For more information about the speaker setup, refer the documentation that shipped with the speakers. - Rear L/R surround port
Connect audio-output devices such as speakers and amplifiers. In a 5.1 or a 7.1 speaker channel setup, connect the rear-left and
rear-right speakers. - USB 3.2 Gen 1 ports (3)
Connect peripherals such as external storage devices and printers. Provides data transfer speeds up to 5 Gbps. - Network port (with lights)
Connect an Ethernet (RJ45) cable from a router or a broadband modem for network or Internet access.
The two lights next to the connector indicate the connectivity status and network activity.
Specifications of Alienware Aurora R11
Dimensions and weight
The following table lists the height, width, depth, and weight of your Alienware Aurora R11.
Table 1. Dimensions and weight

Processors
The following table lists the details of the processors supported by your Alienware Aurora R11.
Table 2. Processors


Chipset
The following table lists the details of the chipset supported by your Alienware Aurora R11.
Table 3. Chipset

Operating system
Your Alienware Aurora R11 supports the following operating systems:
- Windows 10 Home (64-bit)
- Windows 10 Professional (64-bit)
Memory
The following table lists the memory specifications of your Alienware Aurora R11.
Table 4. Memory specifications


Ports and connectors
The following table lists the external and internal ports available on your Alienware Aurora R11.
Table 5. Ports and connectors

Wireless module
The following table lists the Wireless Local Area Network (WLAN) module specifications of your Alienware Aurora R11.
Table 6. Wireless module specifications

GPU—Discrete
The following table lists the specifications of the discrete Graphics Processing Unit (GPU) supported by your Alienware Aurora R11.
Table 7. GPU—Discrete


Storage
This section lists the storage options on your Alienware Aurora R11.
Your computer supports one of the following configurations:
- One M.2 2242/2260/2280 solid-state drive, one 3.5-inch hard drive, and two 2.5-inch hard drives
- One U.2 drive and two 2.5-inch hard drives
- One 3.5-inch hard drive and two 2.5-inch hard drives
NOTE: The primary drive of your computer varies depending on the storage configuration.
Table 9. Storage specifications

Power ratings
The following table lists the power rating specifications of Alienware Aurora R11.
Table 10. Power ratings

Computer environment
Airborne contaminant level: G1 as defined by ISA-S71.04-1985
Table 11. Computer environment

* Measured using a random vibration spectrum that simulates user environment.
Measured using a 2 ms half-sine pulse when the hard drive is in use.
Alienware Command Center
Alienware Command Center (AWCC) provides a single interface to customize and enhance the gaming experience. The AWCC
dashboard displays most recently played or added games, and provides game-specific information, themes, profiles, and access to
computer settings. You can quickly access settings such as game-specific profiles and themes, lighting, macros, and audio that are
critical to the gaming experience.
AWCC also supports AlienFX 2.0. AlienFX enables you to create, assign, and share game-specific lighting maps to enhance the
gaming experience. It also enables you to create your own individual lighting effects and apply them to the computer or attached
peripherals. AWCC embeds Peripheral Controls to ensure a unified experience and the ability to link these settings to your computer
or game.
AWCC supports the following features:
- FX: Create and manage the AlienFX zones.
- Fusion: Includes the ability to adjust game-specific Power Management, Sound Management, and Thermal Management features.
- Peripheral Management: Enables peripherals to appear in and be managed in Alienware Command Center. Supports key
peripheral settings and associates with other functions such as profiles, macros, AlienFX, and game library.
AWCC also supports Sound Management, Thermal Controls, CPU, GPU, Memory (RAM) monitoring. For more information about
AWCC, see the Alienware Command Center Online Help.
Getting help and contacting Alienware
Self-help resources
You can get information and help on Alienware products and services using these online self-help resources:
Table 12. Alienware products and online self-help resources

Contacting Alienware
To contact Alienware for sales, technical support, or customer service issues, see www.alienware.com.
NOTE: Availability varies by country/region and product, and some services may not be available in your country/region.
NOTE: If you do not have an active Internet connection, you can find contact information about your purchase invoice, packing slip, bill, or Dell product catalog.