Panasonic Digital Camera Instruction Manual

Digital Camera
Model No. DMC-LX7


Before use, please read these instructions completely.
We would like to take this opportunity to thank you for purchasing this Panasonic Digital Camera. Please read these Operating Instructions carefully and keep them handy for future reference. Please note that the actual controls and components, menu items, etc. of your Digital Camera may look somewhat different from those shown in the illustrations in these Operating Instructions.
Carefully observe copyright laws.
Recording of pre-recorded tapes or discs or other published or broadcast material for purposes other than your own private use may infringe copyright laws. Even for the purpose of private use, recording of certain material may be restricted.


Information for Your Safety
WARNING:
To reduce the risk of fire, electric shock, or product damage,
- Do not expose this unit to rain, moisture, dripping, or splashing.
- Use only the recommended accessories.
- Do not remove covers.
- Do not repair this unit by yourself. Refer servicing to qualified service personnel.
The socket outlet shall be installed near the equipment and shall be easily accessible.
Product identification marking
| Product | Location |
| Digital camera | Bottom |
| Battery charger | Bottom |
About the battery pack
CAUTION
- The danger of explosion if the battery is incorrectly replaced. Replace only with the type recommended by the manufacturer.
- When disposing of the batteries, please contact your local authorities or dealer and ask for the correct method of disposal.
- Do not heat or expose to flame.
- Do not leave the battery (ies) in a car exposed to direct sunlight for a long period of time with doors and windows closed.
Warning
Risk of fire, explosion, and burns. Do not disassemble, heat above 60 °C, or incinerate.
About the battery charger
CAUTION!
To reduce the risk of fire, electric shock, or product damage,
· Do not install or place this unit in a bookcase, built-in cabinet, or in another confined space. Ensure this unit is well ventilated.
· The battery charger is in standby condition when the AC power supply cord is connected. The primary circuit is always “live” as long as the power cord is connected to an electrical outlet.
Cautions for Use
- When using an AC adaptor, use the AC cable supplied with the AC adaptor.
- Do not use any other USB connection cables except the supplied one or a genuine Panasonic USB connection cable (DMW-USBC1: optional). · Always use a genuine Panasonic HDMI mini cable (RP-CDHM15, RP-CDHM30: optional)
- Part numbers: RP-CDHM15 (1.5 m), RP-CDHM30 (3.0 m) · Always use a genuine Panasonic AV cable (DMW-AVC1: optional)
- Keep this unit as far away as possible from electromagnetic equipment (such as microwave ovens, TVs, video games, etc.).
- If you use this unit on top of or near a TV, the pictures and/or sound on this unit may be disrupted by electromagnetic ic wave radiation.
- Do not use this unit near cell phones because doing so may result in noise adversely affecting the pictures and/or sound.
- Recorded data may be damaged, or pictures may be distorted, by strong magnetic fields created by speakers or large motors.
- Electromagnetic wave radiation generated by microprocessors may adversely affect this unit, disturbing the pictures and/or sound.
- If this unit is adversely affected by electromagnetic equipment and stops functioning properly, turn this unit off and remove the battery or disconnect the AC adaptor (DMW-AC5G: optional). Then reinsert the battery or reconnect the AC adaptor and turn this unit on.
Do not use this unit near radio transmitters or high-voltage lines.
- If you record near radio transmitters or high-voltage lines, the recorded pictures and/or sound may be adversely affected.
| The optional AC adaptor, USB connection cable, HDMI mini cable, and AV cable are available only for DMC-LX7GC and DMC-LX7GH. |
| For information about the software used for this product, press [MENU/SET] and select [Setup] to display [Version Disp.] before pressing [MENU/SET] again. |
| This product is licensed under the AVC patent portfolio license for the personal and non-commercial use of a consumer to (i) encode video in compliance with the AVC Standard (“AVC Video”) and/or (ii) decode AVC Video that was encoded by a consumer engaged in personal and non-commercial activity and/or was obtained from a video provider licensed to provide AVC Video. No license is granted or shall be implied for any other use. Additional information may be obtained from MPEG LA, LLC. See http://www.mpegla.com. |
How to replace the fuse
The location of the fuse differs according to the type of AC cable (figures A and B). Confirm the AC cable fitted and follow the instructions below. Illustrations may differ from actual AC cable.
2. Replace the fuse and close or attach the fuse cover. Figure A Fuse (5 amperes)

-If you see this symbol-

Before use

- Keep the camera away from excessive v vibration, force, or pressure.
- The camera is not dust resistant, splash resistant, or waterproof. Avoid using the camera in places with excessive dust or sand, or where water can come into contact with the camera.
Condensation may occur when the camera is exposed to sudden changes in temperature or humidity. Avoid these conditions, which may make the lens or LCD monitor dirty, cause mold, or damage the camera.
If condensation does occur, turn off the camera and wait about two hours before using it. Once the camera adjusts to the surrounding temperature, the fogging will clear naturally.
Standard accessories
Check that all the accessories are supplied before using the camera. Part numbers are as of July 2012. These may be subject to change.
Battery pack
DMW-BCJ13E · Charge the battery before use. The battery pack is indicated as a battery pack or battery in the text.

Battery charger
DE-A82B (DMC-LX7GC/ DMC-LX7GH)
DE-A82D (DMC-LX7SG), The battery charger is indicated as a battery charger or charger in the text.
K2CT3YY00034 (DMC-LX7GC/ DMC-LX7GH), · In Saudi Arabia, always use it.
USB connection cable K1HY08YY0025


Standard accessories
- SD Memory Card, SDHC Memory Card, and SDXC Memory Card are indicated as cards in the text.
- Cards are optional. You can record or playback pictures on the built-in memory when you are not using a card.
- Consult the dealer or your nearest Service Centre if you lose the supplied accessories. (You can purchase the accessories separately.)
- Please dispose of all packaging appropriately. · Keep small parts in a safe place out of the reach of children.
- The illustrations and screens in this manual may differ from the actual product.
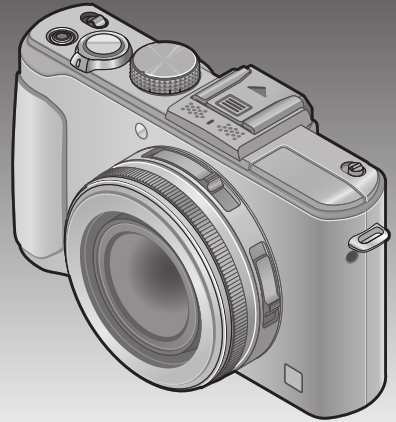
Names and Functions of Main Parts


* Do not attach to a tripod with a 5.5 mm or longer screw. Doing so may damage this unit.
The optional AC adaptor and DC coupler are available only for DMC-LX7GC and DMC-LX7GH.

[ND/FOCUS] lever
To operate this lever, move it left or right, or push it in. Manual Focus adjustment, etc.


Rear dial
To operate the dial, rotate it left or right, or push it in. Shutter speed adjustment, etc.


Aperture ring
Rotate the ring to adjust the aperture value.

Built-in flash
The flash opens. After use, press down the flash until it clicks into place.

Attaching the lens cap and shoulder strap
Cover the lens with the lens cap to protect it when you are not taking pictures. We also recommend attaching the shoulder strap to prevent the camera from being dropped.
1. Use the supplied string to attach the lens cap to the camera
When taking pictures, remove the lens cap and turn on the camera. To attach and remove the lens cap, press the areas shown by arrows in the illustration.


3. Attach the shoulder strap

Attach the other end of the shoulder strap. · Make sure that the shoulder strap does not come loose.
Charging the battery
1. Insert the battery terminals and attach the battery to the charger, Ensure [LUMIX] faces outwards.


- Use the dedicated charger and battery.
- The battery is not charged when the camera is shipped. Charge the battery and set the clock before use.
- Charge the battery with the charger indoors (10 °C to 30 °C)
Inserting and removing the card (optional)/the battery
Check that this unit is turned off.
1. Slide the release lever ( ) to the [OPEN] position and open the card/battery door
2. Insert the battery and card, making sure that their orientation is correct

· Battery: Insert the battery all the way firmly until a locking sound is heard, and check that it is locked by lever ( ).
· Card: Insert the card all the way firmly until it clicks.
3. Close the card/battery door
Slide the release lever to the [LOCK] position.
To remove
· To remove the battery: Move the lever in direction of the arrow.
· To remove the card: Push the card until it clicks, then pull the card out.
- If you use other batteries, we cannot guarantee the quality of this product.
- Keep the Memory Card out of reach of children to prevent swallowing.
- We recommend using a Panasonic card.

Setting the clock

The clock is not set when the camera is shipped. Before using the camera, remove the lens cap.
1. Turn the camera on (A)
2. Press [MENU/SET] (B)
3. Press
[Please set the clock] message appears.
4. Press [MENU/SET]
5. Press
6. Press [MENU/SET]to set
7. Press [MENU/SET] to set
· To return to the previous screen, press


Changing time settings

Select [Clock Set] from [Rec] or [Setup] menu, perform 5 and 6. For details about how to set the menu (20).
Taking pictures
Before using the camera, remove the lens cap.
1. Turn the camera on (A)
2. Rotate the mode dial to select the recording mode (B)
Recording mode
iA Take pictures with automatic settings. |
| |
| |
| |
| |


3. Take pictures
Taking still pictures (Shutter button),


Use the zoom lever to adjust the range of the picture to be captured

Select the combination of shutter speed and aperture value (Mode dial:)
- Press the shutter button halfway to measure the exposure Press halfway
- Rotate the rear dial to select the combination of shutter speed and aperture value


Select the aperture value (Mode dial: A/M )
- Rotate the aperture ring to select the aperture value
· You can set the aperture values between [1.4] and [8] in 1/3-stop increments. (Set the aperture ring to a click stop.)
Rotate the rear dial to select the shutter speed


Taking pictures
About recording motion pictures
- We recommend you use a battery with sufficient battery power or the AC adaptor when recording motion pictures.
- If the power supply is cut off due to a power cut or the AC adaptor being disconnected, the motion picture being recorded using the AC adaptor will not be recorded.
- About recording time
- You can continuously record a motion picture in [MP4] for up to 29 minutes 59 seconds or approx. 4 GB. (Since recording in [MP4] with [FHD] creates larger files, the recording time for such motion pictures will be shorter than 29 minutes 59 seconds.)
· If [Rec Quality] of [AVCHD] motion pictures is set to [PSH] or [FSH], you can continuously record a motion picture for up to 29 minutes 59 seconds.
· You can continuously record [AVCHD] motion pictures for up to 29 minutes 59 seconds. (DMC-LX7GC) - You can record a motion picture to the built-in memory only in [MP4] using the [VGA] setting.
Viewing your pictures [Normal Play]
- Press the Playback button
- Press


· You can also rotate the rear dial to select a picture.


Deleting pictures
Deleted pictures cannot be recovered.
1. Press [


2. Press
Setting the menu
Refer to the following procedures to operate the menus.
Example: Setting [AF Mode] from
1. Press [MENU/SET] to close the menu
2.
3. Press
4. Press [MENU/SET] to close the menu


Switching to other menus
Press [MENU/SET] to display the menu |


Depending on the item, its setting may not appear or it may be displayed in a different way.
The operation of menus varies depending on the menu.
Reading the Operating Instructions (PDF format)
More detailed instructions on the operation of this camera are contained in “Operating Instructions for advanced features (PDF format)” in the supplied CD-ROM. Install it on your PC to read it.
1. Turn the PC on and insert the CD-ROM containing the Operating Instructions (supplied)
2. Select the desired language and then click “Operating Instructions” to install
3. Double-click the “Operating Instructions” shortcut icon on the desktop

When the Operating Instructions (PDF format) will not open
You will need Adobe Acrobat Reader 5.0 or later, or Adobe Reader 7.0 or later to browse or print the Operating Instructions (PDF format). Insert the CD-ROM containing the Operating Instructions (supplied), click
Compatible OS: Windows XP SP3 / Windows Vista SP2 / Windows 7
· You can download and install a version of Adobe Reader that you can use with your OS from the following Website. http://get.adobe.com/reader/otherversions/

For Mac
- Turn the PC on and insert the CD-ROM containing the
- Operating Instructions (supplied) Open the “Manual” folder in the CD-ROM and then copy the PDF file with the desired language inside the folder
- Double click the PDF file to open it
Supplied software
The supplied CD-ROM contains the following software. Install the software on your computer to use.
■ PHOTOfunSTUDIO 8.3 PE
This software allows you to acquire pictures to the PC, and also categorize these acquired pictures by their recording date or the model name of the camera used.
- Operating environment
| OS | Windows® XP (32 bit) SP3 Windows Vista (32 bit) SP2 Windows® 7 (32 bit/64 bit) and SP1 | |
| CPU | Windows® XP | Pentium® III 500 MHz or higher |
| Windows Vista® | Pentium® III 800 MHz or higher | |
| Windows® 7 | Pentium® III 1 GHz or higher | |
| Display | 1024 x 768 pixels or more (1920 x 1080 pixels or more recommended) | |
| RAM | Windows® XP | 512 MB or more |
| Windows Vista® | ||
| Windows° 7 | 1 GB or more (32 bit) 2 GB or more (64 bit) | |
| Free hard disk space | 450 MB or more for installing software | |
- Refer to the Operating Instructions of “PHOTOfunSTUDIO” (PDF) for further information about the operating environment.
■ SILKYPIX Developer Studio (Windows XPNista/7, Mac OS X v10.4/v10.5/v10.6/v10.7)
This is software to edit RAW format images.
For details on how to use the SILKYPIX Developer Studio, refer to the “Help” or the Ich kawa Soft Laboratory’s support website: http://www.isl.co.jp/SILKYPIX/english/p/support/
- LoiLoScope 30-day full-trial version
(Windows XPNista/7)
This software allows you to make full use of your computer and edit motion pictures easily. - This will only install a shortcut to the trial version download site.
Installing supplied software
Preparations:
- Check the environment of your PC.
- Before inserting the CD-ROM, close all running applications
For Windows
- Insert the CD-ROM with the supplied software
- When you insert the supplied CD-ROM, the install menu will
Click on the [Recommended Installation]: Proceed with installation according to messages appearing on the screen.
- For Mac (SILKYPIX Developer Studio)
- Insert the CD-ROM with the supplied software
- Cb Double-click the folder that automatically appears to open
- Double-click an icon in the folder
Proceed with installation according to messages appearing on the screen.
Specifications
Specifications are subject to change without notice.
Digital Camera: Information for Your Safety
| Power Source Power Consumption | DC 5.1 V When recording: 1.6 W When playing back: 1.1 W |
| Camera effective pixels | 10,100,000 pixels |
| Image sensor | 1/1.7″ MOS sensor, total pixel number 12,800,000 pixels Primary colour filter |
| Lens [NANO SURFACE COATING] | Optical 3.8x zoom f=4.7 mm to 17.7 mm (35 mm film camera equivalent: 24 mm to 90 mm) / F1.4 (Max. Wide) to F2.3 (Max. Tele) |
| Image Stabiliser | Optical method |
| Focus range Normal | 50 cm to op |
| AF Macro / MF / Intelligent Auto / Motion pictures | 1 cm (Max. Wide) / 30 cm (Max. Tele) to co |
| Scene Mode | The focus ranges listed above may vary depending on the selected Scene Mode. |
| Shutter system | Electronic shutter + Mechanical shutter |
| Minimum Illumination | Approx. 3 lx (when i-Low light is used, the shutter speed is 1/25th of a second) |
| Shutter speed | 250 seconds to 1/4000th of a second |
| Exposure (AE) | Programme AE (P) / Aperture-priority AE (A) / Shutter-priority AE (S) / Manual exposure (M) |
| Metering Mode | [Multi Metering] / [Center Weighted] / [Spot] |
| LCD monitor | 3.0″ TFT LCD (3:2) (Approx. 921,600 dots) |
| Microphone | Stereo |
| Speaker | Monaural |
| Recording media
|
Built-in Memory (Approx. 70 MB) SD Memory Card / SDHC Memory Card / SDXC Memory Card
|
| Recording file format | Still picture RAW / JPEG (based on Design rule for Camera File system, based on Exif 2.3 standard / DPOF corresponding) / MPO Motion pictures AVCHD / MP4
|
| Audio comp ression | AVCHD: Dolbye Digital (2 ch) MP4: AAC (2 ch) |
| Interface Digital
|
USB 2.0 (High Speed) Data from the PC can not be written to the camera using the USB connection cable. (DMC-LX7GC)
|
| Analogue video | NTSC / PAL Composite (Switched by menu) |
| Audio | Audio line output (Monaural) |
| Terminal | HDMI: MiniHDMI TypeC AV OUT/DIGITAL: Dedicated jack (8 pin) |
| Dimensions | Approx. 110.5 mm (W) x 67.1 mm (H) x 45.6 mm (D) (excluding the projection part) |
| Mass | With card and battery: Approx. 298 g Excluding card and battery: Approx. 269 g |
Specifications
Operating temperature: 0 °C to 40 °C
Operating humidity: 1 OcYoRH to 80%RH
Battery charger
Panasonic DE-A82B (DMC-LX7GC/DMC-LX7GH)): Information for Your Safety
Input: AC– 110 V to 240 V, 50/60 Hz, 0.2 A
Output: DC= 4.2 V, 0.65 A
Battery charger
(Panasonic DE-A82D (DMC-LX7SG)): Information for Your Safety
Input: AC— 100 V to 240 V, 50/60 Hz, 0.2 A 100 V to 240 V, 50/60 Hz, 15 VA (for Japan)
Output: DC= 4.2 V, 0.65 A DC4.2 V, 0.65 A (for Japan)
Battery pack (lithium-ion)
(Panasonic DMW-BCJ13E): Information for your safety
IVoltage / capacity: 3.6 V / 1250 mAh
· HDAVI ControlTM is a trademark of Panasonic Corporation.
· “AVCHD Progressive”, “AVCHD”, the “AVCHD Progressive” Logo and the “AVCHD” logo are trademarks of Panasonic Corporation and Sony Corporation.
· Manufactured under license from Dolby Laboratories. Dolby and the double-D symbol are trademarks of Dolby Laboratories.
· SDXC Logo is a trademark of SD-3C, LLC. · QuickTime and the QuickTime Logo are trademarks or registered trademarks of Apple Inc., used under license therefrom.
· Windows and Windows Vista are either registered trademarks or trademarks of Microsoft Corporation in the United States and/or other countries.
· Mac and Mac OS are trademarks of Apple Inc., registered in the U.S. and other countries.
· This product uses “DynaFont” from DynaComware Corporation. DynaFont is a registered trademark of DynaComware Taiwan Inc.
· Other names, company names, and product names printed in these instructions are trademarks or registered trademarks of the companies concerned.
Web Site: http://panasonic.net
© Panasonic Corporation 2012
