Asus Dual-band Wireless Repeater User Guide


ASUS Dual-band Wireless Repeater
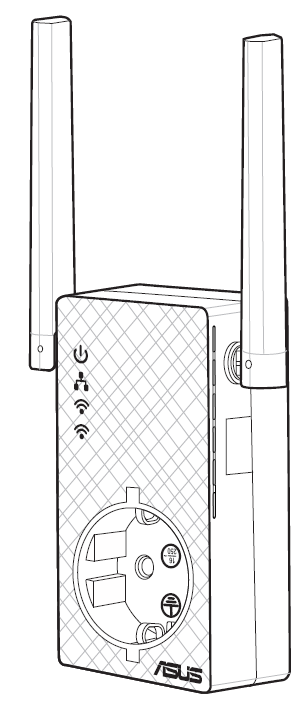

Overview
- Power LED
On: RP-AC53 is plugged to a power outlet and powered on.
Off: RP-AC53 is unplugged from a power outlet or powered off. - Ethernet LED
On: Ethernet is connected.
Off: Ethernet cable is disconnected. - 2.4 GHz / 5 GHz Wi-Fi LED
Green : Best 2.4 GHz / 5 GHz Wi-Fi Repeater connection with parent AP.
Orange: Good 2.4 GHz / 5 GHz Wi-Fi repeater connection with parent AP.
Red: Poor 2.4 GHz / 5 GHz Wi-Fi Repeater connection with parent AP.
Off: Disconnected from parent AP.

Setup with WPS
Power On
Place your RP-AC53 near your router/AP and plug it to a power outlet.

Press the power switch to ON. Wait until the power LED turns solid green and Wi-Fi LEDs stop blinking, indicating that RP-AC53 is ready to connect to the parent AP.
Connect via WPS (Wi-Fi Protected Setup)
- Press the WPS button on your Router/AP.
- Press the WPS button on your RP-AC53 for more than five (5) seconds until the LEDs start to blink.
- The LEDs flash about two (2) minutes and turn solid green. The color of the LED indicates the Wi-Fi signal strength.


NOTE: Ensure that your router/AP supports WPS. Otherwise, use Method TWO.
Place in an ideal location
After placing your RP-AC53 in an ideal location, RP-AC53 connects to your router/AP in about one (1) minute.

NOTES:
- Place your RP-AC53 between your router/AP and wireless device to get the best extender performance.
- Place your RP-AC53 in a location where you can get green or orange Wi-Fi LED.
IMPORTANT! We recommend that you place your RP-AC53 in open or spacious location.

Your RP-AC53’s wireless network name (SSID) changes to your existing Wi-Fi network name, ending with _RPT or _RPT5G and shares your router/AP’s Wireless Password.
Frequently Asked Questions (FAQ)
Q1: What should I do if my router does not support WPS?
A1: You can use Method Two to set up RP-AC53.
Q2: What should I do when only one band Wi-Fi LED is on?
A2: When you are connecting to a dual-band router but only 2.4 GHz or 5 GHz Wi-Fi LED is on, press the WPS button on both the router and the RP-AC53 again and check that both 2.4 GHz and 5 GHz Wi-Fi LEDs are on.
Q3: How do I reset RP-AC53?
A2: Press the RESET button on the side of RP-AC53 for about five (5) seconds until the LEDs blink slowly.
Q4: What should I do if RP-AC53 web interface is not accessible?
A4: You can do any of the following:
- Connect your computer and RP-AC53 using an Ethernet cable, and connect to RP-AC53’s SSID or network name.
- Set up your computer to obtain an IP address automatically.
- On a web browser, ensure that you correctly enter the web address http://repeater.asus.com
Method Two: Set up using your web browser
Power On
Place your RP-AC53 near your router/AP and plug it to a power outlet.

Login
Disconnect your Ethernet connection. On your Wi-Fi enabled device, such as your desktop PC/ notebook/tablet, find the default network name of your RP-AC53 and click or tap Connect.

NOTE: The screenshot below is from a desktopPC.
On a web browser, enter http://repeater.asus.com to access RP-AC53 web GUI (graphical user interface). Enter admin as the username and password.

Configure RP-AC53
IMPORTANT! For the best Wi-Fi extender performance, place your RP-AC53 in an ideal location. Refer to Step 3 in Method One
- On a web browser, enter http://repeater.asus.com.
- Connect to a Wi-Fi network and when prompted, enter the security key. If your Wi-Fi network is hidden, click Manual setting.
- You can either tick Copy AP SSID/Password , Use the default setting or enter the SSID and security key/password for your extended network. When done, click Connect.
NOTE: When you have ticked Use the default setting, your RP-AC53’s wireless network name (SSID) changes to your existing Wi-Fi network name, ending with _RPT or _RPT5G and shares your router/AP’s Wireless Password. - Connect your wireless devices to the new Extender network.
Place in an ideal location
After placing your RP-AC53 in an ideal location, RP-AC53 connects to your router/AP in about one (1) minute.

NOTES:
- Place your RP-AC53 between your router/AP and wireless device to get the best extender performance.
- Place your RP-AC53 in a location where you can get green or orange Wi-Fi LED.
IMPORTANT! We recommend that you place your RP-AC53 in open or spacious location.
Enjoy!
Your RP-AC53’s wireless network name (SSID) changes to your existing Wi-Fi network name, ending with _RPT or _RPT5G and shares your router/AP’s Wireless Password. Connect your wireless devices to the new Extender network and then start to surf the Internet.

NOTE: If you have renamed your extended network name in step 3, your RP-AC53’s SSID will change accordingly.
Media Bridge (Ethernet Adapter)
Set up RP-AC53 via Method One or Method Two, then you can use it as a wireless adapter to connect Ethernet devices such as Blu-ray player, game console, DVR, or smart TV.

