KENWOOD CD Receiver User Guide
CD Receiver
KDC-X303 KDC-BT375U KDC-BT350U
KDC-BT33 KDC-BT275U KDC-BT23
CD-RECEIVER
Quick Start Guide
AMPLI-TUNER LECTEUR DE CD
ENGLISH
KDC-MP375BT KMR-D375BT
For detailed operations and information, refer to the INSTRUCTION MANUAL on the following website:
For your records Record the serial number, found on the back of the unit, in the spaces designated on the warranty card, and in the space provided below. Refer to the model and serial numbers whenever you call upon your Kenwood dealer for information or service on the product. Model KDC-X303/KDC-BT375U/KDC-BT350U/KDC-BT33/KDC-BT275U/KDC-BT23/KDC-MP375BT/KMR-D375BT Serial number
US Residents Only
Register Online Register your Kenwood product at http://www.kenwood.com/usa/
© 2018 JVC KENWOOD Corporation
<www.kenwood.com/cs/ce/>
B5K-0553-10 [KN]
CAUTION Use of controls or adjustments or performance of procedures other than those specified herein may result in hazardous radiation exposure. In compliance with Federal Regulations, following are reproductions of labels on, or inside the product relating to laser product safety.
JVC KENWOOD Corporation 2967-3, ISHIKAWA-MACHI, HACHIOJI-SHI, TOKYO, JAPAN
THIS PRODUCT COMPLIES WITH DHHS RULES 21CFR SUBCHAPTER J IN EFFECT AT DATE OF MANUFACTURE.
Location : Top Plate
FCC WARNING
This equipment may generate or use radio frequency energy. Changes or modifications to this equipment may cause harmful interference unless the modifications are expressly approved in the instruction manual. The user could lose the authority to operate this equipment if an unauthorized change or modification is made.
FCC NOTE
This equipment has been tested and found to comply with the limits for a Class B digital device, pursuant to Part 15 of the FCC Rules. These limits are designed to provide reasonable protection against harmful interference in a residential installation. This equipment may cause harmful interference to radio communications, if it is not installed and used in accordance with the instructions. However, there is no guarantee that interference will not occur in a particular installation. If this equipment does cause harmful interference to radio or television reception, which can be determined by turning the equipment off and on, the user is encouraged to try to correct the interference by one or more of the following measures:
- Reorient or relocate the receiving antenna.
- Increase the separation between the equipment and receiver.
- Connect the equipment into an outlet on a circuit different from that to which the receiver is connected.
- Consult the dealer or an experienced radio/TV technician for help.
Supplier’s Declaration of Conformity Trade Name: KENWOOD Products: CD RECEIVER Model Name: KDC-X303/KDC-BT375U/KDC-BT350U/KDC-BT33/KDC-BT275U/ KDC-BT23/KDC-MP375BT/KMR-D375BT
Responsible Party: JVCKENWOOD USA CORPORATION 2201 East Dominguez Street, Long Beach, CA 90810, U.S.A. PHONE: 310 639-9000
THIS DEVICE COMPLIES WITH PART 15 OF THE FCC RULES. OPERATION IS SUBJECT TO THE FOLLOWING TWO CONDITIONS: (1) THIS DEVICE MAY NOT CAUSE HARMFUL INTERFERENCE, AND (2) THIS DEVICE MUST ACCEPT ANY INTERFERENCE RECEIVED, INCLUDING INTERFERENCE THAT MAY
CAUSE UNDESIRED OPERATION.
IC (Industry Canada) Notice This device complies with Industry Canada’s licence-exempt RSSs. Operation is subject to the following two conditions: (1) This device may not cause interference; and (2) This device must accept any interference, including interference that may cause undesired
operation of the device.
Contains Bluetooth Module FCC ID: IC ID:
ZWY8811X 12033A-8811X
This transmitter must not be co-located or operated in conjunction with any other antenna or transmitter.
CAUTION This equipment complies with FCC/IC radiation exposure limits set forth for an uncontrolled environment and meets the FCC radio frequency (RF) Exposure Guidelines and RSS-102 of the IC radio frequency (RF) Exposure rules. This equipment has very low levels of RF energy that it deemed to comply without maximum permissive exposure evaluation (MPE). But it is desirable that it should be installed and operated keeping the radiator at least 20cm or more away from person’s body.
ATTENTION
SOFTWARE LICENSE AGREEMENT
The software embedded in the Product (hereinafter the “Licensed Software”) provided by Licensor is copyrighted to or sublicensable by the Licensor, and this Agreement provides for the terms and conditions which Users shall follow in order to use the Licensed Software.
The User shall use the Licensed Software by agreeing with the terms of this Software License Agreement. This Agreement shall be deemed completed at the time the User (hereinafter the “User”) initially used the Product in which the “Licensed Software” is embedded.
The Licensed Software may include the software which has been licensed to the Licensor directly or indirectly from any third party. In such case, some third parties require the Users to follow their conditions for use separately from this Software License Agreement. Such software shall not be subject to this Agreement, and the Users are urged to read the “Important Notice concerning the Software” to be provided separately below.
Article 1 General Provision
The Licensor shall grant to the User a non-exclusive and non-transferable (other than the exceptional case referred to in Article 3, Paragraph 1) licensed to use the Licensed Software within the country of the User. (the country where the User bought the Product (hereinafter the “Country”)
Article 2 License
- The license granted under this Agreement shall be the right to use the Licensed Software in the Product.
- The User shall not duplicate, copy, modify, add, translate or otherwise alter, or lease the Licensed Software and any related documents, whether in whole or in part.
- The use of the Licensed Software shall be limited to personal purpose, and the Licensed Software shall not be distributed, licensed or sub-licensed whether it is for commercial purpose or not.
- The User shall use the Licensed Software according to the directions described in the operation manual or help file, and is prohibited to use or duplicate any data in a manner violating the Copyright Law or any other laws and regulations by applying whole or a part of the Licensed Software.
Article 3 Conditions for Grant of License
- When the User transfers the Product, it may also transfer the license to use the Licensed Software embedded in the Product (including any related materials, updates and upgrades) on condition that no original, copies or related materials continue in the possession of the User, and that the User shall cause the transferee to comply with this Software License Agreement.
- The User shall not carry out reverse engineering, disassembling, decompiling or any other code analysis works in connection with the Licensed Software.
Article 4 Right pertaining to the Licensed Software
Any and all copyrights and other rights pertaining to the Licensed Software and related documents shall belong to the Licensor or the original holder of the right who granted to the Licensor the license or sublicense for the Licensed Software (hereinafter the “Original Rightholder”), and the User shall not be entitled to any right other than the license granted hereunder, in respect of the Licensed Software and any related documents.
Article 5 Indemnification of Licensor
- Neither the Licensor nor the Original Rightholder shall be liable for any damage incurred by the User or any third party due to the exercise of the license granted to the User under this Agreement, unless otherwise restricted by law.
- The Licensor will offer no guarantee for the merchantability, convertibility and consistency with certain objective of the Licensed Software.
Article 6 Liability to Third Party
If any dispute has arisen with any third party due to an infringement upon a copyright, patent or any other intellectual property right that was caused by the User’s use of the Licensed Software, the User shall settle such dispute at its own cost and hold the Licensor and the Original Rightholder harmless from any inconvenience it may cause.
Article 7 Confidentiality
The User shall keep the confidentiality of such portion of the Licensed Software, related documents thereof or any other information to be granted under this Agreement, as well as the conditions of this Agreement as has not yet entered the public domain, and shall not disclose or divulge the same to any third party without approval of the Licensor.
Article 8 Termination
In case the User falls under any of the events described in the following items, the Licensor may immediately terminate this Agreement or claim that the User compensates for the damage incurred by the Licensor due to such event: (1) when the User violated any provision of this Agreement; or (2) when a petition has been filed against the User for an attachment, provisional attachment, provisional disposition or any other compulsory execution.
Article 9 Destruction of the Licensed Software
If this Agreement is terminated pursuant to the provision of Article 8, the User shall destroy the Licensed Software, any related documents and copies thereof within two (2) weeks from such date of termination.
Article 10 Protection of Copyright
1. The copyright and all the other intellectual property rights relating to the Licensed Software shall belong to the Licensor and the Original Rightholder, and in no event shall they be under the ownership of the User.
2. The User shall, whenever it uses the Licensed Software, comply with any laws relating to the copyright and other intellectual property rights.
Article 11 Export Restriction
1. It is prohibited to export the Licensed Software and any related documents outside the country of the User (including transmission thereof outside the country of the User via Internet of other communication tools).
2. The User shall understand that the Licensed Software shall be subject to the export restrictions adopted by the country of User and any other countries.
3. The User shall agree that the software will be subject to any and all applicable international and domestic laws (including the export control regulation of the country of User and any other countries, and any restrictions concerning the end-users, the use by end-users and importing countries to be provided by the country of User and any other countries, and any other governmental authorities).
Article 12 Miscellaneous
1. In the event any part of this Agreement is invalidated by operation of law, the residual provisions shall continue in force.
2. Matters not stipulated in this Agreement or any ambiguity or question raised in the construction of this Agreement shall be provided or settled upon good-faith consultation between the Licensor and the User.
3. The Licensor and the User hereby agree that this Agreement is governed by the laws of Japan, and any dispute arising from, and relating to the rights and obligations under, this Agreement shall be submitted to the exclusive jurisdiction of the Tokyo District Court for its first instance.
Important Notice concerning the Software
-jansson
Copyright (c) 2009-2012 Petri Lehtinen <>
Permission is hereby granted, free of charge, to any person obtaining a copy of this software and associated documentation files (the “Software”), to deal in the Software without restriction, including without limitation the rights to use, copy, modify, merge, publish, distribute, sublicense, and/ or sell copies of the Software, and to permit persons to whom the Software is furnished to do so, subject to the following conditions:
The above copyright notice and this permission notice shall be included in all copies or substantial portions of the Software.
THE SOFTWARE IS PROVIDED “AS IS”, WITHOUT WARRANTY OF ANY KIND, EXPRESS OR IMPLIED, INCLUDING BUT NOT LIMITED TO THE WARRANTIES OF MERCHANTABILITY, FITNESS FOR A PARTICULAR PURPOSE AND NONINFRINGEMENT. IN NO EVENT SHALL THE AUTHORS OR COPYRIGHT HOLDERS BE LIABLE FOR ANY CLAIM, DAMAGES OR OTHER LIABILITY, WHETHER IN AN ACTION OF CONTRACT, TORT OR OTHERWISE, ARISING FROM, OUT OF OR IN CONNECTION WITH THE SOFTWARE OR THE USE OR OTHER DEALINGS IN THE SOFTWARE.
-cJSON
Copyright (c) 2009 Dave Gamble
Permission is hereby granted, free of charge, to any person obtaining a copy of this software and associated documentation files (the “Software”), to deal in the Software without restriction, including without limitation the rights to use, copy, modify, merge, publish, distribute, sublicense, and/ or sell copies of the Software, and to permit persons to whom the Software is furnished to do so, subject to the following conditions:
The above copyright notice and this permission notice shall be included in all copies or substantial portions of the Software.
THE SOFTWARE IS PROVIDED “AS IS”, WITHOUT WARRANTY OF ANY KIND, EXPRESS OR IMPLIED, INCLUDING BUT NOT LIMITED TO THE WARRANTIES OF MERCHANTABILITY, FITNESS FOR A PARTICULAR PURPOSE AND NONINFRINGEMENT. IN NO EVENT SHALL THE AUTHORS OR COPYRIGHT HOLDERS BE LIABLE FOR ANY CLAIM, DAMAGES OR OTHER LIABILITY, WHETHER IN AN ACTION OF CONTRACT, TORT OR OTHERWISE, ARISING FROM, OUT OF OR IN CONNECTION WITH THE SOFTWARE OR THE USE OR OTHER DEALINGS IN THE SOFTWARE.
-CMP
The MIT License (MIT) Copyright (c) 2014 Charles Gunyon
Permission is hereby granted, free of charge, to any person obtaining a copy of this software and associated documentation files (the “Software”), to deal in the Software without restriction, including without limitation the rights to use, copy, modify, merge, publish, distribute, sublicense, and/ or sell copies of the Software, and to permit persons to whom the Software is furnished to do so, subject to the following conditions:
The above copyright notice and this permission notice shall be included in all copies or substantial portions of the Software.
THE SOFTWARE IS PROVIDED “AS IS”, WITHOUT WARRANTY OF ANY KIND, EXPRESS OR IMPLIED, INCLUDING BUT NOT LIMITED TO THE WARRANTIES OF MERCHANTABILITY, FITNESS FOR A PARTICULAR PURPOSE AND NONINFRINGEMENT. IN NO EVENT SHALL THE AUTHORS OR COPYRIGHT HOLDERS BE LIABLE FOR ANY CLAIM, DAMAGES OR OTHER LIABILITY, WHETHER IN AN ACTION OF CONTRACT, TORT OR OTHERWISE, ARISING FROM, OUT OF OR IN CONNECTION WITH THE SOFTWARE OR THE USE OR OTHER DEALINGS IN THE SOFTWARE.
INSTALLATION/CONNECTION
Warning
- The unit can only be used with a 12 V DC power supply, negative ground.
- Disconnect the battery’s negative terminal before wiring and mounting.
- Do not connect Battery wire (yellow) and Ignition wire (red) to the car
chassis or Ground wire (black) to prevent a short circuit. - To prevent short circuit:
Insulate unconnected wires with vinyl tape. Be sure to ground this unit to the car’s chassis again after installation. Secure the wires with cable clamps and wrap vinyl tape around the
wires that comes into contact with metal parts to protect the wires.
Basic procedure
- Remove the key from the ignition switch, then disconnect the terminal of the car battery.
- Connect the wires properly. See “Wiring connection” on page
- Install the unit to your car. See “Installing the unit (in-dash mounting)”.
- Connect the terminal of the car battery.
- Press BSRC to turn on the power.
- Detach the face plate and reset the unit within 5 seconds. See “How to reset” on page 4.
Installing the unit (in-dash mounting)
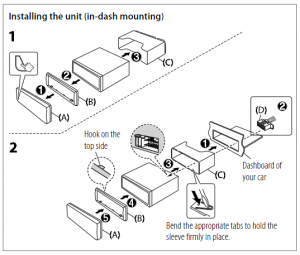

Caution
- For safety’s sake, leave wiring and mounting to professionals. Consult the car audio dealer.
- Install this unit in the console of your vehicle. Do not touch the metal parts of this unit during and shortly after use of the unit. Metal parts such as the heat sink and enclosure become hot.
- Do not connect the wires of speakers to the car chassis or Ground wire (black), or connect them in parallel.
- Mount the unit at an angle of less than 30º.
- If your vehicle wiring harness does not have the ignition terminal, connect Ignition wire (red) to the terminal on the vehicle’s fuse box which provides 12 V DC power supply and is turned on and off by the ignition key.
- Keep all cables away from heat dissipate metal parts.
- After the unit is installed, check whether the brake lamps, blinkers, wipers, etc. on the car are working properly.
- If the fuse blows, first make sure the wires are not touching car’s chassis, then replace the old fuse with one that has the same rating.
Installing the unit (without mounting sleeve)
- Remove the mounting sleeve and trim plate from the unit.
- Align the holes in the unit (on both sides) with the vehicle mounting bracket and secure the unit with screws (supplied/ commercially available).

Use only the specified screws. Using wrong screws might damage the unit.
Wiring connection Fuse (10 A)

Antenna terminal
If no connections are made, do not let the wire come out from the tab.
Removing the unit

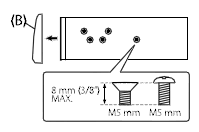
Part list (supplied)
(A) Faceplate (×1)
(B) Trimplate (×1)
(C) Mounting sleeve (×1)
(D) Wiring harness (×1)
(E) Extraction key (×2)
(F) Screw (supplied for / M5 × 7 mm (×4) M5 × 6 mm (×4) M4 × 8 mm (×1)
Car fuse box
Ignition switch
Car fuse box Battery
a Brown: To connect the
d Red: Ignition 12 V
KENWOOD navigation system, e Yellow: Battery 12 V
refer your navigation manual f Black: Ground
b Blue/white: To the power
g White ª, White/black ·: control terminal when using Front speaker (left) the optional power amplifier h Gray ª, Gray/black ·: or to the antenna control Front speaker (right)
/
terminal in the vehicle
i Green ª, Green/black ·:
c Light blue/yellow: To the Rear speaker (left) steering wheel remote control j Purple ª, Purple/black ·: adapter or to KENWOOD Rear speaker (right) Marine Remote Control unit (optional accessory) for
BEFORE USE
BASICS
IMPORTANT
· To ensure proper use, please read through this Guide before using this product. It is especially important that you read and observe Warnings and Cautions in this Guide.
· Please keep the Guide in a safe and accessible place for future reference.
Faceplate

Warning
Do not operate any function that takes your attention away from safe driving.
Caution
Volume setting:
- Adjust the volume so that you can hear sounds outside the car to prevent accidents.
- Lower the volume before playing digital sources to avoid damaging the speakers by the sudden increase of the output level.
General:
- Avoid using the external device if it might hinder safe driving.
- Make sure all important data has been backed up. We shall bear no responsibility for any loss of recorded data.
- Never put or leave any metallic objects (such as coins or metal tools) inside the unit to prevent a short circuit.
- If a disc error occurs due to condensation on the laser lens, eject the disc and wait for the moisture to evaporate.
- USB rating is indicated on the main unit. To view, detach the faceplate.
- Depending on the types of cars, the antenna will automatically
extend when you turn on the unit with the antenna control wire connected. Turn off the unit or change the source to STANDBY when parking at a low ceiling area.
Detach button
USB input terminal
Auxiliary input jack
Lights up when Bluetooth connection is established.
Attach
Detach
How to reset
Reset the unit within 5 seconds after detaching the faceplate.
To Turn on the power
Adjust the volume Select a source Change the display information
On the faceplate Press BSRC. · Press and hold to turn off the power. Turn the volume knob. Press BSRC repeatedly. Press DISP repeatedly.
GETTING STARTED
1 Select the display language and cancel the demonstration
When you turn on the power for the first time (or [FACTORY RESET] is set to [YES]), the display shows: “SEL LANGUAGE” “PRESS” “VOLUME KNOB”
1 Turn the volume knob to select [ENG] (English) or [SPA] (Spanish), then
press the knob.
[ENG] is selected for the initial setup.
Then, (except for
) the display shows: “CANCEL DEMO”
“PRESS” “VOLUME KNOB”.
2 Press the volume knob again.
[YES] is selected for the initial setup.
3 Press the volume knob again.
“DEMO OFF” appears.
2 Set the clock and date
1 Press the volume knob to enter [FUNCTION]. 2 Turn the volume knob to select [CLOCK], then press the knob.
To adjust the clock 3 Turn the volume knob to select [CLOCK ADJUST], then press the knob. 4 Turn the volume knob to make the settings, then press the knob.
Hour Minute 5 Turn the volume knob to select [CLOCK FORMAT], then press the knob. 6 Turn the volume knob to select [12H] or [24H], then press the knob.
To set the date 7 Turn the volume knob to select [DATE FORMAT], then press the knob. 8 Turn the volume knob to select [DD/MM/YY] or [MM/DD/YY], then press
the knob. 9 Turn the volume knob to select [DATE SET], then press the knob.
10 Turn the volume knob to make the settings, then press the knob.
Day Month Year or Month Day Year
11 Press and hold
to exit.
To return to the previous setting item, press
.
3 Set the initial settings
1 Press BSRC repeatedly to enter STANDBY.
2 Press the volume knob to enter [FUNCTION].
3 Turn the volume knob to select an item (see the following table), then
press the knob.
4 Repeat step 3 until the desired item is selected or activated.
5 Press and hold
to exit.
To return to the previous setting item, press
.
[SYSTEM] [KEY BEEP] [FACTORY RESET]
[CLOCK] [CLOCK DISPLAY]
[ENGLISH] [ESPANOL]
Default: [XX]
[ON]: Activates the keypress tone. ; [OFF]: Deactivates.
[YES]: Resets the settings to default (except the stored station). ; [NO]: Cancels.
(Except for
)
[ON]: The clock time is shown on the display even when the unit is
turned off. ; [OFF]: Cancels.
Select the display language for [FUNCTION] menu and music information if applicable. By default, [ENGLISH] is selected.
5
RADIO
Search for a station 1 Press BSRC repeatedly to select RADIO. 2 Press BAND repeatedly to select FM1/FM2/FM3/AM. 3 Press S / T to search for a station.
Settings in memory
You can store up to 18 stations for FM and 6 stations for AM.
Store a station While listening to a station…. Press and hold one of the number buttons (1 to 6).
Select a stored station Press one of the number buttons (1 to 6).
CD/USB/iPod/ANDROID
Start playback
The source changes automatically and playback starts when you load a disc or attach a device (USB device/ iPod/iPhone/ Android device) to the USB input terminal.
To Play back/pause Reverse/Fast-forward Select a track/file Select a folder Repeat play Random play
On the faceplate
Press 6 IW.
Press and hold
.
Press
.
Press 2 / 1 .
Press 4 repeatedly.
Press 3 repeatedly.
6
FUNCTIONS SETTINGS
1 Press the volume knob to enter [FUNCTION].
2 Turn the volume knob to select an item, then press the knob.
3 Repeat step 2 until the desired item is selected or activated.
4 Press and hold
to exit.
To return to the previous setting item, press
.
· Refer to the INSTRUCTION MANUAL on the following website for the detailed explanation of each item: <www.kenwood.com/cs/ce/>
· The availability of each item vary depending on the model.
[FUNCTION] menu items
[AUDIO CONTROL] :
[DISPLAY]
:
[TUNER SETTING] :
[SIRIUS XM] :
[USB]
:
[BT MODE]
:
[REMOTE APP] :
[MIC GAIN]* :
[NR LEVEL]* :
[ECHO CANCEL]* :
[SYSTEM]
:
[CLOCK]
:
[ENGLISH]
:
[DEMO MODE] :
Sets your preferred audio settings. Sets your preferred control for the display window. Settings for radio source. Settings for Sirius XM tuner. Settings for using a USB device. Settings for using a Bluetooth device. Settings for using smartphone to control this unit. Sets the sensitivity of the microphone. Adjusts the noise reduction level. Adjusts the echo cancellation delay time. Settings for this unit. Adjusts the clock. Selects language for the menu and music information. Selects language for the menu and music information. Activates or deactivates the display demonstration.
* Applicable only while talking on the phone.
Examples of some well-used settings
Subwoofer Level Setting 1 Press the volume knob to enter [FUNCTION].
2 Turn the volume knob to select [AUDIO CONTROL], then press the knob.
3 Turn the volume knob to select [SUBWOOFER SET], then press the knob.
4 Turn the volume knob to select [SW SET ON], then press the knob.
5 Turn the volume knob to select [SUB-W LEVEL], then press the knob.
6 Turn the volume knob to adjust the subwoofer level, then press the knob.
7 Press and hold to exit.
Note: For you need to set [SWITCH PREOUT] to [SUB-W] in standby mode before you can make the above settings.
Illumination Color Setting For preferred illumination color for each zone.
, you can set your
6 Repeat step 4 and step 5 to set color for other zones.
7 Press and hold
to exit.
1 Press the volume knob to enter [FUNCTION].
2 Turn the volume knob to select [DISPLAY], then press the knob.
3 Turn the volume knob to select [COLOR SELECT], then press the knob.
4 Turn the volume knob to select a zone ([ALL ZONE], [ZONE 1], [ZONE 2]), then press the knob.
5 Turn the volume knob to select a color for the selected zone, then press the knob. [INITIAL COLOR]/[VARIABLE SCAN]/[CUSTOM R/G/B]/ [RED1]/[RED2]/[RED3]/[PURPLE1]/[PURPLE2]/[PURPLE3]/ [PURPLE4]/[BLUE1]/[BLUE2]/[BLUE3]/[SKYBLUE1]/ [SKYBLUE2]/[LIGHTBLUE]/[AQUA1]/[AQUA2]/[GREEN1]/ [GREEN2]/[GREEN3]/[YELLOWGREEN1]/[YELLOWGREEN2]/ [YELLOW]/[ORANGE1]/[ORANGE2]/[ORANGERED]
OTHER INFORMATION
For playback operations of AUX, SPOTIFY, Pandora®, iHeartRadio®, SiriusXM® Radio sources, refer to the INSTRUCTION MANUAL on the following website: <www.kenwood.com/cs/ce/> · The availability of each source vary depending on the model.
Note for specifications Bluetooth Frequency Range:
2.402 GHz — 2.480 GHz Bluetooth RF Output Power (E.I.R.P.):
+4 dBm (MAX), Power Class 2 Speaker Impedance:
4 — 8 Operating Voltage:
12 V DC car battery
BLUETOOTH®
Depending on the operating system and the firmware version of your mobile phone, Bluetooth features may not work with this unit.
Connect the microphone
Connect the supplied microphone to the microphone input jack on the rear panel.
Adjust the microphone angle Secure using cord clamps (not supplied) if necessary.
Pair and connect a Bluetooth device for the first time
1 Press B SRC to turn on the unit. 2 Search and select the name of your receiver (“KDC-X3 “/”KDC-BT3 “/
“KDC-BT3 /BT2 “/”KDC-MP3 “/”KMR-D3 “) on the Bluetooth device. “PAIRING” “PASS XXXXXX” “Device name” “PRESS” “VOLUME KNOB” appears on the display. · For some Bluetooth devices, you may need to enter the Personal
Identification Number (PIN) code immediately after searching. 3 Press the volume knob to start pairing.
“PAIRING OK” appears when pairing is completed.
Once pairing is completed, Bluetooth connection is established
automatically.
: “BT1” and/or “BT2”
indicator on the faceplate lights up.
: “BT1” and/or “BT2” on the display window lights up.
Answer a call
Press or the volume knob or one of the number buttons (1 to 6).
- To adjust the phone volume [00] to [35], turn the volume knob.
- To end a call, press
Audio player via Bluetooth
1 Press B SRC repeatedly to select BT AUDIO. · Pressing enters BT AUDIO directly.
2 Operate the audio player via Bluetooth to start playback.
To Play back/pause Select group or folder Reverse skip/Forward skip Reverse/Fast-forward Repeat play Random play
On the faceplate
Press 6 IW.
Press 2 / 1 .
Press
Press and hold
Press 4 repeatedly.
Press and hold 3 to select [ALL RANDOM].
· Microsoft and Windows Media are either registered trademarks or trademarks of Microsoft Corporation in the United States and/or other countries. · Use of the Made for Apple badge means that an accessory has been designed to connect specifically to the Apple product(s) identified in the badge, and has been certified by the developer to meet Apple
performance standards. Apple is not responsible for the operation of this device or its compliance with safety and regulatory standards. Please note that the use of this accessory with an Apple product may affect wireless performance. · Apple, iPhone, iPod, iPod nano, iPod touch, and Lightning are trademarks of Apple Inc., registered in the U.S. and other countries. · Pandora, the Pandora logo, and the Pandora trade dress are trademarks or registered trademarks of Pandora Media, Inc., used with permission. · iHeartRadio® and iHeartAutoTM are trademarks owned by iHeartMedia, Inc. All uses are authorized under license. · Sirius, XM and all related marks and logos are trademarks of Sirius XM Radio Inc. All rights reserved. · SPOTIFY and the Spotify logo are among the registered trademarks of Spotify AB. · Android is a trademark of Google LLC. · The “AAC” logo is a trademark of Dolby Laboratories. · The Bluetooth® word mark and logos are registered trademarks owned by the Bluetooth SIG, Inc. and any use of such marks by JVC KENWOOD Corporation is under license. Other trademarks and trade names are those of their respective owners.