Lenovo ThinkPad Compact USB/Bluetooth Keyboard User Guide
Lenovo ThinkPad Compact USB/Bluetooth Keyboard User Guide

Chapter 1. About the user guide
This user guide contains product descriptions and instructions for installing and using the following products:
- ThinkPad® Compact USB Keyboard with TrackPoint®
- ThinkPad Compact Bluetooth Keyboard with TrackPoint
2 ThinkPad Compact USB Keyboard with TrackPoint / ThinkPad Compact Bluetooth Keyboard with TrackPoint User Guide
Chapter 2. ThinkPad Compact USB Keyboard with TrackPoint
This chapter provides information about the ThinkPad Compact USB Keyboard with TrackPoint (hereafter called the USB keyboard).
The USB keyboard has the following features:
- A smart size saves your desk space
- An integrated TrackPoint consisting of a pointing stick and three click buttons eliminates the needs for an external mouse
- Function keys provide shortcuts for some common computer functions
The option package includes:
- ThinkPad Compact USB Keyboard with TrackPoint
- Setup and warranty poster
- Cable
Product description
This topic provides a general description of the USB keyboard.
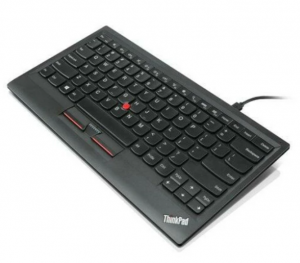
Front view
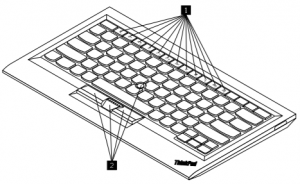

Figure 1. Front view of the USB keyboard
1 Hot keys
Used as shortcuts for some common computer functions. For more information, see “Using the Fn functions” on page 7.
2 TrackPoint
The TrackPoint consists of a pointing stick and three click buttons. For more information, see “ “Using the TrackPoint” on page 6.
Rear view

Figure 2. Rear view of the USB keyboard
- Non-skid feet
Used to prevent the USB keyboard from unexpected moving. - Status indicator
When the USB keyboard is successfully connected with the computer, the status indicator is solid on. - Micro USB connector
Used to connect the USB keyboard to a computer. For more information, see “Installing the USB keyboard” on page 5. - Identification label
Contains the part number, version number, and some other product information. - Tilt feet
Used to adjust the angle of the keyboard to provide comfort.
System requirements
Before installing the USB keyboard, ensure that your computer meets the following requirements:
- There is an available USB connector on your computer.
- Your computer has one of the following operating systems installed:
– Microsoft® Windows® XP (32-bit)
– Microsoft Windows Vista (32-bit or 64-bit)
– Microsoft Windows 7 (32-bit or 64-bit)
– Microsoft Windows 8 (32-bit or 64–bit)
– Microsoft Windows 8.1 (32-bit or 64–bit)
– Microsoft Windows 10 (32-bit or 64-bit)
4 ThinkPad Compact USB Keyboard with TrackPoint / ThinkPad Compact Bluetooth Keyboard with TrackPoint User Guide
Before installing the USB keyboard, it is recommended that you check the Lenovo® Support Web site for the latest software updates, including updated basic input/output system code (BIOS), utility programs, device drivers, and other software updates. You can find the Lenovo Support Web site at: http://www.lenovo.com/support
You are responsible for downloading and installing designated software updates from the Support Web site or other electronic media, and following the instructions provided by your Service Provider.
Installing the USB keyboard
To install the USB keyboard, do the following:
- Adjust the tilt feet to set the keyboard near your computer to your preference.
- Connect the provided cable to an available USB connector on your computer.After the operating system identifies the USB keyboard, the status indicator on the USB keyboard turns on. The USB keyboard is ready for use.
Note: It is recommended that you install the USB keyboard before the ThinkPad Compact Keyboard with TrackPoint driver (hereafter called the ThinkPad Keyboard Suite).
Installing the device driver on Windows operating systems
It is recommended that you install the ThinkPad Keyboard Suite to customize advanced settings before you use the USB keyboard.
If you are using the Windows 7, Windows 8, Windows 8.1, or Windows 10 operating system, and your computer is connected to the Internet, when you connect the USB keyboard to your computer for the first time, a message will be displayed asking if you want to install the ThinkPad Keyboard Suite. Click Download Now and the ThinkPad Keyboard Suite will be automatically installed. If the message is not displayed, manually install the ThinkPad Keyboard Suite by doing the following:
- Go to http://support.lenovo.com/tpkeyboard.
- Locate and download the installation file of the ThinkPad Keyboard Suite.
- Double-click the installation file, and then follow the instructions on the screen to complete the installation.
- b Restart the computer.
Uninstalling the device driver from Windows operating systems
To uninstall the ThinkPad Keyboard Suite from the Windows XP, Windows Vista, Windows 7, Windows 8, Windows 8.1, or Windows 10 operating system, do the following:
For the Windows XP operating system:
- Click Start ➙ Control Panel or Start ➙ Settings ➙ Control Panel.
- Depending on your Control Panel mode, click or double-click Add or Remove Programs .
- Click ThinkPad Compact Keyboard with TrackPoint driver, and then click Remove.
- Follow the instructions on the screen.
For the Windows Vista or Windows 7 operating system:
- Click Start ➙ Control Panel or Start ➙ Settings ➙ Control Panel.
- Depending on your Control Panel mode, do one of the following:
• Click the Uninstall a program option under the Programs menu
• Click Programs and Features. - Select ThinkPad Compact Keyboard with TrackPoint driver and then right-click your mouse. The Uninstall/Change option is displayed.
- Click Uninstall/Change.
- Follow the instructions on the screen.
For the Windows 8 or Windows 8.1 operating system:
- To go to Control Panel, move the pointer to the top-right or bottom-right corner of the screen to display the charms. Click Search and then search for Control Panel.
- Depending on your Control Panel mode, do one of the following:
•Click the Uninstall a program option under the Programs menu.
•Click Programs and Features. - Select ThinkPad Compact Keyboard with TrackPoint driver and then right-click your mouse. The Uninstall option is displayed.
- Click Uninstall.
- Follow the instructions on the screen to uninstall the device driver
For the Windows 10 operating system:
- From the desktop, move the pointer to bottom-left corner of the screen, and then search Control Panel in the search box.
- Depending on your Control Panel mode, do one of the following:
• Click the Uninstall a program option under the Programs menu.
• Click Programs and Features. - .Select ThinkPad Compact Keyboard with TrackPoint driver and then right-click your mouse. The Uninstall option is displayed.
- Click Uninstall.
- Follow the instructions on the screen to uninstall the device driver
Using the USB keyboard
This chapter provides information about using the USB keyboard.
Using the TrackPoint
The TrackPoint consists of a pointing stick and three click buttons. The pointing stick is used to control the cursor. The three click buttons are the left button, the right button, and the middle button.
To use the pointing stick, do the following:
- Place your hands at typing position, and press gently on the pointing stick in the direction that you want the cursor to move. You can press the pointing stick away from you to move the cursor up, toward you to move the cursor down, to one side or the other to move the cursor sideways. The speed at which the cursor moves depends on the pressure you apply to the pointing stick.
Note:The cursor might periodically drift. Stop using the pointing stick for a few seconds and try again. The cursor will work normally. - To select an item, stop the pointing stick when the cursor locates the item and press the left or right button with your thumb. The left and right buttons function the same as the left and right buttons on a conventional mouse.
Replacing the pointing stick cap
The cap on top of the pointing stick is removable. You can buy appropriate caps from Lenovo to replace your current cap. To remove the cap on the pointing stick, simply grasp the top portion of the cap and pull it up. To install a new cap, align the square at the bottom of the cap with the pointing stick and push down until the cap seats into position.
Changing the pointing stick sensitivity
When you are using the pointing stick, you might prefer to use a light touch, or you might want to apply more pressure. You can change the way the pointing stick responds to your touch by doing the following:
- Click the ThinkPad Compact Keyboard with TrackPoint icon on the system tray.
- In the Mouse Properties window, click External Keyboard tab.
- In the Pointer speed area, move the slider toward Slow or Fast according to your preference.
- Click Apply. Then, test how the pointing stick responds to your new setting and make adjustments if necessary.
- Click OK to apply the setting
Using the ThinkPad preferred scrolling function
You can scroll through an active window by moving the pointing stick while pressing the middle button. You also can scroll through an inactive window with the ThinkPad Preferred Scrolling function. To configure the
scrolling function, do the following:
- Click the ThinkPad Compact Keyboard with TrackPoint icon on the system tray.
- In the Mouse Properties window, click the External Keyboard tab.
- Depending on your needs, do one of the following:
• To scroll through active windows just as a conventional mouse, clear ThinkPad Preferred Scrolling.
• To scroll through inactive windows, select ThinkPad Preferred Scrolling. - Click OK.
Note: If you find it can not scroll on some applications, clear ThinkPad Preferred Scrolling to get more compliance.
Using the function keys
The following table describes the function keys and Fn key combinations. By default, the USB keyboard acts the standard F1-F12 function. After installing the ThinkPad Keyboard Suite, you can achieve the hotkey
function by pressing Fn+Fx (where x represents 1 to 12) keys.


If the Fn key combinations do not work correctly on some ThinkPad computers with the Windows XP operating system, ensure that the computer has the latest version of the Lenovo System Interface driver or
the hotkey utility driver installed.
The most up-to-date software and device drivers for your ThinkPad computer are always available for download at: http://www.lenovo.com/support
Notes:
- Ensure that the Fn key combinations are functional on the keyboard of your ThinkPad computer. There are software dependencies to get the most complete Fn key combination support for your ThinkPad
computer. - Most of the Fn key combinations do not work with the ThinkPad SL series notebook computers, Lenovo desktop computers, and computers from other manufacturers.
- Some Fn key combinations have different functions on different ThinkPad computer models.
- On the Windows 8, Windows 8.1, and Windows 10 operating systems, when you press Fn+Esc, hotkey F4, or the CapsLock key for the first time, an On Screen Display window might be displayed. If you want to show the on screen display, click OK. If you do not want to show the on screen display, click No, thank you.To change the on screen display setting, click the External Keyboard tab in the Mouse Property window, select On Screen Displays. When the box before On Screen Displays is in grey, it means that the USB keyboard follows the system default setting, you can change the system setting by clicking Advanced OSD setting
For more information about the Fn key combinations, refer to the Access Help information system that comes with the ThinkPad computer.
.Troubleshooting
This chapter contains troubleshooting information for the USB keyboard.
Problem: All or some of the Fn function key combinations or function keys do not work.
Solution: Read the following for solutions or explanations:
- Ensure that you have correctly installed the ThinkPad Keyboard Suite.
- Ensure that all the Fn function key combinations are functional on the keyboard of your ThinkPad computer. There are software dependencies to get the most complete Fn key and hot key combination support for your ThinkPad computer. You can get more detailed information about the Fn function key combinations from the documentation that comes with your ThinkPad computer. You might need to download the updated software components for your ThinkPad computer at: http://www.lenovo.com/support
- The Fn function key combinations work with all the ThinkPad computers except ThinkPad SL series notebook computers. Most of the Fn function key combinations do not work with ThinkPad SL series notebook computers, Lenovo desktop computers, or computers from other manufacturers.
- It is normal if you found some of the Fn function key combinations act differently on different ThinkPad computer models due to the differences of the applications installed on your notebook computers.
- Some function keys are not supported depending on your operating system and computer.
Problem: The TrackPoint cursor drifts when the computer is turned on or after the computer resumes normal operation.
Solution: The cursor might drift when you are not using the TrackPoint during normal operation. This is a normal feature of the TrackPoint and is not a defect. Cursor drifting might occur for several seconds under the following conditions: - The computer is turned on.
- The computer resumes normal operation.
- The TrackPoint pointing stick is kept pressed for a long time.
- The temperature changes.To solve the problem, you can try reconnecting the USB keyboard or restart your computer.
Problem: I pressed a button once, but the computer responded as if I pressed it twice
Solution: Depending on your operating system, adjust the keyboard repeat delay or repeat rate settings by doing one of the following:
- For the Windows XP or Windows Vista operating system:
1. Depending on your Start menu mode, click Start ➙ Control Panel or Start ➙ Settings ➙ Control Panel
2. Depending on your Control Panel mode, click or double-click Keyboard.
3. Click the Speed tab.
4. Move the Repeat delay slider to Long or the Repeat rate slider to Slow.
5.bClick OK.. - For the Windows 7 operating system:
1. Depending on your Start menu mode, click Start ➙ Control Panel or Start ➙ Settings ➙ Control Panel
2. Click the View by menu and select Small icons or Large icons. The All Control Panel Items category is expanded.
3. Click Keyboard.
4. Click the Speed tab.
5. Move the Repeat delay slider to Long or the Repeat rate slider to Slow.
6. Click OK. - For the Windows 8 or Windows 8.1 operating system:
1. To go to Control Panel, move the pointer to the top-right or bottom-right corner of the screen to display the charms. Click Search and then search for Control Panel.
2. Click the View by menu and select the Small icons or Large icons view. The All Control Panel Items category is expanded.
3.Click Keyboard.
4. Click the Speed tab.
5. Move the Repeat delay slider to Long or the Repeat rate slider to Slow.
6. Click OK. - For the Windows 10 operating system:
1. From the desktop, move the pointer to bottom-left corner of the screen, and then search Control Panel in the search box.
2. Click the View by menu and select the Small icons or Large icons view. The All Control Panel Items category is expanded.
3. Click Keyboard.
4. Click the Speed tab.
5. Move the Repeat delay slider to Long or the Repeat rate slider to Slow.
6. Click OK.
Problem: The ThinkPad Keyboard Suite cannot be automatically installed when I connect the keyboard to my computer for the first time.
Solution: To solve the problem, do the following:
- Ensure that you are using the Windows 7, Windows 8, Windows 8.1, or Windows 10 operating system.
- Ensure that your computer has been connected to the Internet.
- Ensure that you have enabled the automatic Windows update feature by doing the following:
a. Open Control Panel.
b. Depending on your Control Panel mode, do one of the following:
•Click Hardware and Sound ➙ Devices and Printers.
•Click Devices and Printers.
c. Right-click your computer icon under the Devices menu, and then select Device installation Settings.
d. Follow the instructions on the screen to enable the automatic Windows update feature. - Ensure that you have installed all Windows updates by doing the following:
a. Open Control Panel.
b. Depending on your Control Panel mode, do one of the following:
•Click System and Security ➙ Windows Update.
•Click Windows Update.
c .Click Check for updates to install Windows updates. - Disconnect the USB keyboard from the computer and then reconnect it.
- If the above tips still are not workable, it might be caused by the version or language of your operating system. You can manually install the driver by doing the following:
a. Go to http://support.lenovo.com/tpkeyboard.
b .Locate and download the installation file of the driver.
c .Double-click the installation file, and then follow the instructions on the screen to complete the installation.
Problem: It takes a long time to pair the USB keyboard with the computer on the Windows 7 operating system.
Solution: It is not a problem. When the clock on the USB keyboard icon disappears, the USB keyboard is successfully paired with the computer. If it fails, try reconnecting it again.
Product specifications
The following table describes the USB keyboard specifications
| Keys | 84/85/89 keys (varies by country) |
| Color | Raven black |
| Dimensions (height x width x depth) | 305.5 mm x 164.0 mm x 13.5 mm (not including the tilt feet) |
| Weight | About 441 g (Including the cable) |
| Connector type | 4-pin USB Type A |
| Cable length | 1.5 m (4.92 feet) |
| Operating voltage | +5 V (Typical) |
| Power consumption | 100 mA maximum |
| System interface | USB |
| Supported operating system | Windows 10 (32-bit and 64-bit) Windows 8.1 (32-bit and 64-bit) Windows 8 (32-bit and 64-bit) Windows 7 (32-bit and 64-bit) Windows Vista (32-bit and 64-bit) Windows XP (32-bit) |
Chapter 3. ThinkPad Compact Bluetooth Keyboard with TrackPoint
This chapter provides information about the ThinkPad Compact Bluetooth Keyboard with TrackPoint (hereafter called the Bluetooth keyboard).
Product description
This topic provides a general description of the Bluetooth keyboard. Front view

Figure 3. Front view of the Bluetooth keyboar
- Hot keys
Used as shortcuts for some common computer functions. For more information, see “Using the Fn functions” on page 2 - Status indicato
- Used to indicate the status of the Bluetooth keyboard.
| Status | Color | Description |
| Fading in | Green | The Bluetooth keyboard is turned on. |
| Blinking twice at one second intervals | Green | The Bluetooth keyboard is in pairing mode or is establishing a connection with the computer. |
| Blinking for five times | Green | The Bluetooth keyboard has established a connection with the computer. |
| Fading out | Green | The Bluetooth keyboard is turned off. |
| Blinking for three times | Amber | The battery power of the Bluetooth keyboard is low. |
3 Power switch: Used to turn on or turn off the Bluetooth keyboard.
To turn on the Bluetooth keyboard, slide down the power switch and press it for one second. The status indicator starts to fade in. To turn off the Bluetooth keyboard, slide down the power switch and hold it for at
least three seconds. The status indicator starts to fade out.

Figure 4. Turn on and turn off the Bluetooth keyboard
Note: To save the battery power, turn off the Bluetooth keyboard when it is not in use.
4 TrackPoint
The TrackPoint consists of a pointing stick and three click buttons. For more information, see “ “Using the TrackPoint” on page 18.
Rear view

Figure 5. Rear view of the Bluetooth keyboard
- Non-skid feet Used to prevent the Bluetooth keyboard from unexpected moving.
- Charging indicator
Used to indicate the charging status of the Bluetooth keyboard. When the Bluetooth keyboard is in charging, the charging indicator is blinking. When the Bluetooth keyboard is fully charged, the charging indicator is
solid on. - Micro USB connector
- You can charge the Bluetooth keyboard by inserting one end of the provided cable to the Micro USB connector and another end to the computer. 4 Identification label Contains the part number, version number, and some other product information.
- Tilt feet Used to adjust the angle of the keyboard to provide comfort
System requirements
Before installing the Bluetooth keyboard, ensure that your computer meets the following requirements:
- There is an available Integrated Bluetooth host on your computer.
- Your computer has one of the following operating systems installed:
– Microsoft Windows XP (32-bit)
– Microsoft Windows Vista (32-bit or 64-bit)
– Microsoft Windows 7 (32-bit or 64-bit)
– Microsoft Windows 8 (32-bit or 64–bit)
– Microsoft Windows 8.1 (32-bit or 64–bit)
– Microsoft Windows 10 (32-bit or 64–bit)
Before installing the Bluetooth keyboard, it is recommended that you check the Lenovo Support Web site for the latest software updates, including updated basic input/output system code (BIOS), utility programs, device drivers, and other software updates. You can find the Lenovo Support Web site at: http://www.lenovo.com/support
You are responsible for downloading and installing designated software updates from the Support Web site or other electronic media, and following the instructions provided by your Service Provider
Pairing the Bluetooth keyboard with the computer
To establish a connection and exchange data between the Bluetooth keyboard and the computer, you need to pair the Bluetooth keyboard with the computer.
Notes:
- It is recommended that you pair the Bluetooth keyboard before install the ThinkPad Compact Keyboard with TrackPoint driver (hereafter called the ThinkPad Keyboard Suite).
- Once you have successfully paired the Bluetooth keyboard with the computer, you just need to turn on the power switch on the Bluetooth keyboard each time you use it. The status indicator will blink in green for five times and then turns off. Depending on your operating system, you can pair the Bluetooth keyboard with the computer by doing one of the following:
For the Windows XP operating system:
- Turn on the Bluetooth radio in the computer.
- Double-click the My Bluetooth Places icon in the Windows notification area or on the desktop.
- Slide down the power switch and press it for one second to turn on the Bluetooth in the Bluetooth keyboard. The status indicator starts to flash.
- Depending on your menu mode, click View devices in range or Search for devices in range.
- Double-click the ThinkPad Compact Bluetooth Keyboard with TrackPoint icon in the list.
- Type the passcode shown on the computer screen into the Bluetooth keyboard, and then press Enter. The pairing process begins. After the status indicator turns off, the Bluetooth keyboard has been successfully paired with the computer and a connection is established between the Bluetooth keyboard and the computer.
- Click Close when a window is displayed to confirm that the Bluetooth keyboard is connected with the operating system.
For the Windows Vista or Windows 7 operating system
- Turn on the Bluetooth radio in the computer.
- Click Start ➙ Control Panel , and then depending on the operating system you are using, do one of the following:
•For the Windows Vista operating system, double-click Bluetooth Devices, and then click Add Wireless Device.
• For the Windows 7 operating system, click Devices and Printers ➙ Add a device . - Slide down the power switch and press it for one second to turn on the Bluetooth in the Bluetooth keyboard. The status indicator starts to flash.
- Select the ThinkPad Compact Bluetooth Keyboard with TrackPoint icon from the list and click Next.
- Type the passcode shown on the computer screen into the Bluetooth keyboard, and then press Enter. The pairing process begins. After the status indicator turns off, the Bluetooth keyboard has been successfully paired with the computer and a connection is established between the Bluetooth keyboard and the computer.
- Click Close when a window is displayed to confirm that the Bluetooth keyboard is connected with the operating system.
For the Windows 8 or Windows 8.1 operating system:
- Turn on the Bluetooth radio in the computer.
- Move the cursor to the top-right or bottom-right corner of the screen to display the charms, click Settings ➙ Change PC Settings ➙ Devices.
- Slide down the power switch and press it for one second to turn on the Bluetooth in the Bluetooth keyboard. The status indicator starts to flash.
- Select the Keyboard (ThinkPad Compact Bluetooth Keyboard with TrackPoint) icon from the list and click Next.
- Type the passcode shown on the computer screen into the Bluetooth keyboard, and then press Enter. The pairing process begins. After the status indicator turns off, the Bluetooth keyboard has been successfully paired with the computer and a connection is established between the Bluetooth keyboard and the computer.
- Click Close when a window is displayed to confirm that the Bluetooth keyboard is connected with the operating system.
For the Windows 10 operating system:
- Turn on the Bluetooth radio in the computer.
- Slide down the power switch and press it for one second to turn on the Bluetooth in the Bluetooth keyboard. The status indicator starts to flash
- From the desktop, move the pointer to bottom-left corner of the screen, and then search Control Panel in the search box.
- Click the Add a device option under the Hardware and Sound menu when viewing the Control Panel by category.
- Select the Keyboard (ThinkPad Compact Bluetooth Keyboard with TrackPoint) icon from the list and click Next.
- Type the passcode shown on the computer screen into the Bluetooth keyboard, and then press Enter. The pairing process begins. After the status indicator turns off, the Bluetooth keyboard has been successfully paired with the computer and a connection is established between the Bluetooth keyboard and the computer.
- Click Close when a window is displayed to confirm that the Bluetooth keyboard is connected with the operating system.
Note:
If a window is displayed indicating that the connection fails, right-click the ThinkPad Compact Bluetooth Keyboard with TrackPoint icon and select Disable to disable the Bluetooth keyboard. Then, pair the Bluetooth keyboard with the computer again. After the operating system identifies the Bluetooth keyboard, the Bluetooth keyboard will be ready for use. For additional information on this product, go to: http://www.lenovo.com/support/keyboards
Installing the device driver on Windows operating systems
It is recommended that you install the ThinkPad Keyboard Suite to customize advanced settings before you use the Bluetooth keyboard.
If you are using the Windows 7, Windows 8, Windows 8.1, or Windows 10 operating system, and your computer is connected to the Internet, when you connect the keyboard to your computer for the first time, a message will be displayed asking if you want to install the ThinkPad Keyboard Suite. Click Download Now and the ThinkPad Keyboard Suite will be automatically installed. If the message is not displayed, manually install the ThinkPad Keyboard Suite by doing the following:
- Go to http://support.lenovo.com/tpkeyboard.
- Locate and download the installation file of the ThinkPad Keyboard Suite.
- Double-click the installation file, and then follow the instructions on the screen to complete the installation.
- Restart the computer, and the ThinkPad Keyboard Suite is installed on your computer.
Uninstalling the device driver from Windows operating systems
To uninstall the ThinkPad Keyboard Suite from the Windows XP, Windows Vista, Windows 7, Windows 8, Windows 8.1, or Windows 10 operating system, do the following:
For the Windows XP operating system:
- .Click Start ➙ Control Panel or Start ➙ Settings ➙ Control Panel.
- Depending on your Control Panel mode, click or double-click Add or Remove Programs .
- Click ThinkPad Compact Keyboard with TrackPoint driver, and then click Remove.
- Follow the instructions on the screen.
For the Windows Vista or Windows 7 operating system:
- Click Start ➙ Control Panel or Start ➙ Settings ➙ Control Panel
- Depending on your Control Panel mode, do one of the following:
•Click the Uninstall a program option under the Programs menu.
•Click Programs and Features. - Select ThinkPad Compact Keyboard with TrackPoint driver and then right-click your mouse. The Uninstall/Change option is displayed.
- Click Uninstall/Change.
- Follow the instructions on the screen.
For the Windows 8 or Windows 8.1 operating system:
- To go to Control Panel, move the pointer to the top-right or bottom-right corner of the screen to display the charms. Click Search and then search for Control Panel.
- Depending on your Control Panel mode, do one of the following:
•Click the Uninstall a program option under the Programs menu.
•Click Programs and Features. - Select ThinkPad Compact Keyboard with TrackPoint driver and then right-click your mouse. The Uninstall option is displayed.
- .Click Uninstall.
- Follow the instructions on the screen to uninstall the device driver.
For the Windows 10 operating system:
- From the desktop, move the pointer to bottom-left corner of the screen, and then search Control Panel in the search box.
- Depending on your Control Panel mode, do one of the following:
• Click the Uninstall a program option under the Programs menu.
• Click Programs and Features. - Select ThinkPad Compact Keyboard with TrackPoint driver and then right-click your mouse. The Uninstall option is displayed.
- Click Uninstall.
- Follow the instructions on the screen to uninstall the device driver.
Using the Bluetooth keyboard
This chapter provides information about using the Bluetooth keyboard.
Using the TrackPoint
The TrackPoint consists of a pointing stick and three click buttons. The pointing stick is used to control the cursor. The three click buttons are the left button, the right button, and the middle button.
To use the pointing stick, do the following:
- Place your hands at typing position, and press gently on the pointing stick in the direction that you want the cursor to move. You can press the pointing stick away from you to move the cursor up, toward you to move the cursor down, to one side or the other to move the cursor sideways. The speed at which the cursor moves depends on the pressure you apply to the pointing stick.
Note:The cursor might periodically drift. Stop using the pointing stick for a few seconds and try again. The cursor will work normally. - To select an item, stop the pointing stick when the cursor locates the item and press the left or right button with your thumb. The left and right buttons function the same as the left and right buttons on a conventional mouse.
Replacing the pointing stick cap
The cap on top of the pointing stick is removable. You can buy appropriate caps from Lenovo to replace your current cap. To remove the cap on the pointing stick, simply grasp the top portion of the cap and pull it up. To install a new cap, align the square at the bottom of the cap with the pointing stick and push down until the cap seats into position
Changing the pointing stick sensitivity
When you are using the pointing stick, you might prefer to use a light touch, or you might want to apply more pressure. You can change the way the pointing stick responds to your touch by doing the following:
- Click the ThinkPad Compact Keyboard with TrackPoint icon on the system tray.
- In the Mouse Properties window, click External Keyboard tab.
- In the Pointer speed area, move the slider toward Slow or Fast according to your preference.
- Click Apply. Then, test how the pointing stick responds to your new setting and make adjustments if necessary.
- Click OK to apply the setting.
Using the ThinkPad preferred scrolling function
You can scroll through an active window by moving the pointing stick while pressing the middle button. You also can scroll through an inactive window with the ThinkPad Preferred Scrolling function. To configure the scrolling function, do the following:
- Click the ThinkPad Compact Keyboard with TrackPoint icon on the system tray.
- In the Mouse Properties window, click the External Keyboard tab.
- Depending on your needs, do one of the following:
•To scroll through active windows just as a conventional mouse, clear ThinkPad Preferred Scrolling.
•To scroll through inactive windows, select ThinkPad Preferred Scrolling. - Click OK. Note:If you find it can not scroll on some applications, clear ThinkPad Preferred Scrolling to get more compliance.
Charging the Bluetooth keyboard
You can charge the Bluetooth keyboard by connecting the Bluetooth keyboard to the computer with the provided cable. It is recommended that you fully charge the Bluetooth keyboard before you use it for the first time. An average full charging time is 2.5 to 3 hours. When the Bluetooth keyboard is in charging, the charging indicator is blinking. When the Bluetooth keyboard is fully charged with the charging indicator solid on, you are recommended to disconnect the Bluetooth keyboard from the computer. Keeping the Bluetooth keyboard connected to the computer will not keep on charging. When you want to charge the Bluetooth keyboard for another time, reconnect the Bluetooth keyboard to the computer. It is recommended that you charge the battery at least one time in every six months.
Using the function key
The following table describes the functions of Fn keys and Fn key combinations. The Bluetooth keyboard acts the default hot key function. After installing the ThinkPad Keyboard Suite, you can achieve the standard
F1-F12 function by pressing Fn+Fx (where x represents 1 to 12) keys

If the Fn key combinations do not work correctly on some ThinkPad computers with the Windows XP operating system, ensure that the computer has the latest version of the Lenovo System Interface driver
installed. The most up-to-date software and device drivers for your ThinkPad computer are always available for download at: http://www.lenovo.com/support
Notes:
- Ensure that the Fn key combinations are functional on the keyboard of your ThinkPad computer. There are software dependencies to get the most complete Fn key combination support for your ThinkPad computer.
- Most of the Fn key combinations do not work with the ThinkPad SL series notebook computers, Lenovo desktop computers, and computers from other manufacturers.
- Some Fn key combinations have different functions on different ThinkPad computer models.
- On the Windows 8, Windows 8.1, and Windows 10 operating systems, when you press Fn+Esc, hotkey F4, or the CapsLock key for the first time, an On Screen Display window might be displayed. If you want to show the on screen display, click OK. If you do not want to show the on screen display, click No, thank you. To change the on screen display setting, click the External Keyboard tab in the Mouse Property window, select On Screen Displays. When the box before On Screen Displays is in grey, it means that the Bluetooth keyboard follows the system default setting, you can change the system setting by clicking Advanced OSD setting. For more information about the Fn key combinations, refer to the Access Help information system that comes with the ThinkPad computer.
Troubleshooting
This chapter contains troubleshooting information for the Bluetooth keyboard.
Problem: All or some of the Fn function key combinations or function keys do not work. Solution: Read the following for solutions or explanations:
- Ensure that you have correctly installed the ThinkPad Keyboard Suite.
- Ensure that all the Fn function key combinations are functional on the keyboard of your ThinkPad
computer. There are software dependencies to get the most complete Fn key and hot key combination
support for your ThinkPad computer. You can get more detailed information about the Fn function key
combinations from the documentation that comes with your ThinkPad computer. You might need to
download the updated software components for your ThinkPad computer at:
http://www.lenovo.com/support - The Fn function key combinations work with all the ThinkPad computers except ThinkPad SL series notebook computers. Most of the Fn function key combinations do not work with ThinkPad SL series notebook computers, Lenovo desktop computers, or computers from other manufacturers.
- It is normal if you found some of the Fn function key combinations act differently on different ThinkPad computer models due to the differences of the applications installed on your notebook computers.
- Some function keys are not supported depending on your operating system and computer
Problem: The TrackPoint cursor drifts when the computer is turned on or after the computer resumes normal operation.
Solution: The cursor might drift when you are not using the TrackPoint during normal operation. This is a normal feature of the TrackPoint and is not a defect. Cursor drifting might occur for several seconds under the following conditions:
- The computer is turned on.
- The computer resumes normal operation.
- The TrackPoint pointing stick is kept pressed for a long time.
- The temperature changes.To solve the problem, you can try reconnecting the Bluetooth keyboard or restart your computer.
Problem: I pressed a button once, but the computer responded as if I pressed it twice. Solution: Depending on your operating system, adjust the keyboard repeat delay or repeat rate settings by doing one of the following: - For the Windows XP or Windows Vista operating system:
1 Depending on your Start menu mode, click Start ➙ Control Panel or Start ➙ Settings ➙ Control Panel
2.Depending on your Control Panel mode, click or double-click Keyboard.
3.Click the Speed tab.
4.Move the Repeat delay slider to Long or the Repeat rate slider to Slow.
5.Click OK. - For the Windows 7 operating system:
1.Depending on your Start menu mode, click Start ➙ Control Panel or Start ➙ Settings ➙ Control Panel
2.Click the View by menu and select Small icons or Large icons. The All Control Panel Items category is expanded.
3.Click Keyboard.
4.Click the Speed tab.
5.Move the Repeat delay slider to Long or the Repeat rate slider to Slow.
6.Click OK. - For the Windows 8 or Windows 8.1 operating system:
1. To go to Control Panel, move the pointer to the top-right or bottom-right corner of the screen to display the charms. Click Search and then search for Control Panel.
2. Click the View by menu and select the Small icons or Large icons view. The All Control Panel Items category is expanded.
3. Click Keyboard.
4. Click the Speed tab.
5. Move the Repeat delay slider to Long or the Repeat rate slider to Slow.
6. Click OK.
For the Windows 10 operating system:
- From the desktop, move the pointer to bottom-left corner of the screen, and then search Control Panel in the search box.
- Click the View by menu and select the Small icons or Large icons view. The All Control Panel Items category is expanded.
- Click Keyboard.
- Click the Speed tab.
- Move the Repeat delay slider to Long or the Repeat rate slider to Slow.
- Click OK.Problem: The Bluetooth keyboard is not recognized by your computer
Solution: To solve the problem, do the following:
- Ensure that the Bluetooth radio on the computer is turned on and the Bluetooth works.
- Ensure that the Bluetooth connection button on the keyboard is turned on.
- For the Windows XP operating system, ensure that you have downloaded and installed the latest Bluetooth software. If you are using a Lenovo computer with Broadcom Bluetooth solution, check and update to the latest Bluetooth for Windows (BTW) version (BTW 5.6.0.8900 or later version).
- Ensure that the Bluetooth keyboard is within the maximum Bluetooth range (10 m).
Problem: The Bluetooth keyboard lags. Solution: To solve the problem, try moving the Bluetooth keyboard closer to the computer and removing other objects with wireless signals to avoid signal interference. Problem: The ThinkPad Keyboard Suite cannot be automatically installed when I connect the keyboard to my computer for the first time.
Solution: To solve the problem, do the following:
- Ensure that you are using the Windows 7, Windows 8, Windows 8.1, or Windows 10 operating system.
- Ensure that your computer has been connected to the Internet.
- Ensure that you have enabled the automatic Windows update feature by doing the following:
a. Open Control Panel.
b. Depending on your Control Panel mode, do one of the following:
• Click Hardware and Sound ➙ Devices and Printers.
• Click Devices and Printers.
c. Right-click your computer icon under the Devices menu, and then select Device installation Settings.
d. Follow the instructions on the screen to enable the automatic Windows update feature. - Ensure that you have installed all Windows updates by doing the following:
a. Open Control Panel
b.Depending on your Control Panel mode, do one of the following:
•Click System and Security ➙ Windows Update.
•Click Windows Update.
c.Click Check for updates to install Windows updates. - Remove the Bluetooth keyboard from the computer and then reconnect it.
- If the above tips still are not workable, it might be caused by the version or language of your operating system. You can manually install the ThinkPad Keyboard Suite by doing the following:
a.Go to http://support.lenovo.com/tpkeyboard.
b.Locate and download the installation file of the driver.
c.Double-click the installation file, and then follow the instructions on the screen to complete the installation.
Problem: The Bluetooth keyboard might fail to resume from suspend on the Windows 7, Windows 8, Windows 8.1, or Windows 10 operating system.
Solution: You can check if selective suspend is disabled by going to Device Manager and navigating to the Bluetooth keyboard. Right-click the Bluetooth keyboard and go to the Properties page. Clear Allow the computer to turn off this device to save power on the Power Management tab.
Problem: It takes a long time to pair the Bluetooth keyboard with the computer on the Windows 7 operating system.
Solution: It is not a problem. When the clock on the Bluetooth keyboard icon disappears, the Bluetooth keyboard is successfully paired with the computer. If it fails, try reconnecting it again.
Product specifications
The following table describes the Bluetooth keyboard specifications
| Keys | 84/85/89 keys (Varies by country) |
| Color | Raven black |
| Dimensions (Height x Width x Depth) | 305.5 mm x 164.0 mm x 13.5 mm (not including the tilt feet) |
| Weight | 458 g (including the cable) |
| PC interface | Bluetooth 3.0 |
| Operating voltage | 3.7 V (Typical) |
| Battery Capability | 500 mA (Typical) |
| Power consumption | 50 mA maximum |
| Cable length | 1.5m (4.92 feet) |
| Supported operating system | USB Type A connector |
| Windows 10 (32-bit and 64-bit) Windows 8.1 (32-bit and 64-bit) Windows 8 (32-bit and 64-bit) Windows 7 (32-bit and 64-bit) Windows Vista (32-bit and 64-bit) Windows XP (32-bit) |
Appendix A. Compliance information
The latest compliance information is available at:
https://www.lenovo.com/compliance
Electromagnetic emission notices
The following information refers to the ThinkPad Compact USB Keyboard with TrackPoint and ThinkPad
Compact Bluetooth Keyboard with TrackPoint.
ThinkPad Compact Bluetooth Keyboard with TrackPoint – 4Y40U90599
For electronic emissions information on Class B digital devices and compliance information, refer to the
Regulatory Notices publication that is available on the Lenovo Support Web site at:
http://www.lenovo.com/support/keyboards
Lenovo (Slovakia), Landererova 12, 811 09 Bratislava, Slovakia

- Reorient or relocate the receiving antenna.
- Increase the separation between the equipment and receiver.
- Connect the equipment into an outlet on a circuit different from that to which the receiver is connected.
- Consult an authorized dealer or service representative for help.
Lenovo is not responsible for any radio or television interference caused by using other than specified or recommended cables and connectors or by unauthorized changes or modifications to this equipment.
Unauthorized changes or modifications could void the user’s authority to operate the equipment. This device complies with Part 15 of the FCC Rules. Operation is subject to the following two conditions: (1)
this device may not cause harmful interference, and (2) this device must accept any interference received, including interference that may cause undesired operation. Responsible Party: Lenovo (United States) Incorporated
1009 Think Place – Building One Morrisville, NC 27560 Phone Number: 919-294-5900


Appendix B.Accessibility information
Documentation in accessible formats
Lenovo provides electronic documentation in accessible formats, such as properly tagged PDF files or HyperText Markup Language (HTML) files. Lenovo electronic documentation is developed to ensure that visually impaired users can read the documentation through a screen reader. Each image in the documentation also includes adequate alternative text to explain the image so that visually impaired users can understand the image when they use a screen reader.
To open and view PDF files, your computer must have the Adobe Reader program installed. The Adobe Reader program also is available for download at: http://www.adobe.com