Honeywell Thor VM3A Vehicle Mount Computer User Guide
Honeywell Thor VM3A Vehicle Mount Computer User Guide


out of the box
Make sure your shipping box contains these items:
- Thor VM3A vehicle-mounted computer (Model VM3AL0N)
- Regulatory Sheet
If you ordered additional accessories for your computer, verify that they are also included with the order. Be sure to keep the original packaging in case you need to return the computer for service.
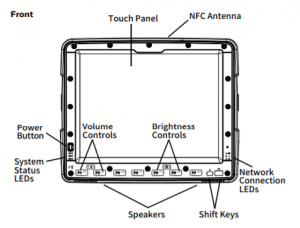
Computer Features

Back
Dock Features
Standard Dock
Mount to vehicle
- Does not obstruct the driver’s vision or safe vehicle
- Will be protected from rain or inclement
- Will be protected from extremely high concentrations of dust or wind-blown
- Can be easily accessed by a user seated in the driver’s seat while the vehicle is not in
To mount the VM3A using a RAM mount system:
- Attach RAM base to vehicle (RAM ball, RAM Clamp, RAM Plate, etc.).
- Attach RAM ball to the Smart Dock.
- Attach VM3A assembly to RAM base using RAM arm and
Connecting the Power Cable for 12-48 VDC Vehicles
Note: Refer to the Thor VM3A User Guide for other power connections, available at www.honeywellaidc.com .
For proper and safe installation, the input power cable must be connected to a fused circuit on the vehicle. If the supply connection is made directly to the battery, the fuse should be installed in the positive lead within 5 inches of the battery’s positive (+) terminal. The fused circuit requires a maximum time delay (slow blow) fuse with a current rating as noted below.
- For 12VDC input, use a 10A slow blow fuse that has a DC voltage rating greater than
- For 24VDC input, use a 6A slow blow fuse that has a DC voltage rating greater than
- For 36VDC input, use a 4A slow blow fuse that has a DC voltage rating greater than
- For 48VDC input, use a 3A slow blow fuse that has a DC voltage rating greater than
Note: For North America, a UL Listed fuse must be used.
Power Cable Routing
Power Cable Wiring Diagram with Right Angle and 6 Wires
Twist the red and red/white wires together and twist the black and black/white wires together before connecting to vehicle power.
Connect the green wire to vehicle ground:
| Wire Color | Connection |
| Red | DC + (10-60 VDC) |
| Red/White | DC + (10-60 VDC) |
| Black | DC – |
| Black/White | DC – |
| Green | Ground |
| Blue | Ignition Sense Input (optional) Refer to the Thor VM3A User Guide,
available at www.honeywellaidc.com, for further information about ignition control. |
Vehicle 10-60 VDC Direct Power Connection
- The VM3A must not be mounted in the The power switch on the dock must be turned Off. The power cable must be UNPLUGGED from the dock.
- Install the proper fuse based on the voltage source you will connect to. Connect to switched and fused power at terminal lug on a fuse or distribution box. Do not tap into existing See page 9 for more information.
- Use proper electrical and mechanical fastening means for terminating the cable. Properly sized “crimp” type electrical terminals are an accepted method of Select
electrical connectors sized for use with 20AWG (0.81mm2) conductors.
- Refer to the following wiring diagrams for wire colors and connections:
- Ignition Control Wiring Diagram
- Ignition Control Wiring Diagram
• Auto On Control and Manual Control Wiring Diagram Ignition wire must be left disconnected.
Green wire connected to vehicle chassis ground.
Green wire connected to vehicle chassis ground, which can also be battery negative.
- Route the cable the shortest way possible removing any leftover cable, making sure the cable does not interfere with safe operation and maintenance of the The cable is rated for a maximum temperature of 221°F (105°C). The cable should be protected from surfaces that exceed this temperature, from physical damage from moving parts, and
- Secure the cable to the vehicle structure at approximately one foot intervals, taking care not to over tighten, pinch conductors, or penetrate the
- Connect the watertight connector end of the power cable to the dock power connector by aligning the connector pins to the power connector; push down on the watertight connector and twist it to fasten
- Secure the power cable to the VM3A using the strain relief cable
- Place VM3A in the
- If using the Screen Blanking feature, install the screen blanking box or (Refer to the Thor VM3A User Guide, available at www.honeywellaidc.com for further information about the Screen Blanking box.)
- Press the power switch on the back of the
- Press the power button on the front of the
Restart the Computer
You may need to restart the computer to correct conditions where an application stops responding to the system or the computer seems to be locked up.
- Press and hold the Power button until the options menu
- Select Reboot and then OK.
To restart the computer if the touch panel display is unrespon- sive:
- Press and hold the Power button for approximately 8 seconds until the computer
Note: To learn about advanced reset options, see the user guide
Support
To search our knowledge base for a solution or to log into the Technical Support portal and report a problem, go to www.hsmcontactsupport.com.
User Documentation
For the user guide and other documentation, go to www.honeywellaidc.com.
Limited Warranty
For warranty information, go to www.honeywellaidc.com and click Get Resources > Product Warranty.
Patents
For patent information, see www.hsmpats.com.
Trademarks
Android is a trademark of Google LLC.
Disclaimer
Honeywell International Inc. (“HII”) reserves the right to make changes in specifications and other information contained in this document without prior notice, and the reader should in all cases consult HII to determine whether any such changes have
HII shall not be liable for technical or editorial errors or omis- sions contained herein; nor for incidental or consequential damages resulting from the furnishing, performance, or use of this material. HII disclaims all responsibility for the selection and use of software and/or hardware to achieve intended results.
This document contains proprietary information that is pro- tected by copyright. All rights are reserved. No part of this docu- ment may be photocopied, reproduced, or translated into another language without the prior written consent of HII. Copyright Ó 2019 Honeywell International Inc. All rights reserved