Makita UR3000 400W String Trimmer Instruction Manual
makita UR3000 400W String Trimmer Instruction Manual

We wish to thank you for choosing our products. We are confident that the high quality of our machine will meet with your satisfaction and appreciation and that we will give you long-lasting service.
Before starting to use your machine, make sure to read with care this manual, which has been purposely drawn up to provide you with all the necessary information for proper use, in compliance with basic safety requirements


SYMBOLS
Some of the following symbols maybe used on your tool, please study them and learn their meaning, proper interpretation of these symbols will allow you to operate the tool more safely and effectively.

| SYMBOLS | NAME | EXPLANATION |
| CE marking | The product meets demands and regulations set by the European Community (now European Union). | |
| Class II Construction | Double insulated construction. | |
|
WEEE MARKING | CAUTION! Unusable power tools do not belong with domestic waste. They must be taken to a communal collecting point for environmentally friendly disposal in accordance with local regulations. |
| Read the operator’s instructions | To reduce the risk of injury, user must read and understand operator’s manual before using this product. | |
| Electric Shock! | Disconnect the mains plug if the cord is damaged or entangled. | |
| Do not expose to rain | Don’t leave your tool expose to outdoor or rain. | |
| Wear eye protection | To reduce the risk of your eye, wear eye protection! | |
| Noise level marking | Your tool noise is not more than 96 dB. | |
| KEEP ALL BYSTANDERS AWAY! | KEEP ALL BYSTANDERS AWAY! |


IMPORTANT SAFETY INSTRUCTIONS
The purpose of the safety rules is to attract your attention to possible dangers. The safety symbols and the explanations with them, require your careful attention and understanding. The safety warnings do not eliminate any danger. Always use proper safety equipment, such as the guard, although you follow the safety instruction and warnings.

Before beginning power tool operation, always wear safety goggles or safety glasses with side shields and a full face shield when needed. We recommend Wide Vision Safety Mask for use over eyeglasses or standard safety glasses with side shield.
- This appliance is not intended for use by persons (including children) with reduced physical, sensory or mental capabilities, or lack of experience and knowledge, unless they have be given supervision or instruction concerning use of the appliance by a person responsible for their safety.
- Children should be supervised to ensure that they do not play with the appliance.
- Read the instructions carefully.
- Be familiar with the controls and proper use of the equipment.
- Before use, check the supply and extension cord for signs of damage or ageing.
- If the cord becomes damaged during use, disconnect the cord from the supply immediately. DO NOT TOUCH THE CORD BEFORE DISCONNECTING THE SUPPLY.
- Do not use lawn trimmer (edge trimmer), if the cords are damaged or worn.
- Warning: Cutting elements continue to rotate after the motor is switched off.
- Keep extension cords away from cutting elements.
- Wear protective glasses or goggles.
- Never allow children or people unfamiliar with the instructions to use the machine.
- Stop using the machine while people especially children, or pets are nearby.
- Only use the machine in daylight or good artificial light.
- Before using the machine and after any impact, check for sighs of wear or damage and repair as necessary.
- Never operate the machine with damaged guards or without the guards in place.
- Keep hands and feet away from the cutting means at all times and especially when switching on the motor.
- Take care against injury from any device fitted for trimming the filament line length. After extending new cutter line, always return the machine to its normal operating position before switching on.
- Never fit metal cutting elements.
- Never use replacement parts or accessories not provided or recommended by the manufacturer.
- Disconnect the machine from the mains before checking, cleaning or working on the machine and when it is not in use.
- Always ensure that ventilation openings are kept clear of debris.
- Where symbols pictograms are used in the marking on the machine their function shall be explained.
- Always disconnect the trimmer from the mains when leaving the trimmer unattended.
- When not in use, store the machine out of the reach of children.
- Mains powered trimmers should only be repaired by an authorized service center.
- Ask an authorized service center for any repair or adjustment other than described in this manual.
- Use only manufacturer’s recommended replacement parts and accessories.
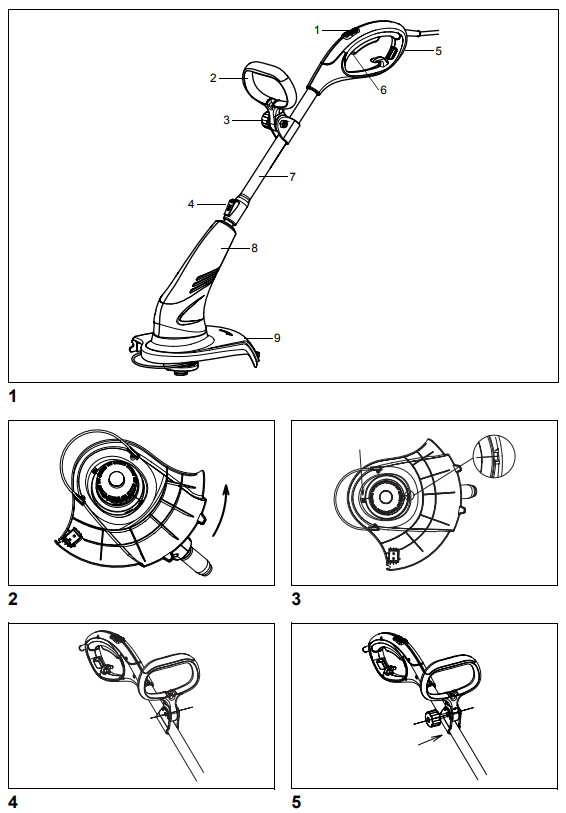
GENERAL IDENTIFICATION
(Fig. 1)
- Safety lock button
- Auxiliary handle
- Lock knob
- Adjust button
- Main handle
- Switch trigger
- Tube
- Motor housing
- Safety guard
Accessories:
- Belt
- Eye protection glass
SPECIFICATIONS
| Model | UR3000 |
| Rated voltage: | 230 – 240 V~ |
| Rated frequency: | 50 – 60 Hz |
| Rated power: | 450 W |
| No load speed: | 9,000 min-1 |
| Cutting width: | 300 mm |
| Line size: | Φ1.65 mm |
| Sound pressure level at operator’s position: | 75.1 dB (A) K=3 dB (A) |
| Guaranteed sound power level: | 96 dB (A) |
| Vibration: | 2.73 m/s2 K=1.5 m/s2 |
| Size (L/ W/ H): | 1,016 – 1,256 / 301 / 262 mm |
| Net weight: | 2.6 kg |
ASSEMBLY INSTRUCTION
The trimmer is supplied with some components not assembled. To assemble these, proceed as follows:
Safety guard assembly
Fix the safety guard onto the motor housing. (Fig. 2 & 3)
- Put the safety guard onto the motor housing.
- Rotate the safety guard to the right position.
- Fix the safety guard on the motor housing with a screw.
After extending new line, always return the trimmer to its normal operating position before switching on.
Auxiliary handle assembly
- Attach the auxiliary handle to the support. (Fig. 4)
- Insert the bolt to the holes of the handle support and the handle, and screw the lock knob to the bolt, but don’t screw fully. (Fig. 5)
- Put the head of the machine on the ground, then adjust the auxiliary handle to the comfortable position by another handle for you: (Fig. 6)
- a. Push the adjust button, adjust the tube length for you want.
b. Rotate the auxiliary handle on a comfortable angle for you want.
4. Screw the lock knob to firm the auxiliary handle.
STARTING
Before start the trimmer, fix the extension cord into the hole of the main handle. (Fig. 7 & 8)
Take a secure hold the trimmer and without letting it touch the grass to be cut, depress the safety lock button and the switch trigger on the upper and grip.
To switch off the trimmer, release the switch trigger. (Fig. 9)
UTILIZATION THE TRIMMER AS AN EDGER
For edging of driveways and paths, transform the trimmer from the trimmer mode to the edging mode as follows:
- Hold the tube of the trimmer with one hand and push the rotation button by another hand. (Fig. 10)
- Rotate the tube 180º until it locks in the edging mode. (Fig. 11)
REPLACEMENT OF THE CUTTING LINE CARTRIDGE
Your trimmer is supplied with a fully disposable cutting line cartridge which overcomes troublesome rewinding of the cutting line.
To replace an empty cutting line cartridge as follows:
- Press both of the release latch on the spool holder and boost up it out of the cap (Fig. 12), remove the empty spool out. (Fig. 13)
- Put the spring and cap out of the empty spool and into the new spool, then feed the two cutting lines of the new spool through the eyelets of the cap. (Fig. 14)
- Put the new spool into the spool holder, and then press the cap down till lock into place by the release latch. (Fig. 15)
8. REFILL OF CUTTING LINE
To refill cutting line:
- Disconnect the machine from the mains.
- Remove the empty spool. (Fig. 12 & 13)
- Cut a new cutting line to less than 8 m and bend it at the middle.
- Hook the middle of the new cutting line to the notch located at the center of the spool between the 2 channels provided for the cutting line. The arrow on the spool shows the direction of winding the cutting line. (Fig. 16)
- Wind the cutting line around the A section (10) in an orderly placement. Make sure to wind it tight and flat so that the surface of the wound line is not ragged. (Fig. 17)
- Wind all but about 100 mm of the cutting line, leaving the end temporarily hooked through a line holder (12) on the side of the spool. (Fig. 18)
- In this way, wind the cutting line in the B section (11) as well and leave the end temporarily hooked. (Fig. 17 & 19)
- Mount the spool onto the cap so that the temporarily hooked position of the cutting line (13) matches up with the notches (14) on the side of the cap (15). (Fig. 20)
- Unhook the ends of the cutting line from their temporary position and fit them into the notches on the side of the cap. (Fig. 21)
- Make sure that the spring is in place. Push the cap (15) in the spool holder (16). Make sure the latches fully spread in the cap. (Fig. 14, 15 & 22)
- Press on the spool button (18) and pull out one end of the cutting line. Make sure that the line has been fed out. (Fig. 22 & 23)
- Finally, pull out the other end of the line without pressing the spool button. Make sure that the line has been fed out.
FEEDING CUTTING LINE
Short or worn lines cut less efficiently. To improve its operation on subsequent occasions, tap the spool button lightly on the ground while the trimmer is running at full speed. This will automatically feed extra cutting line. The cutting line blade (17) under the guard will automatically trim the cutting line to the correct length during operation. (Fig. 22 & 24)
INSTRUCTION FOR USE
Start the trimmer before getting close to the grass to be cut.
Cut the grass by moving the trimmer from right to left and proceed slowly, keeping trimmer inclined about 30°. High grass should be cut in layers, always beginning from the top. The cuts should be short.
Do not cut damp or wet grass.
Avoid wearing the line out quickly by knocking against hard objects (stone, walls, fences, etc.). Use the edge of the guard in order to keep the trimmer at the right distance.
NOTE: Excessive force or hitting the Trimmer Bump Head on the ground to feed the cutting line will damage the bump head.
EXTENSION CORDS
You should only use extension cords for outdoor use, PVC ordinary duty with a cross sectional area not less than 0.75 mm2.
Before using, check the supply and extension cords for signs of damaged during use, disconnect the cord for signs of damage or aging. If the cord becomes damaged during use, disconnect the cord from the supply immediately. DO NOT TOUCH THE CORD BEFORE DISCONNECTING THE SUPPLY. Do not use the appliance if the cord is damaged or worn. Keep extension cord away from cutting elements.
MAINTENANCE
- After use, disconnect the machine from the mains and check for damage.
- When not in use, store the machine out of the reach of children.
- Mains powered trimmers should only be repaired by an authorized service center.
- Ask an authorized service center for any repair of adjustment other than described in this manual.
- Use only manufacturer’s recommended replacement parts and accessories.
ENVIRONMENTALLY FRIENDLY DISPOSAL
According to EU directive 2002/96/EC on electric and electronic equipment and its implementation into national law, all electric tools must be separately collected and environmentally friendly recycled. Alternative disposal: If the owner of the power tool does not return the tool to the manufacturer, he is responsible for proper disposal at a designated collection point that prepares the device for recycling according to national recycling laws and regulations.
This does not include accessories and tools without electric or electronic components.
EC Declaration of Conformity
We Makita Corporation as the responsible manufacturer declare that the following Makita machine(s):
Designation of Machine: String Trimmer
Model No./ Type: UR3000
Specifications: see “SPECIFICATIONS” table. are of series production and Conforms to the following European Directives:
2000/14/EC, 2004/108/EC, 2006/42/EC, 2006/95/EC
And are manufactured in accordance with the following standard or standardised document:
EN55014, EN60335, EN61000, EN62233
The technical documentation is kept by our authorised representative in Europe who is:
Makita International Europe Ltd.
Michigan Drive, Tongwell, Milton Keynes, MK15 8JD, England
The conformity assessment procedure required by Directive 2000/14/EC was in Accordance with annex VIII.
Notified Body:
TÜV SÜD Industrie Service GmbH
Westendstraße 199, D-80686 München
Identification number: 0036
Measured Sound Power Level: 92.7 dB (A)
Guaranteed Sound Power Level: 96 dB (A)
17. 12. 2010
Tomoyasu Kato
Director
Makita Corporation
3-11-8, Sumiyoshi-cho,
Anjo, Aichi, JAPAN

Makita Corporation
Anjo, Aichi, Japan
www.makita.com