Dewalt Laser Distance Meter User Manual
DeWalt Laser Distance Meter User Manual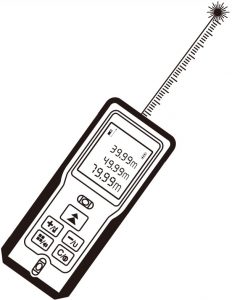
M1905

Introduction
Firstly thank you for your choice on our handhold laser distance meter.Please carefully read the safety instructions and the user manual before using this product, otherwise it may result in hazardous laser radiation and electric shock.
Safety Instructions
- This product is a class II laser product. Please DO NOT stare into beam at any time when operating this product!
- Please DO NOT looking directly into the beam with optical aids to avoid causing serious laser radiation!
- Please DO NOT remove any safety labels on this product!
Caution
- Please DO NOT use this product in an unstable situation.
- Please avoid kids to contact and use the meter.
- Please DO NOT disassemble or restructure the meter. Otherwise, it may lead to laser emission resulting in unnecessary personal injury.
- Please keep the manual, it is useful when you use it.
Configuration
Laser distance meter |
1pc |
AAA battery |
2pc |
| User manual | 1pc |
Packing box |
1pc |
| Hand rope | 1pc |
Basic Function
Single Measurement |
√ |
| Continuous Measurement (Max/Min) | √ |
Area/Volume/Pythagoras |
√ |
Plus and Minus |
√ |
Unit Conversion |
√ |
| Measuring Reference | √ |
Silence Function |
√ |
| Historical Data Review | 20Groups |
Error Code |
√ |
| Battery Power Indication | √ |
Laser Auto Switch of |
30s |
| Instrument Auto Switch off | 180s |
Measuring Range |
|
Measuring Accuracy (Standard Deviation) |
±2.0mm |
| Measuring Unit | m,ft,in |
Area Unit |
m²,ft²,in² |
| Volume Unit | m³,ft³,in³ |
Laser Type |
620~690nm |
| Laser Class | class II ,<1mW |
Operating Temperature |
0~+40℃ |
| Storage Temperature | -20~+65℃ |
Batteries |
AAA(Alkaline),2×1.5V |
| Working time(Fully charged) | >5000 times |
Weight (Without batteries) |
Approximate 91g |
| Dimension (L*W*H) | 117X53X27mm |
Comment:
- When measuring distance within 10m,measurement accuracy is±2mm; more than 10m,measurement accuracy is calculated as
follows:±2mm±0.05*(D-10)(D: Measuring Distance, Unit: m) - When measuring too poorly reflecting target or very rough surfaces, or the environment temperature is too high or too low or ambient brightness is too bright, such as under sunlight, The deviation will be unfavorable.
Forbidden:
- Opening or repairing the equipment without allow.
- Measuring on sun.
- Others measuring out of appointed range.
- Immersing the equipment in water.
- Cleaning the lens using alcohol or any other organic solvent.
- Wiping the lens directly with fingers or other rough surfaces.
- Powering the equipment beyond the rated DC voltage.
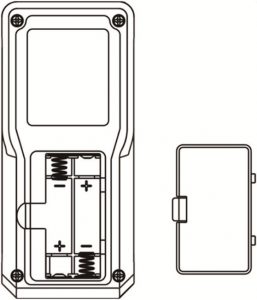
Battery Installation
According to figures, remove battery compartment lid and insert 2*AAA batteries (alkaline).

Structure of Product

- Laser receiver
- Laser emitter
- Display screen
- Spirit bubble
- Power key/Measuring key
- Minus key/Unit switch key
- Clear key/Exit key/OFF key
- Spirit bubble
- Plus key/Reference switch key
- Function key/Sound key
- Battery compartment
Operation
Switch-on
Short-time press


Then the meter enter Single Measurement Mode and laser point is opened, indication as shown as figure A. Laser point is automatically shut down if no any operation after 30 seconds. Or short-time press


Change Measurement Reference
Default measuring reference is the bottom of meter, indication as shown as figure D. Long-time press


Unit Conversion
Factory default that unit is m, indication as shown as figure F. Long-time press

When the unit is m², Long-time press
When the unit is m³, Long-time press
Later when you switch on meter, the meter will remember the last measuring unit you used.

Change Measurement Mode
Default setting of measurement is Single Measurement Mode, indication as shown as figure I. Short-time press


Switch off
The equipment can be switched off at any time by long-time press
Function description
Single measurement
At the Single Measurement Mode, aim the laser onto target. Short-time press

Continuous measurement
At the Single Measurement Mode only, aim the laser onto target. long-time press

Area Measurement
At the Area Measurement Mode, aim the laser onto target. Short-time press

Volume Measurement
At the Volume Measurement Mode, aim the laser onto target. Short-time press

Single Pythagorean Theorem Measurement
At Single Pythagorean Theorem Measurement Mode, aim the laser onto target. Short-time press

Dual Pythagorean Theorem Measurement
At Dual Pythagorean Theorem Measurement Mode, aim the laser onto target. Short-time press

Historical Data Review and Delete
At Historical Data Review Mode, up-date data is last measurement, Short-time press
Plus and Minus Functions
At the Single Measurement Mode, aim the laser onto target. Short-time press
At Area Measurement Mode and Volume Measurement Mode, plus function and minus function is available.

Battery Power Indication
When the battery power indication as shown as figure X, It means the battery should be changed.

Silence Function
At any state, long-time press
Error Code
Code |
Possible cause |
Remedy |
Err 10 |
Battery too low | Change batteries |
Err 15 |
Out of measuring range | Measure target within the range |
Err 16 |
Received signal too weak | Measuring high reflectance target or use high reflectance reflector |
Err 18 |
Received signal too strong | Measuring low reflectance target or use low reflectance reflector |
Err 26 |
Value is too big to display at screen | Reduce measuring range |
Warranty Card
We guarantee ONE years warranty for laser distance meter.
Warranty begins from purchase date and it is subject to the following conditions:
- Within warranty,we shall deal with complaints based on faulty equipment by repair,replacement of defective parts or replace an identical flawless product at our discretion.
- Declarations:
Following conditions are NOT included in warranty:- Open the equipment by tools without specifically permission
- The use of the equipment outside the state limits or improper handing
- The use of non original accessories
- Serviced by unauthorized persons or workshops
- Obliterated Serial Number of equipment
- Warranty card must be provided and please present your invoice when desired.
- Repairing and replacing equipment must comply with ‘ Conditional Of Warranty ’ of manufacture.
Model No. :__________________________________
Date of Purchase:_____________________________
Signature:___________________________________