Samsung Wall Mount Installation Guide
Wall Mount Installation Precautions
- Use the provided accessories and parts to install the wall mount.
- Install on a vertically flat wall surface only.
- Avoid the following areas to ensure the best product performance and prevent malfunctions:
– Areas that are susceptible to vibration and impact: The product may fall and become damaged.
– Next to fire sprinklers: Heat generated by the product may activate the sprinkler.
– Near high-voltage cables: Electronic interference from the high voltage cables may disrupt the screen display.
– Near heating appliances: The product may overheat and malfunction.
– Check the stability of the wall surface.
– If the wall is too weak, reinforce it before installing the mount. - If you are installing the product on a non-concrete wall, seek advice from a professional installer before proceeding.
- The maximum weight of Signage (with its components attached) is 29kg for safe installation.
- The wall mount must not be installed tilted.
- Make sure to install the wall mount perpendicular to the floor.
- Make sure to install the safety screws to prevent the Signage from falling.
- Do not keep the Signage extended, except when you replace it.
- When the Signage is unlocked and extended for replacement, take care not to damage the devices and appliances nearby.
- When you install the Signage according to the Easy Installation Function (only available for SAMSUNG UD/UE Series), the Signage may not be installed exactly as set in the user manual. This disconformity is mainly caused by tolerances. If this is the case, adjust the tolerance.
- Make sure to confirm the size of your Signage with the size of the corresponding wall mount. You can use the Easy Installation Function (only available for
SAMSUNG UD/UE Series) as an installation guide only. - Check the model of your Signage, the corresponding installation guide on the back, and the types of walls the Signage can be mounted on.
Installation Requirements based on the Wall Type - Can only be mounted on a concrete or interior wall of sufficient thickness. Refer to the diagrams below.
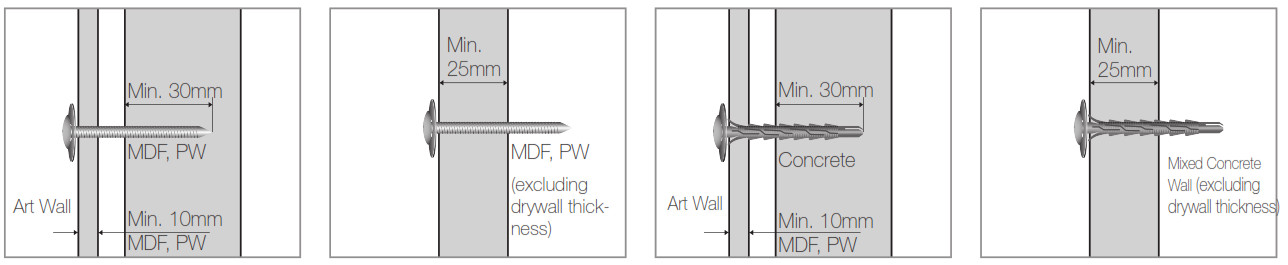
MDF = Medium Density Fiberboard
PW = Plywood


Precautions for installing the wall mount

Insert the anchors and screws where marked.

- Check the location of the studs and then insert the screws.
- Minimum Stud Size: 51 x 102 mm (2 x 4 in), Predrill 3mm holes before inserting the screws.
- The holes must be drilled along the center axis of the studs.
- Inserting the screws without predrilling can split the studs.

These safety instructions are intended to protect you and prevent property damage. Read them carefully and comply with these instructions.
Failing to follow them may result in physical injury.
- This product must be installed by a qualified technician assigned by the retailer.
Install by a non-professional may result in physical injury or product damage. - Do not let children play around the product without supervision.
Children may bump their heads or bodies into the corners, resulting in injury. - Do not install the product on a wall that will not support its weight.
The product may fall, resulting in physical injury or product damage. - Do not install the product under abnormal or non-standard site conditions. The product may be severely damaged. In these circumstances, contact a local
Samsung service center.
Keep the product away from dust, chemicals, high or low temperatures, humidity, and/or vehicle traffic.

Components / Installation Process

1.
Installation Guide
2.
Assembly Adapter to Signage


3. Easy Installation Function – only for SAMSUNG UD/UE Series: Wall mount size ≒ Signage size
■ For UE/UD Series

If you are using a different Signage model, skip this step and proceed to the next one.
Use screw G to attach the components. Where to attach the components differs with whether you are using the UE or UD model.
(TOP direction: See the arrows. How to determine where to attach the components: See the model names (UD or UE) on the wall mount.)
■ For Only UE Series
Refer to the appended diagrams for assembly specifications for each model.
4. Installing the Wall Mount on the Wall5. Layout the wall Mount
– Easy Installation Function – only for SAMSUNG UD/UE Series


If you are using a different Signage model, skip this step and proceed to the next one.
- Install the wall mounts according to the size of the wall mount corresponding to the size of your Signage. Refer to the appended diagrams for the shape of each corner.
- Make sure to remove the component Cafter the wall mount is installed on the wall.
6. Mounting the Signage on the Wall Mount

| Step 1: Lift the locks on both sides, then extend the wall mount. Step 2: Mount the Signage, then fasten the safety screw O into the B component by hand. Step 3: Push the wall mount until both locks are engaged. • The wall mount can be extended by as far as 190mm. • Do not keep the Signage extended, except when you replace it. |

7. Installing the Video Wall
Install the Signages starting from the bottom row of the video wall.8. Separating the Video Wall


| The locks on both sides must be disengaged. Use the accessory L(L-wrench) with no or little space available. Make sure to remove the safety screws before dismounting the Signage. |
9. Finely Adjusting the Video Wall
1. Direction X

2. Direction Y
When you adjust tolerance in the direction of Y, you can adjust it only in the direction of +Y from the reference position in the appended diagram.
When you adjust tolerance in the direction of Z, you can adjust it only in the direction of +Z from the reference position in the appended diagram.


10. Reassembly Wall Mount for Portrait
If you are using the UE/UD Series, reassemble the wall mount according to the Easy Installation Function, then follow the installation steps for landscape orientation to install the wall mount.


11. Easy Installation Function(For Portrait) – only for SAMSUNG UD/UE Series: Wall mount size ≒ Signage size
■ For UE/UD Series


If you are using a different Signage model, skip this step and proceed to the next one.
Use the screwG to attach the bracket height bars detached from the component. A How to attach the bars depends on whether you are using the
UE or UD model. (TOP direction: See the arrows)

Product Specifications
■ WMN-55VD
| Width (mm) X Height (mm) | 1213.0 X 539.8mm (Landscape type) (Exclusion: BRKT HEIGHT BAR, SPACER NB) VESA(mm): 600×400, 400×400, 400×600 |
| Width (mm) X Flight (mm) | 684.0 X 539.8mm (Portrait type) (Exclusion: BRKT HEIGHT BAR, SPACER NB) VESA(mm): 600×400, 400×400, 400×600 |
| Depth (mm) | 39.0mm (Minimum) / Tolerance adjustment (+8.0mm) |
| Extendible Range (mm) | 190mm Type : Landscape(default), Portrait type. |
| Product weight with the packaging (Kg) | 11.3Kg |
| Maximum SET load (Kg) | 29Kg |
■ WMN-46VD
| Width (mm) X Height (mm) | 1022.0 X 539.8mm (Landscape type) (Exclusion: BRKT HEIGHT BAR, SPACER NB) VESA(mm): 600×400, 400×400, 400×600 |
| Width (mm) X Height (mm) | 576.6 X 539.8mm (Portrait type) (Exclusion: BRKT HEIGHT BAR, SPACER NB) VESA(mm): 600×400, 400×400, 400×600 |
| Depth (mm) | 39.0mm (Minimum) / Tolerance adjustment (+8.0mm) |
| Extendible Range (mm) | 190mm Type : Landscape(detault), Portrait type. |
| Product weight with the packaging (Kg) | 10.4Kg |
| Maximum SET load (Kg) | 23Kg |
Precautions for interior assembly
When you both install a video wall and proceed with interior trim or decorative moldings on it, you can adjust the tolerance properly in the directions of +Y
(10mm) and +Z (8mm) based on the provided specifications.
Ensure proper space (+ α mm) required to adjust tolerance at the top of the video wall.
Make sure to take into account the additional distance required to adjust tolerance (+α mm / maximum 8.0mm) when you conform to
specifications for distance (39.0mm) behind the video wall.
Warranty period: 1 Year
This SAMSUNG brand product, as supplied and distributed by SAMSUNG and delivered new, in the original carton to the original consumer purchaser, is warranted by SAMSUNG against manufacturing defects in materials and workmanship for the limited warranty period listed for your country in the warranty table at the end of this manual. This limited warranty begins on the original date of purchase. To receive warranty service, the purchaser must contact SAMSUNG for problem determination and service procedures. Warranty service can only be performed by a SAMSUNG authorized service centre. The original dated bill of sale must be presented upon request as proof of purchase to SAMSUNG or SAMSUNG’s authorized service center.
■WMN-55VD (Landscape type)

■WMN-55VD (Portrait type)
■WMN-46VD (Landscape type)


■WMN-46VD (Portrait type)
[ Make sure to take into account the additional distance required to adjust tolerance (+ α mm / maximum 8.0mm) when you conform to specifications for distance (39.0mm).
■WMN-55VD (Landscape type – UD Series)


■WMN-55VD (Landscape type – UE Series)

■WMN-55VD (Portrait type – UE Series)
[ Make sure to take into account the additional distance required to adjust tolerance (+ α mm / maximum 8.0mm) when you conform to specifications for distance (39.0mm).
[The spacers are subject to a tolerance of less than 1mm, depending on how they are attached.
[The VESA standards indicate that the wall mount should not be bilaterally symmetric when it is installed in portrait orientation.
■WMN-46VD (Landscape type – UD Series)
Make sure to remove component A before mounting the Signage.


■WMN-46VD (Landscape type – UE Series)

when you conform to specifications for distance (39.0mm).
Make sure to remove component A before mounting the Signage.

