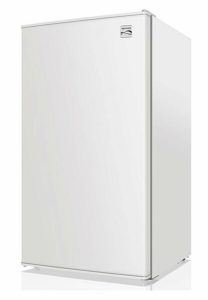
Kenmore Compact Refrigerator User Guide
KENMORE Compact Refrigerator

PARTS AND FEATURES
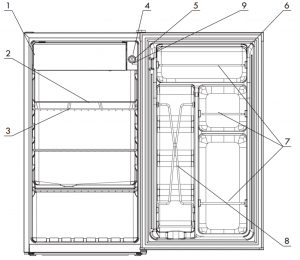

- Built-in freezer
- Drip tray
- Removable shelf
- Temperature control knob (Turn to right to raise; turn to left to lower)
- Defrost button
- Door seal (gasket)
- Can holders
- Tall bottle storage
- Lamp Switch
| Customer Assistance
For the most prompt assistance to order available replacement parts for this appliance, call 1-844-553-6667 and select option 2 “If you have purchased your Kenmore item at any other store”. |
SAVE THESE INSTRUCTIONS
Risk of child entrapment. Before you throw away your old refrigerator, take off the doors. Leave the shelves in place so that children may not easily climb inside. |

CFCs/HCFCs DISPOSAL
Your old refrigerator may have a cooling system that used CFCs or HCFCs
(chloro fluoro-carbons or hydro-chloro-fluoro-carbons. CFCs and HCFCs are believed to harm stratospheric ozone if released to the atmosphere. Other refrigerants may also cause harm to the environment if released to the atmosphere.
If you are throwing away your old refrigerator, make sure the refrigerant is removed for proper disposal by a qualified technician. If you intentionally release refrigerant, you may be subject to fines and imprisonment under provisions of environmental legislation.
WARNING: When handling, moving, using or cleaning this refrigerator, be careful to avoid damaging refrigerant tubing. Tubing damage may allow flammable refrigerant gas leakage, which can result in personal injury.
Thank you for purchasing this Kenmore product. This easy-to-use manual will guide you in getting the best use of your refrigerator.
PRODUCT RECORD
Staple your receipt to this manual.
Record the model and serial number of your unit in the spaces provided to the right.
Model number:_________
Serial number: __________
WARNING!
The use of this appliance can expose you to chemicals known to the state of California to cause cancer, birth defects, or other reproductive harm. For more information go to www.P65Warnings.ca.gov
PREPARING TO USE YOUR REFRIGERATOR
Unpacking Your Refrigerator
- Remove all packaging material. This includes the foam base and all adhesive tape holding the refrigerator accessories inside and outside. Slide out and remove the plastic or foam guard used to protect the compressor from shipping damage due to vibration or shock.
- Inspect and remove any remaining packaging, tape or printed materials before powering on the refrigerator.
- Check to be sure you have all accessories and parts listed in the Parts and Features section.
Proper Air Circulation
To ensure that your refrigerator works at the maximum efficiency it was designed for, you should install it in a location where this is proper air circulation, plumbing and electrical connections.
The following are recommended clearances around the refrigerator:
Sides ………………. 4 inches (10 cm)
Top …………………. 12 inches (30 cm)
Back ……………….. 4 inches (10 cm)
Electrical Requirements
Make sure there is a suitable power outlet (120 volts, 15 amps) with proper grounding to power the refrigerator.
Interior light bulb replacement
If the interior 10 watt appliance light bulb burns out, remove the light bulb cover and replace bulb as follows:
- Unplug refrigerator from power outlet.
- Loosen and remove the bulb from its socket by rotating counterclockwise.
- Insert new bulb and screw into socket.
- Plug refrigerator back into power outlet.

IMPORTANT SAFETY INSTRUCTIONS
The guidelines must be followed to ensure that safety mechanisms in this unit will operate properly. |
The unit must be plugged into its own dedicated 10 amp, 120 Volt, 60 Hz. AC only electrical outlet.
The power cord of the appliance is equipped with a three-prong grounding plug for your protection against shock hazards. It must be plugged directly into a properly grounded three-prong receptacle. The receptacle must be installed in accordance with local codes and ordinances. Consult a qualified electrician.
WARNING: Do not use an extension cord or adapter plug.
Do not use appliance if power cord is damaged or frayed. Take appliance to qualified service dealer for inspection and possible repair.
Never unplug the appliance by pulling on the power cord. Always grip the plug firmly, and pull straight from the receptacle to prevent damaging the power cord.
If your unit has an internal light, unplug the appliance before cleaning and before replacing a light bulb to avoid electrical shock.
Performance may be affected if the voltage varies by 10% or more. Operating the unit with insufficient power can damage the motor. Such damage is not covered under the warranty.
Do not plug the unit into an outlet controlled by a wall switch or pull cord to prevent the appliance from being turned off accidentally.
Avoid connecting unit to a Ground Fault Circuit Interrupter (GFCI).
Risk of fire or explosion. Flammable refrigerant used. To be repaired only by trained service personnel. Do not use mechanical instruments to remove frost from interior walls. Do not puncture refrigerant tubing. |

OPERATING YOUR REFRIGERATOR
Installation
Your refrigerator is designed for freestanding installation only. It should not be recessed or built-in. Place the refrigerator on a floor strong enough to support it fully loaded.
When moving the refrigerator, never tilt it by more than a 45 degree angle, this could damage the compressor and the sealed system.
If the refrigerator has been tilted more than 45 degrees, let it stand in an upright position for at least 24 hours prior to plugging it into the power source. This will allow the refrigerant to settle and reduce the possibility of a malfunction in the cooling system.
Plug the refrigerator into its own dedicated, properly installed grounded wall outlet.
Do not plug another appliance into the same outlet as the refrigerator.
Do not under any circumstances cut or remove the third (grounding) prong from the power cord. See the
Any questions concerning power and/or grounding should be directed toward a certified electrician or other qualified service dealer.
After plugging the appliance into a wall outlet, allow the unit to cool down for 2-3 hours before placing food into the refrigerator.

Installation Limitations
Do not install your refrigerator in any location not properly insulated or heated, such as a garage etc. Your refrigerator was not designed to operate in temperature settings below 55° Fahrenheit. Select a suitable location for the refrigerator on the hard even service away from direct sunlight or heat sources such as radiators, baseboard heaters, cooking appliances, etc.
Leveling Feet
There are two leveling feet on the bottom of the unit near the unit front. Turn the leveling foot knobs to the left to raise the cabinet, and to the right to lower the cabinet.
DOOR REVERSAL
DOOR REVERSAL
WARNING: Unplug the refrigerator before performing door reversal process. Failure to unplug may result in serious injury or death from electrical shock.
CAUTION: To avoid personal injury and property damage, obtain assistance from another person to perform the door reversal process.
Reversible door hinge allows you to open from the left or right side.
- Using a flat blade screwdriver, remove the plastic hinge cover from the top of the door. Be careful not to scratch refrigerator surface.
- Using a slotted screwdriver, unscrew the three screws from the top hinge bracket. Remove the bracket. Lift and remove the door from the bottom hinge pin. Set door safely aside.
- On the opposite side of the unit, use a thin-bladed tool to carefully pry up and remove the hole plug from top of door and plastic square cover from top of cabinet. Insert plug and cover into provided hole on opposite side of door and into holes exposed by removal of top hinge bracket.]
- Unscrew and remove the bottom foot from over the hinge bracket. Use a slotted screwdriver to remove the two screws attaching bracket to the cabinet. Remove bracket and replace foot. On the opposite side of the unit, remove the foot and attach bracket with the same screws. Replace foot.
- Mount the door onto the bottom bracket. Insert top bracket hinge pin into hole in top of door. Use the three previously removed screws to attach back of top bracket to cabinet.
- Replace the plastic hinge cover over the top hinge bracket.
- Check that the door is aligned horizontally and vertically with the the perimeter of the cabinet opening before finally tightening the top hinge. After tightening, adjust the leveling feet if necessary to align the door evenly with the floor.
CAUTION: If the refrigerator has been placed in a horizontal or tilted position for ease of doing reversal, wait 24 hours before plugging it in. Plugging in sooner may result in permanent damage to cooling system.


FEATURES AND USE
Holder Bars
The inside of the refrigerator door is equipped with a holder bars to keep food packages, bottles and pop cans securely in place on the door shelves.
Initial Use
To reach the set coldness level when operating the refrigerator for the first time, run it without food load until you hear the compressor stop. This usually takes 2 to 3 hours.
Once the set temperature is reached, load food into the refrigerator.
Note: If the refrigerator has been placed in a horizontal or tilted position for any period of time, wait 24 hours before plugging it in.
Temperature Control
The first time you turn the unit on, adjust the temperature control knob to recommended setting (3) and give unit time to cool down completely before adding food. If food does not cool to your satisfaction, turn dial past 3 to increase coldness or turn dial back from 3 to decrease coldness. Turning dial to colder setting will increase the freezing capability of the freezer compartment, but also increases the coldness of the refrigerator section.
Note: Turning the temperature control knob to the 0 position will stop the cooling cycle but does not shut off power to the unit.

Defrosting the Freezer
– When being defrosted the appliance must be unplugged to avoid the risk of electrical shock. |
The built-in freezer compartment is designed to keep contents below 32 °F. Defrost the freezer whenever frost accumulates to a thickness of 1/8″ or more on freezer walls.
Note that frost tends to accumulate more during summer months.
To defrost freezer, push in the button in the center of the control dial to shut off power to the refrigerator. Unplug the refrigerator from the electrical outlet.
Remove all food from refrigerator and freezer compartments. Place the drip tray on the shelf immediately beneath the freezer. Defrosting may take several hours, so store food in another refrigerator in the meantime.
To speed up defrost time, keep the door open and place a bowl of warm water in the refrigerator.
During defrosting water will accumulate in the freezer compartment. After defrosting is complete, empty water from drip tray and freezer compartment. Wipe down both compartments.
Turn the control dial to the left as far as it will go to pop the button in the center of the control dial out. The button must be popped out to return power to the refrigerator once it is plugged back in. Turn dial to right if turning to left doesn’t pop button out.
Plug refrigerator back into electrical outlet and set control dial to desired number.
Once interior has sufficiently cooled, place food back into refrigerator and freezer.
CAUTION: DO NOT use boiling water to melt frost accumulation on freezer walls, as it may damage plastic parts.
CARE AND CLEANING
Normal Operating Sounds You May Hear
Gurgling sounds or slight vibrations that are the result of the refrigerant circulating through the cooling coils.
The thermostat control will click when it cycles on and off.
Cleaning and Maintenance
WARNING: To avoid electric shock, always unplug your refrigerator before cleaning.
Ignoring this warning may result in injury or death.
CAUTION: Before using cleaning products, always read and understand the cleaning processes explained in this manual. Follow cleaning product manufacturer’s instructions and warnings to avoid personal injury or product damage.
General Cleaning
Prepare a cleaning solution of 1 to 2 tablespoons of baking soda mixed with warm water. Use a sponge or soft cloth, dampened with the cleaning solution, to wipe down your refrigerator.
Rinse sponge or cloth with clean water, and wipe surfaces clear of any cleaning solution residue.
Wipe all surfaces and racks dry with a soft cloth before resuming operation.
Do not use harsh chemicals, abrasives, ammonia, chlorine bleach, concentrated detergents, solvents for metal scouring pads. Some of these chemicals may dissolve, damage and/or discolor your refrigerator.
Door Gaskets
Clean door gaskets every three months according to the instructions described above in General Cleaning.
Gaskets must be kept clean and pliable to ensure a proper seal.
Petroleum jelly applied lightly on the hinge side of gaskets will keep the gaskets pliable and ensure a good seal.
Power Interruptions
Occasionally there may be power interruptions due to thunderstorms or other causes.
Remove the power cord plug from the AC outlet when a power outage occurs. When power has been restored after a prolonged outage, inspect all food for spoilage. Clean the inside of the refrigerator and freezer compartment before reuse.
Vacation and Moving Care
For long vacations or absences, unplug the unit, empty food from both compartments, move the temperature dial to the 0 position and clean the door gaskets according to the General Cleaning section. Prop door open, so air can circulate inside. When moving, always move the refrigerator vertically. Do not move unit when in a horizontal position, as possible damage to the sealed system could occur.
WARNING: When handling, moving, using or cleaning this refrigerator, be careful to avoid damaging refrigerant tubing. Tubing damage may allow flammable refrigerant gas leakage, which can result personal injury.
TROUBLESHOOTING
CONCERN |
POTENTIAL CAUSE |
COMMON SOLUTION |
Does not work |
|
|
Refrigerator runs continuously |
|
|
Internal temperature not cold enough |
|
|
