JVC XS-N6111PBA Bluetooth Party Speaker User Manual

XS-N6111PBA


Important Safety Instructions
- Read all instructions before use. Retain for future use.
- No user-serviceable parts inside. Do not dismantle.
- Do not immerse the unit in water or other liquids. Do not use in very humid or dusty environments.
- Do not expose to direct sunlight, heat, or fire.
- Keep the unit away from flammable materials.
- This speaker is intended for indoor use only.
- Do not cover the speaker during use.
- Use a soft cloth with a small amount of diluted detergent for cleaning. Do not use harsh chemicals or abrasives.
- Do not dispose of batteries in your household waste. Contact your local council for information on disposal or recycling.
- Replace all batteries at the same time. Do not use old and new batteries together.
- Remove batteries from the remote control and wireless microphone if they will not be used for a long time.
- Batteries (packed or in use) must not be exposed to high temperatures such as direct sunshine or fire.
- This product is not a toy. Children should be supervised to ensure that they do not play with the unit.
CONTENTS OF BOX
| 1x speaker unit 1x power adaptor 1x remote control |
1x wireless microphone 1x user manual |
Specifications:
| Speaker Unit: | 10inch x 2 + 3inch |
| Input Sensitivity: | 700~1000mV |
| Frequency Response: | 20Hz~20kHz |
| FM: | 87.5~108MH |
| Power Output: | 2x30W (stereo output) |
| Power Consumption: | 65W |
| Power Supply: | 100-240V~50/60Hz |
| Battery: | Lead-acid rechargeable battery DC 12V, 7Ah Built-in |
| Input: | DC 15V, 2A |
| Separation: | 64dB |
| Bluetooth transmission distance (without obstacle): | 10m |
| Signal/Noise Ratio: | S/N>80dB |
| Audio Distortion: | THD<0.5% @1W output |
| Product Dimension: | W37cm x D37cm x H89cm |
| Product Net Weight: | 18.6kg |
Supported Audio Format:
MP3 format only for USB up to 32GB
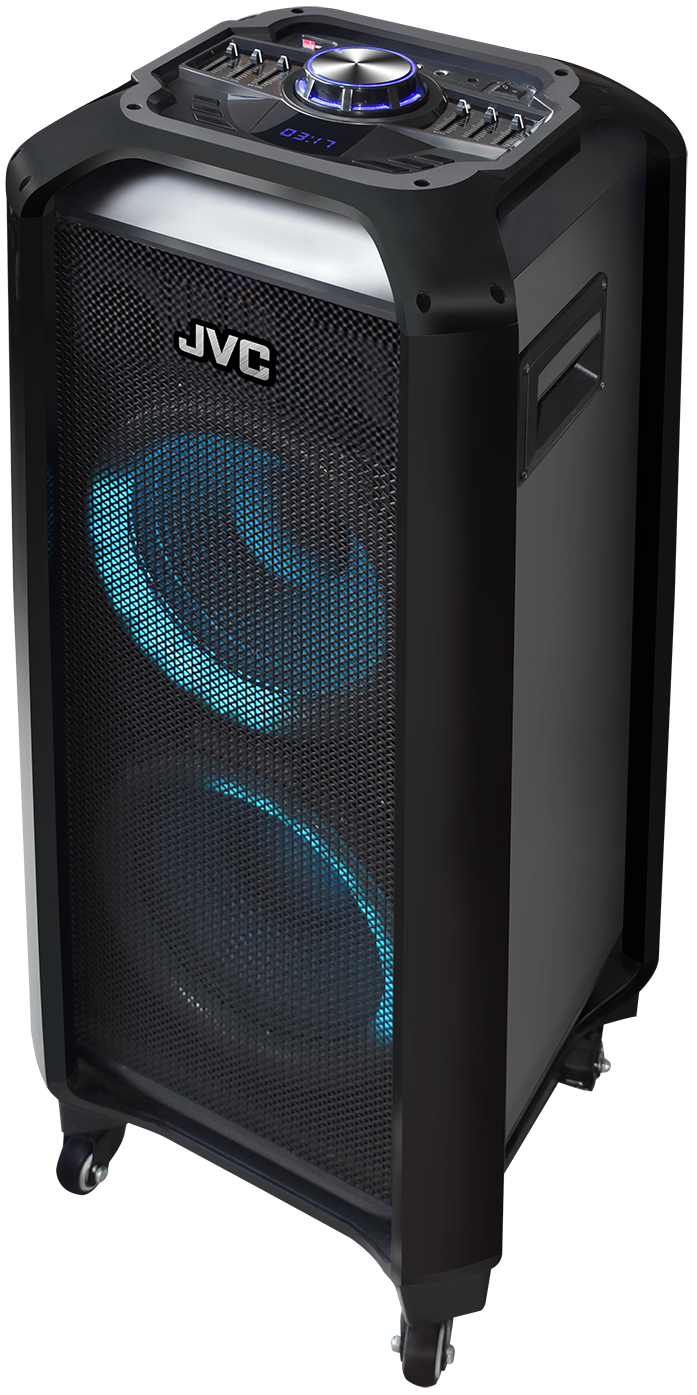
Product Overview:

| 1. Power On/Off 2. USB Input 3. microSD (TF) Input 4. AUX Input 5. Microphone 1 Input 6. Microphone 2 Input 7. Instrument Input 8. Charging Port DC15V, 2A (Connect adaptor here for charging) 9. Microphone Echo Effect Adjustment 10. Microphone Volume Adjustment |
11. Instrument Volume Adjustment 12. Mode Button (Switch between BT/AUX/USB/microSD13. Microphone Priority/ Lights On/Off 14. Record 15. Previous/ Play/Pause/ Next 16. Volume Control 17. Mid Range Adjustment 18. Treble Adjustment 19. Bass Adjustment |
Note:
- The Bass, Mid, and Treble sliders work for Bluetooth, USB, microSD, FM, and AUX modes.
- The echo effect is only applicable for Microphone input.
Remote Control:
The remote control uses 2x AAA batteries (provided separately).
Please ensure correct polarities when inserting batteries.
Note: The On/Off Switch on the unit must be set to the On position for the remote control buttons to work.

| 1. Mute Button 2. Power (On/Stand by) Button 3. 0-9 Track Select 4. Record/ Scan Button 5. Mode Button(Switch between BT/AUX/USB/MicroSD/FM) 6. Song Loop (Repeat song) |
7. Previous Folder/ Loop(Repeat) Folder/ Next Folder 8. Previous/Next 9. Play/Pause 10. Volume +/ Volume – 11. Equaliser (Switch between Rock/Jazz/Classic/Pop/Normal/ Scene) |
Charging the Speaker and Turning On:
This speaker has a built-in rechargeable battery. Please charge the battery before first use and whenever the low battery indicator on the LED display lights up.
To charge the battery:
- Make sure the On/Off Switch on the unit is set to the Off position.
- Connect the Power Adaptor to the Charging Port on the top of the unit.
- Plugin the Power Adaptor into a suitable Wall Socket (see Technical Specifications for details). The red Charging Indicator on the top of the unit lights up and remains lit during charging.
- When fully charged, the Charging Indicator changes color to blue. Remove the Power Adaptor promptly. Do not overcharge.
- Now set the On/Off Switch to the On position to turn on the speaker. It is recommended that you set the volume to a minimum before connecting a device.
- You are now ready to use the speaker.
Connecting your BLUETOOTH Device:
Your speaker can play almost all Bluetooth devices by simply pairing the device to the speaker. Please follow these steps to properly pair your device to your speaker.
- Press the Mode Button until the words “BLUE” appear on the LCD screen.
- Navigate to the Bluetooth section on your device and select “browse for devices”.
- Look for the Bluetooth name ‘XS-N6111’ and press connect.
- You should hear a connection sound on your speaker and your device should display “connected”.
- Play the music from your device and adjust the volume on your device.
- Adjust the master volume on the speaker to your desired volume level.
Connecting your wired microphone (not included):
- Connect your ¼” wired microphone into the ¼” Microphone Input.
- Make sure your microphone is in the ON position and talk normally.
- Adjust the microphone volume to your desired volume level.
- Adjust the echo effect to your desired effect.
- Adjust the master volume as needed.
Connecting your guitar (or other ¼” instrument) (not included):
- Connect your ¼” plug from your guitar (or another instrument) into the ¼” instrument Input.
- Make sure your guitar (or another instrument) is in the ON position.
- Adjust the instrument volume to your desired volume level.
- Adjust the master volume as needed.
Connecting to wireless microphone device:
- Insert 2x AA batteries into the wireless microphone.
- Turn on the microphone. It is recommended to keep the Microphone Volume at a minimum initially, and then adjust as required.
- Adjust the Echo Adjustment on the unit as desired.
Note: Do not hold the microphone very near the speaker as it will cause a whistling sound.
Connecting your USB Device:
- Plug your (FAT32 formatted) USB stick or USB device into the USB input.
- The LCD display shows “USB”.
- Your speaker’s built-in MP3 Player will automatically play the next MP3 song on your USB device.
- Adjust the master volume as needed.
- Press the next track, previous track, and play/pause buttons as needed.
- Quickly press the repeat button if you want the current song to repeat over and over, Press it once again to end the repeat function and repeat play all the songs in the device.
- The maximum size of the device that can be connected is 32GB.
Connecting your MicroSD (TF) Card:
- Insert your (FAT 32 formatted) microSD card into the microSD input.
- The LCD display will show “TF”.
- Your speaker’s built-in MP3 player will automatically play the next MP3 song on your microSD card.
- Adjust the master volume as needed.
- Press the next track, previous track, and play/pause buttons as needed.
- Quickly press the repeat button if you want the current song to repeat over and over, Press it once again to end the repeat function.
- The maximum size of the device that can be connected is 32GB.
Recording onto your USB Device:
- Insert your (FAT32 Formatted) USB Stick into the USB input.
- Press and hold the record button until you hear a beep that indicates the start of the recording.
- Play your music devices and use the microphone as needed and your vocals will be recorded onto the USB device.
- To stop recording press and hold the record button once again until you hear a beep.
- Your recording will be saved onto your USB device.
- To play the recording, press the record button again.
Playing music from the built-in FM Radio:
- Press the mode button until “FM” appears on the LCD display.
- Press the Play/Pause Button on the unit or the Scan Button on the remote control to have the speaker scan and store all available FM radio stations in your area.
- Once the scan is completed, your available stations will be saved automatically to your speaker.
- Press the previous station or next station to select the preset station that you want to listen to.
- Adjust the master volume as needed.
