Panasonic ACXF55-26500 Room Air Conditioner Instruction Manual
Panasonic ACXF55-26500 Room Air Conditioner Instruction Manual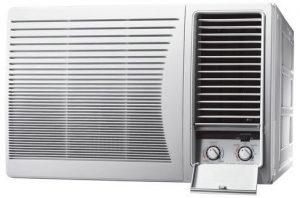

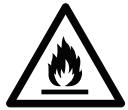
If the refrigerant is leaked, together with an external ignition source, there is a possibility of ignition


Before operating the unit, read these operating instructions thoroughly and keep them for future reference.
SAFETY PRECAUTIONS
Please observe these following safety precautions when using your air conditioner. Failure or negligence in observing these safety precautions could cause fire, electrical shock or personal injury.


INSTALLATION PRECAUTION
| Do not install, remove and reinstall the unit yourself. Improper installation may cause leakeage, electric shock or fire. Please engage an authorized dealer or specialist for the installation work. | |
| Do not add or replace refrigerant other than the specified type. It may cause product damage, burst and injury. If the supply cord is damaged, it must be replaced by the manufacturer, its service agent or similar qualified persons in order to avoid hazard. | |
| The appliance shall be stored in a room without continuously operating ignition sources (for example: open flames, an operating gas appliance or an operating electric heater) | |
| In cases that require mechanical ventilation, ventilation openings shall be kept clear of obstruction. | |
| Ventilate any enclosed areas when installing or testing the refrigeration system. Escaped refrigerant gas, on contact with fire or heat, can produce dangerously toxic gas. | |
| Confirm after installation that no refrigerant gas is leaking. If the gas comes in contact with a burning stove, gas water heater, electric room heater or other heat source, it can cause the generation of toxic gas. | |
| The room air conditioner must be earthed. Improper grounding could cause electric shock. Do not install the unit in a place where there are explosive gas leaks. Gas leaks near the unit could cause fire. Ensure that the drainage piping is connected properly. R32 Otherwise water will leak out. |


OPERATION PRECAUTION

- Do not modify the length of power cord or use an extension cord.
- Do not touch or operate with wet hands.
- Do not modify or damage the cord.
- Do not turn on the unit by inserting the power plug.
- Do not switch off the unit by pulling out the power plug.
- Avoid an extended period of direct airflow.
- Do not insert your fingers or other objects into the unit, rotating
- parts may cause injury.
- Do not try to repair the unit yourself
- Plug in properly before operating and use a specified power cord.
- If abnormal conditions (burnt smell, etc.) occur, switch off and remove the power plug.
- Confirm to authorized dealer or specialist on usage of specified
refrigerant type. Using of refrigerant other than the specified may cause product damage, burst and injury etc. - This appliance is not intended for use by persons (including children) with reduced physical, sensory or mental capabilities, or lack of experience and knowledge, unless they have been given supervision or instruction concerning use of the appliance by a person responsible for their safety. Children should be supervised to ensure that they do not play with the appliance.
Caution: This sign warns of risk of injury or damage to property
- Do not use the unit for other purposes, than its intended use.
- Do not remove the power plug by pulling the cord.
- Do not block the air intake and outlet vanes.
- Do not splash or direct water at the unit.
- Do not expose the unit to direct sunlight during operation.
- Do not operate the unit without the air filter installed or when the front intake grille has been removed.
- Do not place any objects on the unit.
- Do not operate any combustion equipment near the unit’s air flow area.
- Do not sit or step on the unit, you may fall down accidentally.
- Do not touch the sharp aluminium fin, sharp parts may cause injury.
- Do not use means to accelerate the defrosting process or to clean, other than those recommended by manufacturer.
- Switch off the breaker and unplug the unit from the socket if the unit will not be operated for a long period.
- Pay attention to any damages on the unit caused by extensive usage.
- Ventilate the room occasionally where the unit is installed.
- Unplug the power cord when cleaning the unit.
PARTS IDENTIFICATION
MAIN UNIT

Touch Control Panel
TYPES OF SIGNAL SOUND – One long “BEEP” and one short “BEEP” . (Sound from the main unit.)

- When the filter cleaning light flashes or brighten, it is recommended to clean the filter after dismantle. Filter cleaning light will flashes about 20 second, if didn’t press the “MAIN UNIT RESET“, it will keep brighten after flashes about 20 second.
- Please tap the “MAIN UNIT RESET“ button after the air filter is cleaned, unit will make a “BEEP” sound.(Filter cleaning light extinguish)
ACCESSORIES
Remote Control:

Be sure to observe the following:
- Aim remote control at control panel on air conditioner when operating.
- Do not drop or throw the remote control.
- Do not place the remote control in a location that is exposed to direct sunlight or next to a heating unit or other heat souces.
- Maximum Distance: 10 m

PREPARATION BEFORE OPERATING

NOTES:
- If the unit is not going to be used for an extended period of time, remove the power plug. Otherwise, approximately 2.5W of electricity will be used even if the unit has been turned off using the remote control.
- If operation is stopped, and to be restarted immediately, the unit will resume operation only after 3 minutes.
HOW TO INSERT BATTERIES
- Open the cover.
- Insert the two batteries.
- Close the cover.


Caution: Do not use rechargeable (Ni-Cd) batteries because such batteries differ from the standard dry cell batteries in shape, dimensions and performance.
ABOUT THE BATTERIES
- The batteries can be used for approximately one year.
- Be sure to replace the batteries with two new identical batteries.
- Remove the batteries if the air conditioner will not be used for an extended period of time.
OPERATION CONDITIONS
Use the air conditioner under the following conditions:
Indoor side |
Outdoor side | |||
D.B.T. |
W.B.T. |
D.B.T |
W.B.T. | |
Max. Temperature |
32 |
23 |
43 |
26 |
Min. Temperature |
16 |
11 |
16 |
11 |
NOTE: Humidity may exceed 90%
D.B.T.: Dry Bulb Temperature
W.B.T.: Wet Bulb Temperature
- Avoid installation in the following locations.
- Mechanical processing plants and other places with a lot of mechanical oil.
- High humidity areas such as laundry room and bathroom.
- Air conditioner COOLING/HEATING normal operating temperature.
- In side maximum temperature 30(30) ℃, lowest temperature 16(16)℃
- Out side maximum temperature 43(24) ℃, lowest temperature 16(0)℃
- NOTICE:
When the air conditioner is used at room temperature of 21 degrees or less, the temperature may be too low, and the air conditioner may be easily frosted. After frosting, it may be difficult to drain and may flow into the room - Operating temperature range.
Continuous operation at over 90% high humidity may create condensation and result in waterdrops on the intake and outlet vanes.
AIR CONDITIONER INSTALLATION
CHOOSING THE INSTALLATION LOCATION

- When installing, use the nearest power outlet. Make sure the power outlet is easy to reach so you can quickly disconnect your air conditioner in case of emergency.
- Ensure that the air conditioner is well supported, securely fastened, easily reachable and not obstructed.
- Aviod location with: salty or sulphurous air, draughts, dampness and flammable gas.
- If you install the drainage system, be sure to channel the concensed water to a suitable location.
- Covers, obstructions and unsteady support may cause excessive operating noise and vibration.
- The rear end of the air conditioner is splash proof. You don’t need to shield or cover it.
- Installation and maintenance should be done by competent person.
PREPARATIONS BEFORE INSTALLATION

Dimension
- There should not be any obstacles surrounding the unit.
- Prepare and installation hole slightly bigger than the cabinet size.
- Left and right side of the unit should be at least 15 cm
away from the wall. - The minimum installation height is 75cm.
(Based on IEC 60335-2-40, there is no restriction for r the minimum installation floor area since the refrigerant charges is less than 1.224kg.
CAUTION POINT DURING INSTALLATION

When installing air conditioner at glass window or thin partition, fix the vertical and side supporting bar to the concrete wall in order to support the weight of the air-conditioner and reduce the vibration that is being transferred to the glass window or thin partition.
This can minimize the noise problem caused by improper installation.
- Proposed to use 1/8” x 1-11/4” “angle-aluminium for installation frame and side supporting bar.
INSTALLATION PROCEDURES
- Remove the rear cabinet screws and chassis locking 1 bracket from the cabinet. Save for later use.
- Slide the chassis out from the cabinet.
- Place the cabinet into the installation hole.
- Slide the chassis into the cabinet.
- Lock the chassis to the cabinet reusing the chassis locking bracket.
- Depending upon the location of AC outlet, route the AC cord to either left or right side before installing the front grille.
- Attach the front grille to the cabinet and fasten it with a screw.
- Attach air filter to the front grille. (see anti-bacterial filter installation instructions included in this package).
- Control panel keep it horizontal, the panel arm both sides inwardly adapted to match the panel pivot point with the body support portion at the same time.
- Press down control panel and close the cover.


REMOVAL OF FRONT GRILLE
- Open the Intake Griille until over 90°
front grille fulcrum can remove from Grille force arm. - Remove the air filter.
Tilt up and pull out the air filter by the holder - Remove the front grille.
- (A) Remove the screw on the front grille.
- (b) At the bottom right side of the front grille, press inward on the cabinet near the power cord, and pull the grille outward to the right until right tab releases.
- (c) At the bottom left side, push inward on the cabinet and pull the grille outward to the left to release the left tab. Do not pull the bottom edge towards to you for more than 3 inches to prevent the two top tabs from damage.
- (d) Slide the front grille upwards to loosen the two top tabs from slots at the top of the cabinet.


ELECTRIC WORK
- Always use at the rated voltage and with a specific air conditioning circuit.
- This equipment must be earthed and strongly recommended to be installed with Earth Leakage Circuit Breaker (ELCB) or Residual Current Device (RCD). Otherwise, it may cause electric shock or fire in case of malfunction.
- A 16 Ampere time delay fuse or circuit breaker is required.
- Nominal cross sectional area of power supply wire must be 3 core x 1.5 mm2 or above.
- The power supply must be from an independent circuit.
- All electrical installations must be made in accordance with local wiring and safety regulation wherever applicable.
- There must be a double pole switch with a minimum of 3.5 mm contact gap in the fixed installation circuit.
- Please engage and authorized dealer or specialist for the installation work.
CONDENSED WATER DRAINAGE
This air conditioner are “INVERTER” model, in order to prevent the water overflows from the machine, please make sure provide an outside drainage by using the following the procedure .
- Remove the chassis locking bracket from the cabinet. Then slides the chassis out from the cabinet.
- Install the drain pan.
Install the drain pan at the right corner of the cabinet using 2 screws. - Connect a drain hose. Fit the drain hose to the drain pan. Underside view with drain pan and hole in place.
- Slide the chassis back into the cabinet. Lock the chassis to the cabinet reusing the chassis locking bracket. Then reinstall the cabinet to the chassis.


NOISE CONSIDERATION

- Select an installation location that can support the weight of the air conditioner and one that will not cause increased operating noise and vibration.
- Ensure that when installed, airflow and noise from the rear side of the unit (outdoor) do not disturb neighbouring elements.
- Obstacles placed in front of the air outlet on the rear side of the unit (outdoor), or covers placed over it will cause excessive noise and deterioration in performance.
TRANSFERRING
- Repositioning or transfer of the air conditioner due to renovation or moving requires an additional service charge. Please consult your dealer before moving.
AIR CONDITIONER OPERATION
OPERATING THE UNIT

- Start operation by pressing OPERATION.
- The operation will turn on and the display panel will light up.
- To stop the operation, press the OPERATION again.
- The unit will stop operating and the display panel light will turn off
SETTING DISPLAY TEMPERATURE


Press TEMP/TIMER

NOTES:
- The latest temperature setting will be memorized and will appear on the display the next time it’s turned on.
- The display temperature selection is for display purpose only and does not indicate actual room setting temperatures. Your room temperature may not necessarily match the displayed temperature
SELECTING OPERATION MODE
Mode


- Press MODE to select the desired operation.
(The indicator will light up and a “beep” sound will indicate changing setting) - AUTO mode
Air conditioners are automatically selected according to indoor and outdoor temperatures. - COOL mode
To set room temperature to your preference of cooling comfort. - HEAT mode
To set room temperature to your preference of heating comfort. - DRY mode
DRY mode unit operates at low fan speed to give a gentle cooling operation.
SELECTING FAN SPEED
FAN


Press FAN SPEED selection button to choose fan speed level of the fan.
(The indicator will light up and a “beep” sound will indicate changing setting).
If air conditioner automatically selects COOL or DEHUMIDIFYING mode and the fan speed is at AUTO speed, it will operate the “Self-cleaning” function to clear the dust on Heat exchanger,(Defer air flow for 40 seconds or intermittently operate)
ADJUSTING HORIZONTAL AIRFLOW DIRECTION

Press AIR SWING button to select air swing direction angle.
(The indicator will light up and a “beep” sound will indicate changing setting)
Press the upper button to adjust left and right airflow direction.
Press the lower button to stop AIR SWING.
POWERFUL OPERATION
POWERFUL


To reduce / increase temperature quickly :
Press POWERFUL button, after powerful is selected, the operation will go on for 30 minutes, after that it will shift back to previous operation mode.
If you want to cancel this operation, press powerful button once more,
SETTING THE OFF TIMER
TIMER-OFF
SET

When the air conditioner is OFF:
Press the ON TIMER button to set the timer.
Press the same button until the preferred hour of operation is reached.
(The TIMER indicator light will blink to await for setting)
Press TIMER SET button to complete the setting. At this time, the TIMER indicator light is steady instead of blinking.
NOTE:
it is unavailable to set ON TIMER and OFF TIMER simultaneously. The timer figure will change according to the time remaining.
QUIET OPERATION
QUIET

To reduce / increase temperature quickly :
Press QUIET button.
If you want to cancel this operation, press QUIET button once more.
SETTING THE ON TIMER
TIMER-ON
SET
When the air conditioner is ON:
Press the OFF TIMER button to set the timer. Press the same button until the preferred hour of operation is reached. (The TIMER indicator light will blink to await for setting) Press TIMER SET button to complete the setting. At this time, the TIMER indicator light is steady instead of blinking.
NOTE:
it is unavailable to set ON TIMER and OFF TIMER simultaneously. The timer figure will change according to the time remaining.
CANCEL OFF TIMER SETTING
CANCEL

Press the CANCEL button to cancel the timer setting. The CANCEL indicator light will turn off. However the temperature remains displayed.
HELPFUL INFORMATION & ENERGY SAVING HINTS
HELPFUL INFORMATION
Auto Restart Control
- Operation will automatically resume under the previous operation mode.
If the unit was set to TIMER mode or SLEEP mode, operation will not resume automatically.
Tim er Setting
- When power failure occurs, the timer setting is cancelled. Once power returns, reset timer.
ENERGY SAVING HINTS
- Setting the temperature 1 C higher save 10% electricity costs.
- Clean the ait filter every 2 weeks. Regular cleaning of the air filter preserves efficiency.
- Keeping openings closed keeps cool air in and hor air out.
- Avoid direct sunlight and heat.
- For health reason do not overcool your room.
- Your air conditioner’ s cooling capacity should match your room size.
CARE AND MAINTENANCE

Always turn off the air conditioner and the main power supply before cleaning the unit.
Switch off the power supply if the unit is not going to be used for a long period of time.

- Clean the cabinet, front grille with mild soap or detergent and lukewarm water.
- The front intake grille can be easily removed for cleaning purposes (refer to Remove the front intake grille procedures). Gently wash it with water and a sponge.
- The filter can be easily cleaned using a vacuum cleaner. Vacuum the front of the filter and then wash the rear with water. If it is badly spoiled, wash with a mild household detergent.
- Do not clean with benzene, thinner, scouring powder or cloth\ soaked in caustic chemicals.
- If the unit is extremely dirty, heat transfer is less effecient and the unit may not cool effectively. Contact Shun Hing Electric Service Center Ltd. for an annual check. (Annual check is not covered by the warranty.)
- If the air filter becomes clogged with dust, the cooling capacity will drop, and 6% of the electricity used to operate the air conditioner will be wasted.
NOTE:
Do not dry the front panel or the air filter in direct sunlight.
(Exposure to direct sunlight may discolour deform the panel.)
PRE-SEASON INSPECTION
Is the discharged air cold?
After 15 minutes of operation, it is normal for the temperature difference between intake and outlet air to be more than 8°C for cooling.
Are the air intake and outlet vanes of the indoor and outdoor side obstructed?
Are the remote control batteries weak?
RECOMMENDED INSPECTION
Usage over several seasons will reduce performance as the unit becomes dirty. A dirty unit may produce foul odours and dust may clog the dehumidifying drainage. Seasonal inspection is recommended in addition to regular cleaning. Consult Shun Hing Electric Service Centre Ltd.,
8 BEFORE CALLING FOR SERVICE
BEFORE

Check the following points before calling for repairs or service. If the malfunction persists, please contact Shun Hing Electric Service Centre Ltd.,
Condition 1
If the unit is too noisy during operation.
The following sounds are normal during operation:
- A low humming sound indicating that the unit is operating.
- A soft clicking sound when the compressor turns on and off.
- A flowing sound due to circulation of the refrigerant when the compressor is turned on.
- A splashing sound indicating condensation in the condenser coil.If you hear other noises, please consult Shun Hing Electric Service Centre Ltd.,
Condition 2
If the unit does not operate.
- The main power cord is not plugged in.
- The main circuit breaker has tripped.
- Remote control batteries are weak.
Condition 3
If the unit does not cool properly.
- The room is too big for the unit’ s capacity.
- The ventilation lever is set to OPEN
- The air circulation is impeded by curtains or furniture.
- After 15 minutes of operation, it is normal for the temperature difference between intake and outlet air to be more than 8°C `for cooling.
Condition 4
If water drips off the rear of the unit.
- Humidity is high.
- Condensed water is overflowing.
- To rectify the problem, mount an optional drain pan to the unit
Condition 5
If water drips inside the room.
- The unit is tilted inward. To rectify this, tilt the unit slightly outward.
- Mount the optional drain pan if you prefer.
The drain pan may be blocked.
To call Shun Hing Electric Service Centre Ltd. IMMEDIATELY Turn off the power and contact Shun Hing Electric Service Centre Ltd. as soon as any of the following events occur.
- The circuit breaker frequently trips or the fuse blows regularly.
- If water or foreign objects have accidentally entered the air conditioner.
- If there is abnormal sound during operation
Information for Users on Collection and Disposal of Old Equipment and used Batteries

Note for the battery symbol (bottom two symbol examples):
This symbol might be used in combination with a chemical symbol. In this case it complies with the requirement set by the Directive for the chemical involved
NOTE:
- The enclosure opposing the room side is splash proof (IPX4).
- Do not install this appliance in a laundry room or other locations where water may drip from the ceiling, etc.
- If the supply cord is damaged or need to be replaced, it must be replaced by the manufacturer or its service agent or a similarly qualified person in order to avoid a hazard.