HP 43M07UT Notebook User Manual
hp 43M07UT Notebook

Congratulations on becoming the owner of this notebook, the finely designed notebook.
You will have a delightful and professional experience in using this exquisite notebook.
We are proud to tell users that this notebook is thoroughly tested and certified by our reputation for unsurpassed dependability and customer satisfaction.
Unpacking
First, unpack the shipping carton and check all items carefully. If any item contained is damaged or missing, please contact your local dealer immediately. Also, keep the box and packing materials in case you need to ship the unit in the future. The package should contain the following items:
- Notebook
- Quick Start Guide
- AC/DC adapter and AC power cord
- Optional carry bag
Product Overview
This section provides the description of basic aspects of the notebook. It will help you to know more about the appearance of this notebook before using it. Please be aware that the figures shown here are for reference only.
Top-open View
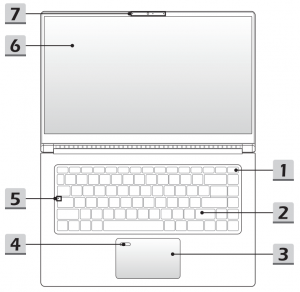

- Power Key/ Power LED
Power Key - Press this key to turn the notebook power ON.
- While the notebook is turned on, press this key to force the computer into sleep state. Press again to wake up the system from sleep state.
- Long press this key and follow the on-screen instruction to turn the notebook power OFF.
Power LED
- LED goes off when the notebook goes to the sleep
- state. LED goes off when the notebook is turned off.
- Keyboard
Keyboard The built-in keyboard provides all the functions of a notebook keyboard. Refer to How to Use the Keyboard for details. - Touchpad
- Fingerprint Sensor (optional)
Use the fingerprint sensor to set up user’s fingerprints on the notebook, and use it to unlock the notebook. Refer to “How to Set Up Windows Hello Fingerprint Login” in
chapter 3 for details. - Status LED
Caps Lock
Glows when the Caps Lock function is activated - Touch Screen Monitor (optional)
This optionally equipped 10-point multi-touch screen monitor allows users to interact with the notebook by using fingers or stylus. - Webcam/ Webcam LED/ Internal Microphone
• This built-in webcam can be used for picture taking, video recording or
conferencing, and so on.
• Webcam LED indicator, next to the webcam, blinks when webcam function is activated; LED goes out when this function is turned off.
• The built-in microphone shares the same function with an external one. - Power Connector
This connector is to connect the AC/DC adapter and supply power for the notebook. - USB 3.2 Gen 2 Port (Type C) (with DisplayPort function) (optional)
USB 3.2 Gen 2, the SuperSpeed USB, delivers the higher interface speeds for connecting various devices, such as storage devices, hard drives, or video cameras, and offers more advantages over high-speed data transferring. The slim and sleek USB Type C connector features reversible plug orientation and cable direction, and supports 5V/3A portable charging power when AC power is connected. And it also supports scalable performance to future-proof solution, including USB 3.x, DisplayPort, Audio. - Audio Port Connectors
Make high quality sound blaster with stereo system.Combo Audio Connector - A connector for headsets with attached microphones
- The Combo Audio Connector supports 4-Pole 3.5mm headphone jack
- HDMI Connector
HDMI (High-Definition Multimedia Interface) technology is the industry-leading interface and de-facto standard connecting high-definition (HD) and ultra high definition (UHD) equipment. - USB 3.2 Gen 2 Port
USB 3.2 Gen 2, the SuperSpeed USB, delivers the higher interface speeds for connecting various devices, such as storage devices, hard drives, or video cameras, and offers more advantages over high-speed data transferring. - Status LED
Power - Glowing white when the notebook power is turned on.
- LED flashes when the notebook goes to the sleep state.
- LED goes
Battery - LED glows when the battery is being charged.
- LED turns glowing amber while the battery is in low
capacity status. - Continuously blinking if the battery fails. If the problem
persists, please contact your local authorized retailer or
service center. - Battery LED goes out when it is fully charged or when the AC/DC adapter is disconnected.
Rear Side View
- Ventilator
The ventilator is designed to cool the system. DO NOT block the ventilator for air circulation.
Bottom Side View
- Ventilator
The ventilator is designed to cool the system. DO NOT block the ventilator for air circulation. - Stereo Speakers
This notebook may be equipped with built-in stereo speakers which deliver the high quality sound, and supports the HD audio technology. - Battery Reset Hole
Whenever the system firmware (EC) is upgraded or the system hangs, please 1) power off the notebook; 2) remove the AC power; 3) use a straightened paperclip and insert it to this hole for 10 secs; 4) connect the AC power; 5) power on the notebook. - SSD Slot
This notebook is equipped with a SSD M.2 slot that supports the SSD device with PCIe interface. Contact the authorized dealer or service center for product service.
How to Use the Keyboard
This notebook provides a full functioned keyboard. To ensure that the keyboard will be functioning properly, it is a must to install the necessary applications before using the keyboard function keys.
Use the FN keys on the keyboard to activate the specific applications or tools. With the help of these keys, users will be able to work more efficiently
Power Key/ Enter Sleep Mode
- Press this key to turn the notebook power ON.
- While the notebook is turned on, quick press this key to force the notebook into sleep state (depending on the system configuration) Press again to wake up the system from sleep state.
- Long press this key to force shutdown the notebook if needed.
You can find the Windows Logo key on the keyboard which is
used to perform Windows-specific functions, such as opening the Start menu and launching the shortcut menu.Enable Quick Fn Launch Keys
- This notebook is equipped with a set of Quick FN Launch Keys. Each function key, located on F1 to F12, has a built-in function that is available to use with an easy single press.
- Users are allowed to enable or disable the Quick Fn Launch Keys by pressing FN and ESC keys.
- Read the FN Lock LED indicator, located on the ESC keycap, to learn the function status.
LED on: Standard FN combination keys enabled.
LED off: Quick FN Launch Keys enabled.
Use Quick Fn Launch Keys
Speaker Settings - f1: Mute the built-in speakers.
- f2: Decrease the built-in speaker’s volume.
- f3: Increase the built-in speaker’s volume.
Touchpad
Press to enable or disable the touchpad function.Microphone - Press to enable or disable the microphone function.
- Microphone is turned off under default settings.
Webcam - Press to turn ON/ OFF the Webcam function on.
- Webcam is turned off under default settings.
MSI Center - This notebook may be pre-installing with a versatile utility, MSI Center for BP, providing users an astonished and efficient solution in multitasking.
- Press repeatedly to switch between High Performance/ Balanced/ Silent/ Super Battery scenarios according to your preference.
- Refer to the Notebook Software Application Manual for further details.
Keyboard Backlight LED Settings Press repeatedly to select a backlight LED level according to your preference. LCD Settings - f9: Decrease the LCD brightness.
- f10: Increase the LCD brightness.
Switch Display Switch the display output mode between the LCD, external monitor and both.
Screen Rotation Rotate the screen upside down for 180 degrees. Press again to rotate the screen back to its default position.
Screen Capture
It is a must to use FN and prtscr keys to take a screen capture
to the clipboard, and then be pasted into an editing program.Use Multiple Monitors
If users connect an additional monitor to the notebook, the
system will automatically detect the external monitor connected.
Users will be allowed to customize the display settings.- Connect the monitor to the notebook.
- Press and hold the Windows key, and then press [P] key to bring up [Project].
- Select how you want your display to project on the second screen from the selections of PC screen only, Duplicate, Extend, and Second screen on
Specifications
Physical Characteristic Dimension 356.8 (W) x 233.8 (D) x 18.9 (H) mm Weight 1.6 kg CPU Package FP6 Mobile Processor The latest AMD® Ryzen™ Processor Family Memory Technology DDR4, 3200 Memory 2 x SO-DIMM slots Maximum Up to 64GB Power AC/DC Adapter 1 x 65W, 19V
Input: 100-240V~, 50/60Hz
Output: 19VBattery 3-cell RTC Battery Yes Storage SSD 2 x M.2 slot, supports PCIe SSD device I/O Port USB 3 x USB 3.2 Gen 2 USB (optional) 1 x USB 3.2 Gen 2 Type C (with DisplayPort function) - 4K display monitor output
- Supports maximum 5V/3A portable charging power output when AC or DC power is connected
Audio 1 x Mic-in/ Headphone-out combo Video 1 x HDMI Card Reader 1 x MicroSD Communication Port Wireless LAN Supported Bluetooth Supported Display LCD Type 15.6″ FHD LED panel Touch Screen (optional) 10-point multi-touch screen monitor optionally supported Video Graphics AMD Radeon™ graphics Webcam Resolution HD Audio Internal Speakers 2 x stereo speakers Security Trusted Platform Module (optional) TPM 2.0 is a hardware-based encryption device that collaborates with software measures to form a more advanced and secure data protection.
TPM functionalities can be de/activated in BIOS settings where appropriate.
With professional versions of Windows, BitLocker is the default console available for TPM communications serving data encryption purposes.`


Front Side View

Right Side View

1. Card Reader
Check the Specifications for details.
2. USB 3.2 Gen 2 Port
USB 3.2 Gen 2, the SuperSpeed USB, delivers the higher interface speeds for connecting various devices, such as storage devices, hard drives, or video cameras, and offers more advantages over high-speed data transferring.


