Panasonic EW1611 Oral Irrigator Instruction Manual
Panasonic EW1611 Oral Irrigator Instruction Manual

Safety precautions
To reduce the risk of injury, loss of life, electric shock, fire, and damage to property, always observe the following safety precautions.
Explanation of symbols
The following symbols are used to classify and describe the level of hazard, injury, and property damage caused when the denotation is disregarded and improper use is performed.


The following symbols are used to classify and describe the type of instructions to be observed.


Preventing accidents
– Doing so may cause an accident or injury due to accidental ingestion of removable parts.

– Failure to do so may cause suffocation or other accidents to children or infants.

Power supply
– Doing so may cause electric shock or injury.

Do not use the appliance near a bath tub or inside a shower room.
– Doing so may cause electric shock or fire.

Do not damage, modify, forcefully bend, pull, twist, or bundle the cord.
Also, do not place anything heavy on or pinch the cord.
– Doing so may cause electric shock or fire due to a short circuit


Do not use in a way exceeding the rating of the household outlet or the wiring.

Always ensure the appliance is operated on an electric power source matched to the rated voltage indicated on the appliance. Fully insert the power plug.

The supply cord cannot be replaced. If the cord is damaged, the appliance should be scrapped.
In case of an abnormality or malfunction Immediately stop using and remove the power plug if there is an abnormality or malfunction.

- The main unit or cord is deformed or abnormally hot.
- The main unit or cord smells of burning.
- There is an abnormal sound during use of the main unit or cord.
→ Immediately request inspection or repair at an authorized service center.
This product
Do not drop or subject to shock.

Do not modify, disassemble or repair.
→ Contact an authorized service center for repair.

This appliance is not intended for use by persons (including children) with reduced physical, sensory or mental capabilities, or lack of experience and knowledge, unless they have been given supervision or instruction concerning use of the appliance by a person responsible for their safety. Children should be supervised to ensure that they do not play with the appliance.

Cleaning
Always unplug the power plug from a household outlet when cleaning the power plug.

Regularly clean the power plug to prevent dust from accumulating (once every half a year).
Disconnect the power plug and wipe with a dry cloth.


Preventing damage to teeth and gums People who are unable to operate should not use this appliance. People with weak oral senses should not use this appliance.

People who may have periodontal disease, have teeth being treated, or concerned about symptoms within their mouth should consult a dentist before use.

This product
Never use for a purpose other than oral cleaning.

Do not fill the tank with water warmer than 40 °C.

Do not share nozzle with your family or other people.

Note the following precautions
Do not allow metal objects or trash to adhere to the power plug.
Do not wrap the cord around the appliance when storing.

Disconnect the power plug from the household outlet when not using for extended period of time.
Disconnect the power plug by holding onto it instead of the cord.
After use, always care for and clean the appliance. (See page 10.)

Intended use
Notice
- Do not put salt, mouthwash or other chemicals into the water tank. Doing so may cause malfunction.
- Do not dry the main unit with a dryer or a fan heater. Doing so may cause malfunction or deformation of the parts.
- Do not wipe with thinners, benzine, alcohol etc. Doing so may cause malfunction, cracking or discoloration of the parts.
- Store the appliance in a place with low humidity after use. Failure to do so may cause malfunction.
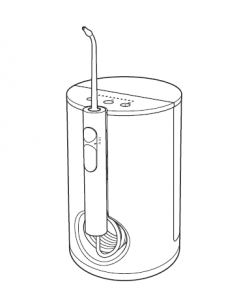
Parts identification

A Handle
- Stop/Jet switch
- Jet mode
- Stop
- Nozzle release button
- Nozzle
B Main unit
- Cord
- Power plug
- Suction hose
C Water tank
- Upper water level limit
- Water tank cap
D Operation panel
- Water pressure level LED indicator (1~10 levels)
- Power switch “ ”
- Water pressure regulator switch
E Nozzle (x2)
• The nozzle is a consumable.
- Identification ring (white & blue) Accessory
F Nozzle stand
There may be moisture inside the main unit (water tank and suction hose) left from the distilled water used for product testing
(The shape of the power plug differs depending on the area.)
How to use
On sink
- Place the main unit on a flat and stable surface.
- Plug in the power plug.
• The power cord can be pulled out from either the right or the left.

- Open the water tank cap, remove the water tank, and fill it with water.
• Always use new tap water or lukewarm water.
• If water is cold, use lukewarm water with temperature 40 °C or below.
• When filling water, be sure not to exceed the upper water level limit. - Set the tank to the main unit firmly, and attach the water tank cap.
- Insert the nozzle firmly into the handle until it clicks. Make sure it is fixed firmly.
- Select the water pressure level.
• Ensure the Stop/Jet switch is set to “ ” (Stop)
1 Press the power switch “ ”. (The water pressure level LED indicator lights on.)
• The power will be cut off after about 10 minutes to avoid forgetting to turn off.
(This function is to avoid forgetting cutoff.)
2. With the nozzle facing the basin, set the Stop/Jet switch to “ ” (Jet mode) to jet water.
3 Press “+” or “-” on the water pressure regulator switch until the desired flow intensity is reached.
• Keep pressing “+” or “-” will continuously change the water pressure. - Place the nozzle in your mouth, close your mouth gently, and set the Stop/Jet switch to “ ” (Jet mode).
If you want to pause jetting, set the Stop/Jet switch to “ ” (Stop). - After use, set the Stop/Jet switch to “ ” (Stop) and turn off the power switch “ ”, and then move the nozzle away from your mouth.
• The water pressure level LED indicator flashes. (The indicator will go out after 1 minute.)
• The last selected water pressure level will be remembered, from which the oral irrigator will start next time


Notes
- Do not push the tip of the nozzle too hard against the teeth or gums.
- Since plaque adhering to the surface of teeth cannot be removed only with water jet, brushing is always necessary. It is recommended to clean inside your mouth with water jet
after brushing your teeth. - Do not turn on the power switch “ ” when the water tank is empty (except discharging the water inside the main unit).
- When the Stop/Jet switch is set to “ ” (Stop) for more than 1 minute, turn off the power switch “ ”.
- The recommended operating temperature of oral irrigator is 5 °C – 40 °C. If the indoor temperature is over or lower than the recommended temperature, the oral irrigator may stop
operating.
Cleaning the teeth
Interdental cleaning
- Direct the water jet onto the space between the teeth.
- Direct from the front and rear sides of the teeth

Periodontal pocket cleaning
- Aim the water jet at the space between the teeth and gum.
- Slowly shift the water jet along the gum.
- Clean the front and back of the teeth and behind the molars as well.
- If you are concerned about sensitive gums, clean with a gentle water jet setting.

Gum care
- Stimulate the gums with water jet.
- If you are concerned about sensitive gums, stimulate with a gentle water jet setting.

After use
- Open the water tank cap, remove the water tank, and throw away the remaining water.
• While removing the water tank, press the main unit by hand.
• Change the water every time when you use the irrigator.
• Remove the dirt inside the water tank with a sponge brush etc.
• The water tank can be washed in a dish washer.
• The water tank cap cannot be cleaned in a dish washer. - Install the water tank, and turn on the power switch “ ”.
- With the nozzle facing the basin, set the Stop/Jet switch to “ ” (Jet mode) to remove the remaining water from the main unit.
- When there is no water coming out, set the Stop/Jet switch to “ ” (Stop), and turn off the power switch “ ”.
- Disconnect the power plug from the household outlet.
- Push the release button on the body to release nozzle off, then wash it. Keep the
• The nozzle stand cannot be cleaned in a dish washer. release button - Clean the handle, and put it back into the main unit.


When cleaning the nozzle and handle
- Do not use lukewarm water exceeding 50 °C.
- Use neutral kitchen detergent and rinse well with water to ensure no detergent remains after cleaning.
- Wipe away the water with a towel or the like, keep the product in the dry place.
- The nozzle cannot be cleaned in a dish washer.
When wiping stains away from the main unit with a cloth that has been soaked in soap water and then wrung out
- Never use thinners, benzine, or alcohol. (Doing so may cause malfunction, cracking or discoloration of the parts.)
- Do not wash the main unit with water.
- Use cotton swabs to clean any part that is inaccessible to the cloth.

When the identification ring is coming off, as shown in the right figure, align the nozzle with any direction of the identification ring to install it
- Even if the identification ring is not attached, it does not affect the performance of the nozzle.

Troubleshooting

If the problems still cannot be solved, contact the store where you purchased the unit or a service center authorized by Panasonicfor repair.
Specifications
| Power Source | See the name plate on the product (Automatic voltage conversion) |
| Power consumption | 18 W |
| Date of production | See engraving on the commodity |
| Water tank volume | Approx. 600 mL (the water pressure level “10”, 115 seconds) |
| Dimensions | Main unit: 280 (H) × 125 (W) × 140 (D) mm (Including nozzle) 200 (H) × 125 (W) × 140 (D) mm (Not including nozzle) |
| Suction hose length | Approx. 1 100 mm |
| Mass | Main unit: Approx. 940 g (Including nozzle) |
This product is intended for household use only.
Changing the nozzle (Sold separately)
- If the tip of nozzle gets deformed (or abrasion), please replace with a new nozzle.
- The nozzle is a consumable. The nozzle should be replaced with a new one every 6 months or so due to hygiene reasons, even if its shape is unchanged (or without abrasion).
- Optional nozzles with identification ring to allow several persons to share the main unit.
Changing the nozzle (Sold separately)


Deformed (worn) nozzle (tip) New nozzle (tip)
| Part number | Replacement Nozzle for EW1611 | |
| WEW0982 | Nozzle | |