Honeywell BWRR100D BW RigRat Multi-Gas Monitor User Guide
Honeywell BWRR100D BW RigRat Multi-Gas Monitor

User Interface
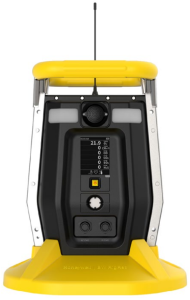
Functions are controlled via the front-panel button. The display shows information such as monitored threats, real-time readings and measurement units, alarm type (when in alarm, including cal. overdue), battery status, datalog (if on), and radio and connection quality (if available).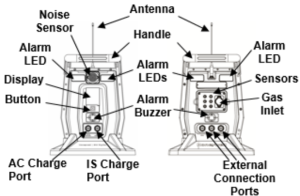
Note: Pumped version shown here

Charging The Instrument
Always fully charge the battery before use. In safe settings, use the AC Charge input with the included power adapter. Align the connector and plug and then press in and turn the ring until it clicks.
Make sure the charger is firmly attached. Then connect the AC Adapter’s plug to the charger, and plug its transformer into an AC outlet. For intrinsically safe charging via a SolarPak or Hazardous Area Charger, connect to the IS Charge input. While charging, the “battery” icon along the top of the screen is animated. When the battery is fully charged, the icon shows a full battery and does not animate. (Consult the User’s Guide for more details on charging.)

Download The User’s Guide
The free BW RigRat User’s Guide is the complete manual for operating and maintaining the instrument. It must be carefully read by all individuals who have or will have the responsibility of using, maintaining, or servicing the product.
Download the BW Rigrat User’s Guide and other resources here:
https://www.honeywellanalytics.com/en/ products/bw-rig-rat

WARNINGS
Read Before Operating
The User’s Guide must be carefully read by all individuals who have or will have the responsibility of using, maintaining, or servicing this product. The product will perform as designed only if it is used, maintained, and serviced in accordance with the manufacturer’s instructions.
Note: When the battery’s charge falls below a preset voltage, the instrument beeps and flashes once every minute, and the “empty battery” icon blinks on and off once per second. You should recharge the battery.
Turning The Instrument On/Off
With the instrument off, press and hold the button through the countdown until the audible alarm stops, and then release. During startup, it tests the battery, buzzer, vibration alarm, LEDs, and internal functions. Then the main reading screen is then shown.
Note: During a pumped BW RigRat’s startup, startup pauses and the display instructs you to place your finger over the pump inlet to test the pump.

Turning The Instrument Off
Press and hold the button for the 3-second countdown to shutoff When the countdown ends, release your finger from the button. The instrument is now off.
Bump Test
- In Operation Mode, hold the button for 3 seconds at “Bump Due” screen to start a bump test. Then follow onscreen instructions.
- The audible and visible alarms are tested.
- Hold the button for 3 seconds to acknowledge.
- Attach test gas. For a pumped model, connect a hose from the gas source to the filter inlet. For a diffusion model, press the calibration cap into place over the sensors and then connect gas.
- Start the test gas flow.
- When the bump test is complete, the display shows bump test results.
- Click the button to end.
- Turn gas off.
- After bump testing is complete, the screen displays when the next bump testing is due and automatically progress to the main display screen.
Calibration
- At the main screen, hold the button through the two 3-2-1 countdowns (“Powering Off” and “Entering Menu”) and then release it.
- Supply the password.
- Hold the button to select “Start Calibration.”
- If prompted, attach zeroing gas. For a pumped model, connect a hose from the gas source to the filter inlet. For a diffusion model, press the diffusion cap into place over the sensors and then connect to a gas source.
- Start the gas flow.
- After zeroing is complete, follow instructions for applying gas to the sensors. Connect calibration gas in the same manner as with zeroing gas.
- After all calibrations are done, the screen displays when the next calibrations are due. It then automatically progresses to the main display screen.
BW RigRat Basic Navigation
With the instrument on, navigate the informational screens and perform bump testing by either clicking or pressing and holding the button. Follow instructions on the screen. Some screens shown here are optional. More details are covered in the User’s Guide.
Note: Calibration is reached from the main screen (refer to the procedure above).

Important!
- If the mesh radio is to be used, attach the antenna by screwing it onto its base.
- Protect sensors on a diffusion model by pressing the protective rain cover into place.
- Protect power and other ports by covering them with their caps when they are not in use.


The Honeywell Device Configurator Mobile App for mobile devices provides easy control over the BW RigRat’s settings and functions. After pairing the BW RigRat with your mobile device, change settings, manage firmware updates, examine datalogs, upload configuration data, and more.
Download the free Device Configurator Mobility App. Then follow the instructions.
Honeywell Hatchpond House, 4 Stinsford Rd Poole, Dorset BH17 0RZ, UK
Phone: +44 1202676161 Fax: +44 (0)1202 645555 Email:
www.honeywellanalytics.com
