Honeywell T4H110A1021 T4 Programmable Thermostat Installation Guide
Honeywell T4H110A1021 T4 Programmable Thermostat Installation Guide

Quick Start Installation Guide
Compatible with 24-230V on/off appliances such as gas boilers, combi-boilers and zone valves. Not compatible with 230V electric heating.
Installation in 3 steps…


Find a suitable wall location away from draughts, direct sunlight or other heat sources, and where cables can be run from the boiler to the thermostat.


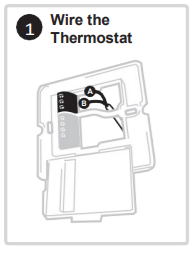
A) Separate the wallplate from the thermostat, and using a screwdriver open the wall plate terminal cover to connect wires.

B) Connect wires according to wiring diagrams and clip the cover closed.

Basic 230V Boiler

Combi-Boiler


- When using multi-core cables: Only remove enough outer insulation to allow secure fixing of the cores into the terminal block.
- When using single core cables: Secure them together with a cable tie as close as possible to the terminal block.


A) Power Up the Thermostat Remove the battery tab and clip the thermostat onto the wall plate.

B) Power Up the Heating System and do a quick functional test on the thermostat to check that it switches the boiler.


Specific settings for the thermostat and heating system can be configured in the advanced menu. Press and hold and then buttons together until the display changes (approx. 3 seconds).

A) Press and buttons to navigate through the parameter list

B) Press and buttons to change a parameter

C) Press button to save the change (or press to cancel the change)

D) Press button to exit advanced menu and save any changes

Adding a Remote Temperature Sensor
A remote temperature sensor can be added if the Thermostat needs to be installed in a different location from where the room temperature needs to be measured.
If a remote sensor is added parameter No 8 Ss needs to be changed to ‘1’.

Parameters
No Description Settings (default in bold)
| 1 LA | Language | 1 = EN, 2 = NL, 3 = FR, 4 = DE, 5 = ES |
| 2 CR | Heating Cycle Rate (cph) | 3 (oil boiler / thermal actuator) 6 (gas or combi boiler / zone valve) 9 |
| 12 | ||
| 3 OT | Minimum on time | 1 – 5 (mins) (set to 4 mins for oil boiler) |
| 4 LL | Lower Temperature Limit | 5 – 21 (°C) |
| 5 UL | Upper Temperature Limit | 21 – 35 (°C) |
| 6 SO | Schedule options | 1 = 7 day (different schedule each day of the week) 2 = 5 + 2 day (weekday + weekend schedule) 3 = 1 day (same schedule every day) |
| 7 NP | Number of periods per day | 4 or 6 |
| 8 SS | Wired Remote Sensor | 0 = No Remote Sensor, 1 = Wired Remote Sensor |
| 9 LC | Fail Safe mode | 0 = Boiler off, 1 = Boiler 20% on / 80% off |
| 10 BL | Backlight | 0 = Off, 1 = On (only on demand) |
| 11 CL | Clock Format | 0 = 24 hr, 1 = AM/PM |
| 12 DS | Daylight Saving time change | 0 = Off, 1 = Auto |
| 13 TO | Temperature Display Offset | +/-1.5°C |
| 15 SD | Restore Schedule Defaults | 0, 1 = reset |
| 16 FS | Restore Factory Settings | 0, 1 = reset |
Troubleshooting
What’s happening? What itcould mean… How to fix it…

EMC: 2014/30/EU and LVD: 2014/35/EU
ErP: Class IV (+2%), (EU) 811/2013
WEEE Directive 2012/19/EC – Waste Electrical and Electronic Equipment directive
At the end of the product life dispose of the packaging and product in a corresponding recycling centre. Do not dispose of the unit with the usual domestic refuse. Do not burn the product.


@2020 Resideo Technologies, Inc. All rights reserved The Honeywell Home trademark is used under license from Honeywell International Inc. This product is manufactured by Resideo Technologies, Inc and its affiliates.
