Hitachi 75” Ultra HD android TV 75QLEDSM20 User Guide
HITACHI 75” Ultra HD android TV 75QLEDSM20

Have you got everything?
You will also need:
- Phillips-head screwdriver
- Someone to help lift the TV
Unpack the box (be gentle) and make sure all of these items are there: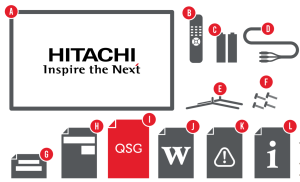

A. 75″ Ultra HD Android TV
B. Remote Control
C. AAA Batteries (2)
D. Mini AV Adaptor
E. TV Stands (2)
F. Screws for TV Stand (4)
G. Warning Sheet
H. TV Toppling Safety Message
I. Quick Start Guide
J. Warranty Certificate
K. General Safety Warnings
L. User Manual
Attach the TV stand
Unless you are wall-mounting the TV, you will need to attach its stands/legs. If you do want to wall mount the TV, see page 7 of the User Manual.}

- Lay the TV face-down on a soft, flat surface (like the sofa, or a towel on a table) larger than the TV itself.
- Match the stands to the installation points on the underside of the TV.
- Attach the stands to the TV at the installation points using the screws provided. (Grab a screwdriver for this bit).
Which plug goes where?
Want to hook up your new TV to the internet, a DVD player or something else? Use the basic guide below to see what the plug and port should look like for different connections. You can find more of these on pages 10 – 11 of the User Manual. (These cables do not come with your TV, however we have included a mini AV adaptor for you)
Use this to connect your soundbar, amplifier, digital receiver, or other external audio equipment.

Use this connection for a DVD player, gaming console, computer and camera.
To watch free-to-air TV channels, you need an antenna connection.
Use this to connect the TV to your modem for internet access. This TV also has Wi-Fi connectivity.
Get to know the remote

On-screen set-up
Follow the on-screen set-up prompts to pair voice-enabled remote with the TV, connect the TV to the internet, sign in to Google Account and tune TV channels.
How to pair the remote control:
- Press and hold the LEFT and MENU buttons simultaneously for 5 seconds.
- When the name of the remote control appears on the screen, select the name and press the OK button.
- If pairing is unsuccessful, please wait a few seconds and try again or you can do this later by going to Settings > Remotes & Accessories.

Set-up not going smoothly? We’ve got you! We just need you to check a few things first:

A new TV is exciting! So it’s easy to forget something simple – like plugging it into the power outlet. Psst… make sure the outlet is switched ON.

More often than not, the answer you need is right there in the User Manual. The troubleshooting section on pages 44 – 46 may come in handy for tricky stuff.

What? You mean the User Manual didn’t have ALL the answers? Speak to us! We’d love to help you get up and running as quickly as possible. Call our After Sales Support on 1300 886 649. Operating hours: Monday-Friday, 8:30am-6pm; Saturday, 9am-6pm AEST

Your new TV is ready to enjoy!
Well done, you made it. Now sit back and relax… your new TV is automatically covered by a 3-year warranty. How nice!