Dell A3 Neck-Mounted Bluetooth Headset User Manual
DELL A3 Neck-Mounted Bluetooth Headset User Manual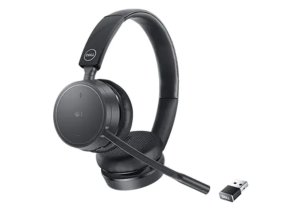

Thank you for choosing the A3 Bluetooth Headset. Please read this manual carefully for future reference. If you have any further assistance, please connect our customer support team via e-mail behind this manual.
Package Content
1×Bluetooth Headset
1×USB Charging Cable
6×Ear Buds(two are already installed)
1×User Guide
Package Diagram
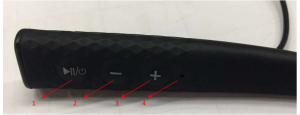

- Multifunction Button(MFB)
- Volume – / Previous Track Button
- Volume + / Next Track Button
- LED Indicator
Control Functions
| Power On / Off | Press and hold the MFB for 3 seconds |
| Pairing | Power on until the LED Indicator flashes red and blue alternately |
| Play / Pause | Press the MFB once to play/pause. |
| Volume Increase / Decrease | Press the Volume + / Volume – Button once to play/pause. |
| Next / Previous Track | Press and hold the Volume + / Volume – Button for 2 seconds |
| Answer Phone Call | When a call is incoming, press the MFB once |
| Hang Up Phone Call | During a call, press the MFB once |
| Reject Phone Call | When a call is incoming, press and hold the MFB for 2 seconds |
| Redial | Press the MFB twice to re-dial the latest phone number |
| Activate Voice Control | Press and hold the MFB for 2 seconds |
| Clear Pairing History | Press and hold the Volume + button and Volume – button for 5 seconds until the LED Indicator flashes red once |
Note:
When a call is coming, there is vibration promoted.
Specification
| Bluetooth Version | CSR8635 V4.1 |
| Bluetooth File | Support HSP,HFP.A2DP,AVRCP |
| Audio Codec | SBC ,MP3,AAC,Faststream decoder |
| Range | 33 ft / 10m |
| Waterproof Rating | IPX5 |
| Charging Power | DC 5V |
| Working Time | 10H at 70% volume |
| Charging Time | 5V 80mA about1.5H–2.5 H |
| Dimension | 400*17*10mm |
| Weight | 44g |
LED Indicators
| LED Indicator | Status |
| Red LED on | Charging |
| Blue LED on | Fully charged |
| Flashes blue and red | In Pairing mode |
| Flashes blue twice every 6seconds | Paired with a Bluetooth device |
| Slowly flashes red | Low battery |
Note:
The earphones will not automatically connect to a Bluetooth® device when switched on, please read the next section on how to connect to your Bluetooth® device.
How to Use
- Charging
- Connect the charging port with any USB charging adapter or active
computer USB port. - Charging will start automatically with the LED indicator turning red.
- The earphones are fully charged when the LED indicator turns blue.
- Connect the charging port with any USB charging adapter or active
- Pairing
- Make sure the earphones and your Bluetooth® device are next to each other (within 3 feet / 1 meter).
- Press and hold the Multifunction Button for 5 seconds to bring the earphones into pairing mode with the LED indicator flashing blue and red.
- Activate the Bluetooth® function on your phone and search for nearby Bluetooth® connections:
- For iOS: Settings > Bluetooth > On
- For Android: Settings >Bluetooth: On > Scan for devices
- Find “A3” in the search results. Tap on the name to connect. Once connected, the blue LED will flash twice every 5 seconds.
- Pairing with two devices at the same time
Although you can pair with two devices, only one of them can play music or make phone calls with the headphone at any time. To pair with two devices:- Follow the previous instructions in the “Pairing” section to pair the A3 with your first device.
- Turn off the Bluetooth® function of your first device and follow the “Pairing” instructions again to pair and connect to your second device.
- With the Bluetooth® function on both devices turned on, switch between the two paired devices by pausing the music on the first device and playing music on the second device.
- How to Wear
Please wear the earphones as shown in the diagram:

Note:
- Please note the “L” and “R” markings on the earphones, they correspond to your left side and right side respectively.
- In addition to the earphones, two extra pairs of different sized ear buds are included in the package. Please try them out and find the most comfortable fit for you.
Troubleshooting
Q: My earphones will not switch on.
A: Please recharge it and make sure it has enough power. Plug the unit to a charger and see if the power button becomes solid red.
Q: Why can’t I pair the earphones with other Bluetooth® devices?
A: Please check the following points:
- Make sure your Bluetooth® device supports A2DP.
- Make sure the earphones and your device are next to each other or within 3 feet / 1 meter.
- You must get the earphones into pairing mode with the indicator flashing blue and red.
- Try to reboot your Bluetooth® device.
Q: After connecting and pairing with my Bluetooth® device, I cannot hear any music from the earphones.
A: Please check the following:
- Your sound system is connected to the earphones (if the LED indicator flashes blue once every 5 seconds, then they are connected).
- Make sure the music volume is at audible level on both your Bluetooth® device and earphones.
- Make sure your Bluetooth® device is playing music.
Care and Maintenance
- Charge the earphones at least once every 6 months.
- Keep the earphones away from heat and humidity.
- Do not put the product under direct sunlight or hot areas. High temperatures will shorten the lifespan of the earphones and its battery.
- Do not try to take the product apart.
- Do not drop or knock your earphones on hard surfaces.
- Do not use chemicals or detergents to clean the product.
- Do not scrape the surface with sharp objects.
Warranty
TaoTronics earphones are covered by the TaoTronics Parts and Labor Warranty for 12 months from the date of their original purchase. If the device becomes defective, please contact TaoTronics Support to launch warranty claim. We will instruct you on how to return the defective unit back to us for repair and replacement.
The following are excluded from the TaoTronics warranty:
- Device purchased as 2nd hand, used or from unauthorized sellers
- Damage resulted from misuse and abusive action
- Damage resulted from chemical, fire, radioactive substance, poison, liquid
- Damage resulted from natural disaster
- Damage caused to any 3rd party / person / object and beyond
No return will be accepted without seller authorization.
Statement
We can only provide after sale services for products that are sold by Richen or
Richen authorized retailer and distributor. If you have purchased your unit from a
different place, please contact the seller for return and warranty issues.

NOTE: This equipment has been tested and found to comply with the limits for a Class B digital device, pursuant to part 15 of the FCC Rules. These limits are designed to provide reasonable protection against harmful interference in a residential installation.
This equipment generates uses and can radiate radio frequency energy and, if not installed and used in accordance with the instructions, may cause harmful interference to radio communications. However, there is no guarantee that interference will not occur in a particular installation. If this equipment does cause harmful interference to radio or television reception, which can be determined by turning the equipment off and on, the user is encouraged to try to correct the interference by one or more of the following measures:
- Reorient or relocate the receiving antenna.
- Increase the separation between the equipment and receiver.
- Connect the equipment into an outlet on a circuit different from that to which the receiver is connected.
- Consult the dealer or an experienced radio/TV technician for help
Changes or modifications not expressly approved by the party responsible for compliance could void the user’s authority to operate the equipment.
This device complies with Part 15 of the FCC Rules. Operation is subject to the following two conditions: (1) this device may not cause harmful interference, and(2) this device must accept any interference received, including interference that may cause undesired operation.