Hoover HH710M handHeld Vacuum CLeaner Instruction Manual
HOOVER HH710M handHeld Vacuum CLeaner
Instruction Manual


INSTRUCTIONS FOR SAFE USE
This appliance should only be used for domestic cleaning, as described in this user guide. Please ensure that this guide is fully understood before operating the appliance.
Always switch off and remove the charger from the socket before cleaning the appliance or any maintenance task.
This appliance can be used by children aged from 8 years and above and persons with reduced physical, sensory or mental capabilities or lack of experience and knowledge if they have been given supervision or instruction concerning use of the appliance in a safe way and understand the hazards involved. Children shall not play with the appliance. Cleaning and user maintenance shall not be made by children without supervision.
If the power cord is damaged stop using the appliance immediately. To avoid a safety hazard, an authorised Hoover service engineer must replace the power cord.
Keep hands, feet, loose clothing and hair away from rotating brushes.
Use only the original charger supplied with the appliance.
Check that your supply voltage is the same as that stated on the charger.
This appliance is supplied with a double insulated battery charger which is only suitable for insertion in a 230V (UK 240V) socket outlet.
Plug the charger in to a suitable socket outlet and put the product on the charger base.
Switch off the appliance before charging.
Before first use, charge your appliance for at least 24 hours. The On/off button LED will flash (blue color) during charging and will be on (blue color) when fully charged.
Re-connect the appliance to the charger after use to recharge the battery.
Never charge the batteries in temperatures above 37°C or below 0°C.
It is normal for the charger to become warm to the touch when charging.
Do not unplug the charger by pulling on the power cord.
Unplug the charger in the event of prolonged absence (holidays, etc.). Recharge appliance again before use as batteries may self discharge over increased periods of storage.
If the appliance is to be disposed of the batteries must first be removed. The appliance must be disconnected from the supply mains when removing the battery. Dispose of the batteries safely. Run the appliance until it stops because the batteries are fully discharged. Used batteries should be taken to a recycling station and not disposed of with household waste. To remove the batteries, please contact the Hoover Customer Centre or proceed according to the following instructions.
IMPORTANT: Always fully discharge the batteries before removal.
Run the cleaner until the batteries are completely empty.
Remove the product from the charger base.
Rotate the battery cover anti-clockwise and remove the battery.
NOTE: Should you experience any difficulty in dismantling the unit or for more detailed information on treatment, recovery and recycling of this appliance, please contact your local city office or your household waste disposal service.
Use only attachments, consumables or spares recommended or supplied by Hoover.
Static electricity: Some carpets can cause a small build up of static electricity. Any static discharge is not hazardous to health.
Do not use your appliance out of doors or on any wet surface or for wet pick up.
Do not pick up hard or sharp objects, matches, hot ashes, cigarette ends or other similar items. Do not spray with or pick up flammable liquids, cleaning fluids, aerosols or their vapours.
Do not run over the power cord when using your appliance or remove the plug by pulling on the power cord. Do not continue to use your appliance or charger if it appears faulty.
Hoover service: To ensure the continued safe and efficient operation of this appliance we recommend that any servicing or repairs are only carried out by an authorized Hoover service engineer.
Do not use the appliance to clean animals or people.
Do not replace the batteries with non-rechargeable batteries.
The Environment:
This appliance is marked according to the European directive 2011/65/EC on Waste Electrical and Electronic Equipment (WEEE). By
For more detailed information about treatment, recovery and recycling of this product, please contact your local city office, your household waste disposal service or the shop where you purchased the product.


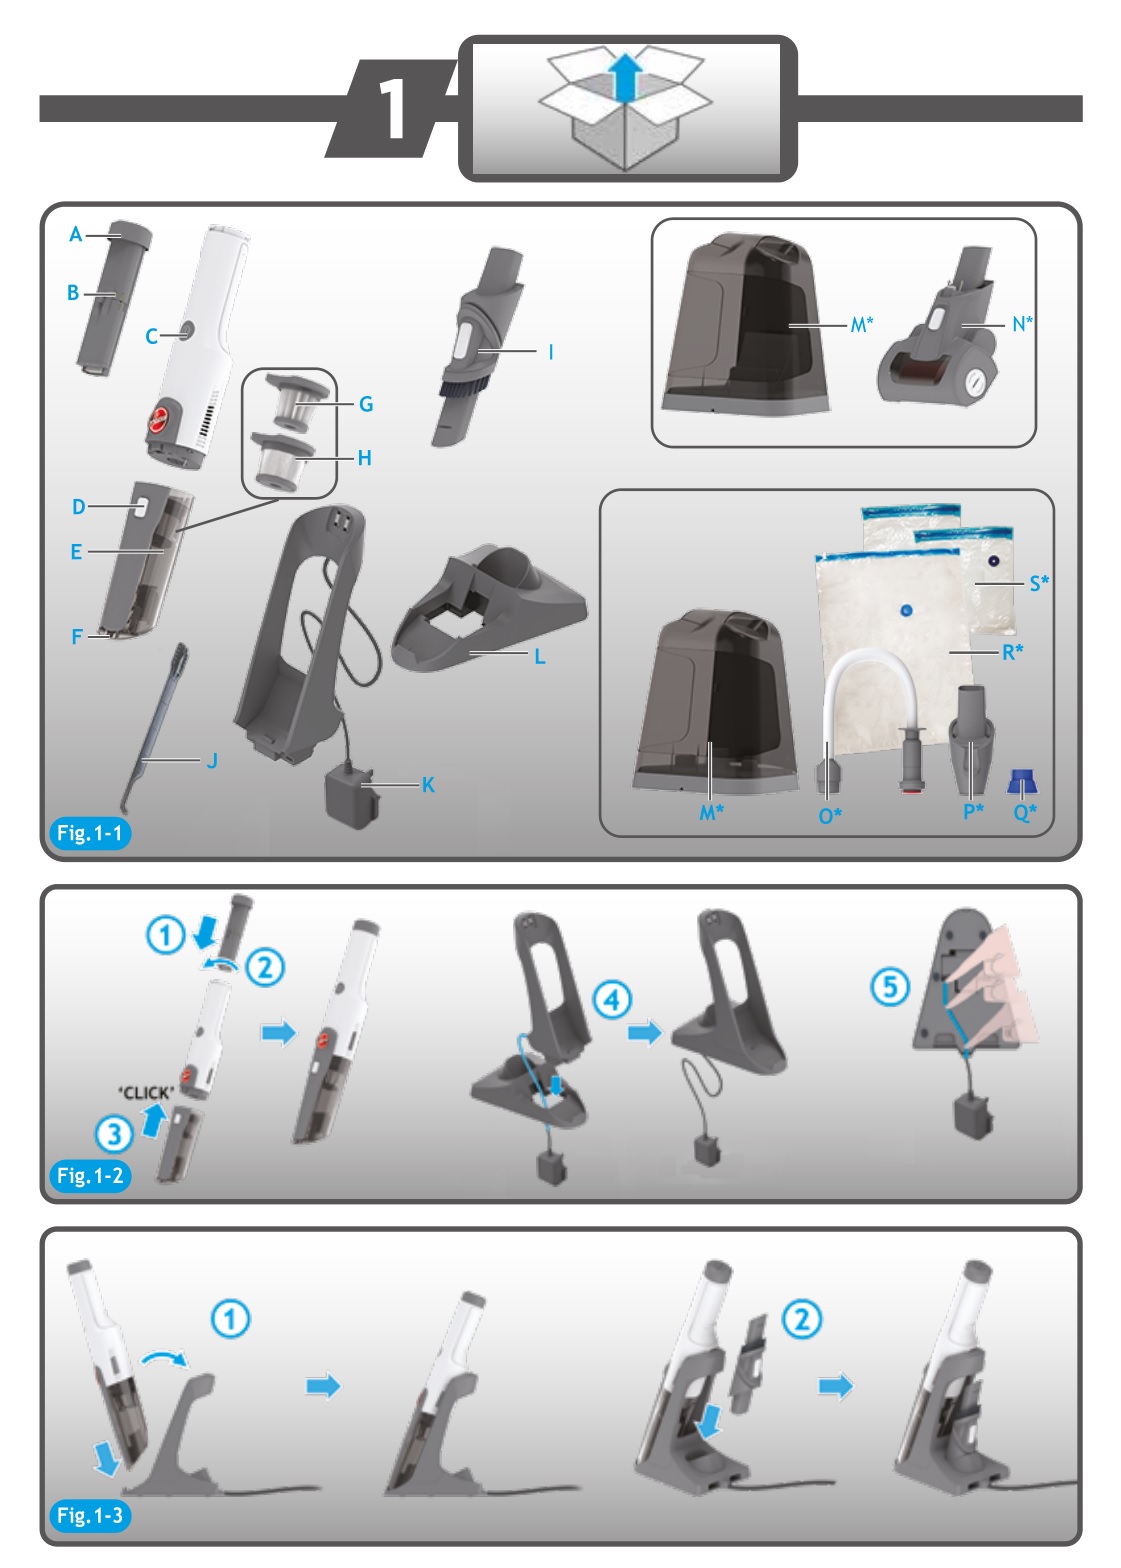
PRODUCT COMPONENTS
A. Battery Cover
B. Battery Pack
C. ON/OFF LED button
D. Dust Bin Release Button
E. Dust Bin
F. Frontal LED Light
G. Pre-motor Filter
H. Metal Mesh
I. 3 in 1 Tool
J. Cleaning Brush
K. Charger and Charger Base Back
L. Charger Base
M. Accessory Box*
N. Power Pet Nozzle*
O. Food Saver Tool *
P. Kit Connector*
Q. Space Saver Tool*
R. Vacuum Bag for Soft Goods And Cloths*
S. Vacuum Bags for Food*
PREPARING YOUR CLEANER [Fig.1]
Carefully remove your product from the packaging.
- Insert the battery pack into the product handle and rotate the battery pack cover clockwise. [Fig.1- 2]
- Make the charger cross through the charge base. [Fig.1- 2]
- Insert the charger back into the charger base and press.
- Press the wire into the wire slot. [Fig.1- 2]
- Put the product on the charger base. [Fig.1- 3]
- Put the 3 in 1 tool on the charger base. [Fig.1- 3]
- Insert the accessory box* into the back of charger base. [Fig.1- 5 & Fig.1- 6]
- Press the wire into the wire slot. [Fig.1- 5 & Fig.1- 6]
- Put the Power pet nozzle* into the accessory box*. [Fig.1- 5]
- Put the Space & food saver kit* into the accessory box*. [Fig.1- 6]
NOTE: Use only the charger supplied with your cleaner to recharge . It is normal if the charger becomes warm when the product is charging.
CHARGING [Fig.2]
Remove all the accessories from the cleaner, then put the product on the charger base and plug the charger into suitable socket outlet. [Fig.2- 1 & Fig.2- 2]
The product will start to charge and the on/off LED button will blink in blue color. The blinking frequency is 1HZ. [Fig.2-3]
When the product is fully charged, the on/off LED button will be on (fixed).[Fig.2-4]
NOTE: Use only the charger supplied with your cleaner to recharge. It is normal if the charger becomes warm when the product is charging.
NOTE: If you are not going to use the cleaner for a long period of time, please remove the battery pack from the cleaner to maintain the battery life.
USING YOUR CLEANER [Fig.2]
Remove the cleaner from the charger and then press the on/off LED button.
The on/off LED button will illuminate in fixed blue colour (if the product charge is >10%) and the frontal LED light will illuminate in white colour. When you finish to use it, turn the product off pressing the on/off LED button, empty and clean the dust bin and the filter after each use or when the dust bin becomes full. Please refer to CLEANER MAINTENANCE section.
This cleaner is equipped with a on/off LED button on main body. When the product is switched on, the LED will illuminate or be off to show the battery level.
Battery level:
The on/off LED is on (fixed blue color):10%-100% charge
The on/off LED is blinking in red color and the flashing frequency is 1HZ: ≤10% charge
The on/off LED is off: 0% charge
ACCESSORIES [Fig.3]
All accessories can be fitted directly onto the cleaner main body.
To remove the accessory, press the accessory release button and pull it away from the main body. If the accessory is not equipped with a release button, pull it away from the main body.
3 IN 1 TOOL:
Crevice tool: Suitable for cleaning corners and hard to reach areas. [Fig. 3-6]
Dusting brush: Ideal for cleaning hard surfaces without damaging or scratching. [Fig. 1-4 & Fig. 3-7]
Furniture nozzle: Perfect for fabric surfaces such as mattresses and sofas. [Fig. 1-4 & Fig. 3-8]
POWER PET NOZZLE*: [Fig. 3-9]
Ideal for removing pet hairs and allergens from soft furnishings and carpeted stairs.
Do not touch the rotating brush, when the product is switched on. Do not keep the nozzle stationary while the brush is rotating.
SPACE AND FOOD SAVER KIT*:
The space saver kit allows you to reduce the volume of soft goods and cloths to optimize space at home or when travelling. [Fig. 3-11]
The food saver kit optimizes space inside your fridge or freezer and keeps food fresh and secure for longer with no air inside the bag. [Fig. 3-10]
WARNING: Keep away food and space saver bags from children. They are made from plastic and could become hazardous to children, if left unsupervised. Make sure these bags are stored up high and out of the reach of young children.
How to use the Food Saver kit*:
- Insert the kit connector into the product inlet.
- Insert the Food Saver tool into the kit connector. [Fig. 3- 12]
- Take the vacuum bag for food, open it grabbing each side of the zipper and pulling the side apart.
- Put the food inside the bag, placing the open bag face-up on a flat surface. The air valve and the fill line must be facing upwards. [Fig. 3- 13] Be sure not to overfill the bag.
- Take one sure-zip (included in the kit) and put it on the top of your vacuum bag to help you sealing it. Firmly grasp the sure-zip slider using your thumb and index fingers. Then, slide the zipper across the top of the bag. Make sure to slide the zipper back and forth at least twice. Press down a little harder to ensure a tight seal has been made, and no air will leak out. [Fig. 3- 13]
- Run your fingers along the zipper. To ensure that the zipper is completely sealed, slide your fingers along the zipper track and press down. You should be able to feel if any areas are not sealed.
- Place the circular red component of the Food Saver tool onto the air valve. Make sure to cover the air valve completely with this red component. [Fig. 3- 14]
How to use the Space Saver kit*:
- Insert the kit connector into the product inlet.
- Insert the Space Saver tool (in light blue colour) into the kit connector. [Fig. 3- 15]
- Take the vacuum bag for of soft goods/cloths open it grabbing each side of the zipper and pulling the side apart
- Put the soft goods inside the bag, placing the open bag face-up on a flat surface. The air valve must be facing upwards. [Fig. 3- 16] Be sure not to overfill the bag. Make sure that all items are dry before packing them.
- Take one sure-zip (included in the kit) and put it on the top of your vacuum bag to help you sealing it. Firmly grasp the sure-zip slider using your thumb and index fingers. Then, slide the zipper across the top of the bag. Make sure to slide the zipper back and forth at least twice. Press down a little harder to ensure a tight seal has been made, and no air will leak out. [Fig. 3- 16]
- Run your fingers along the zipper. To ensure that the zipper is completely sealed, slide your fingers along the zipper track and press down. You should be able to feel if any areas are not sealed.
- Open the valve cap on the top of the bag.[Fig. 3- 17] To open the valve cap, place one hand around the base of the valve and use the other to rotate and lift the cap.
- Place the circular light blue component of the Space Saver kit onto the air valve. Make sure to cover the air valve completely with this light blue component. [Fig. 3- 17]
- Turn on the product. Once the vacuum is turned on, you will see the bag begin to shrink as air is removed. When the bag stops shrinking, it means you have completed the sealing process. At this point you can turn off the product. [Fig. 3- 17]
- Remove the Space Saver tool and close the air valve, putting back the valve cap and rotating it to prevent any air from escaping the bag. [Fig. 3- 17]
- Store it on a smooth and flat surface. Make sure there are no sharp objects placed near the bag
CLEANER MAINTENANCE [Fig.4]
Emptying the Dust Bin
- Press the bin release button and remove the dust bin. [Fig. 4-3]
- Pull the metal ring and remove the pre-motor filter pack (metal mesh and pre-motor filter). [Fig. 4-4 ]
- Empty the debris from the dust bin. [Fig. 4-5]
- Remove excess debris from the metal mesh then hold the base of the metal mesh and rotate the top in an anticlockwise direction and remove the pre-motor filter. [Fig. 4-6]
- Tap the base and the top of the pre motor filter to remove dust, then using the dusting brush remove any additional debris from the pre-motor filter and metal mesh. [Fig. 4-7]
- Once all excess dust and debris is removed, wash the pre-motor filter and metal mesh with warm water until the water runs clean. Do not wash the DUST BIN as there are electronic parts inside the dust bin. [Fig. 4-8]
- Remove excess water and leave to dry for 24 hours. Only refit the filter and mesh when completely dry. [Fig. 4-9]
- Reassemble once completely dry and refit to the product. [ Fig. 4-11]
NOTE : Do not use hot water or detergent when cleaning the pre-motor filter. In the unlikely event of the pre-motor becoming damaged, fit only a genuine Hoover replacement part. Please ensure you Re-Fit the pre-motor filter into the dust bin as the product is fitted with a filter protection mechanism which will prevent the dust bin being reassembled to the product.
IMPORTANT: For optimum performance , always keep your filter clean. We recommend that you wash your pre-motor filter and mesh at least once per month.
WARNING : DO NOT WASH THE DUST BIN as there are electronic parts inside. You can clean the dust bin with a dry cloth.
CLEARING AN ACCESSORY BLOCKAGE [Fig.5]
If the product works with the attached accessory and the on/off LED is blinking in red color with the flashing frequency of 2HZ, it informs the attached accessory is blocked and so you need to check and remove the blockage from the accessory or/and from the product inlet or bin.
IMPORTANT: Always switch the cleaner off and remove all the accessories from the cleaner before attempting any maintenance.
POWER PET NOZZLE* blockage
Step1: Turn off the on/off LED button, press the release nozzle button and remove the power pet nozzle*
Step2: Rotate agitator end cap anticlockwise with a coin or a screwdriver.[Fig.5- 7]
Step3:Take off the agitator.
Step4: Remove the blockage from the agitator or agitator end cap.
Step5: Press the agitator locker
Step6: Refit the agitator inside the nozzle
Step7: Rotate agitator end cap clockwise
Step8: Completed. Ready to use.
Replacing the Battery pack
This cleaner is fitted with a rechargeable lithium ion battery pack which is replaceable. Rotate the battery pack cover anticlockwise and then remove the battery pack.
End of product life battery disposal
If the cleaner is to be disposed of the batteries should be removed . Use batteries should be taken to a recycling station and not disposed with household waste.
IMPORTANT : Always fully discharge the batteries before removal.
WARNING: Do not try to open the battery pack and repair it by yourself. Only use approved replacement parts for your cleaner. Using parts not validated by Hoover are dangerous and will invalidate your guarantee.
TROUBLE SHOOTING
Should you have any problems with your cleaner , follow this simple check list before calling the Hoover Customer Service Centre.

HOOVER SPARES AND CONSUMABLES
Always replace parts with genuine Hoover spares.These are available from your local Hoover dealer or direct from Hoover.When ordering parts always quote your model number.
YOUR GUARANTEE
The guarantee conditions for this appliance are as defined by our representative in the country in which it is sold. Details regarding these conditions can be obtained from the dealer from whom the appliance was purchased. The bill of sale or receipt must be produced when making any dlaimunder the terms of this guarantee.
IMPORTANT: The battery in this cleaner is guaranteed for 1 year from the date of purchase. After 1 year the customer is liable for the cost of a replacement battery.
Subject to change without notice.

Part No. : 48032447