Miele WWI860 Front Loader Washing Machine Installation Guide


Miele WWI860 Front Loader Washing Machine

Installation
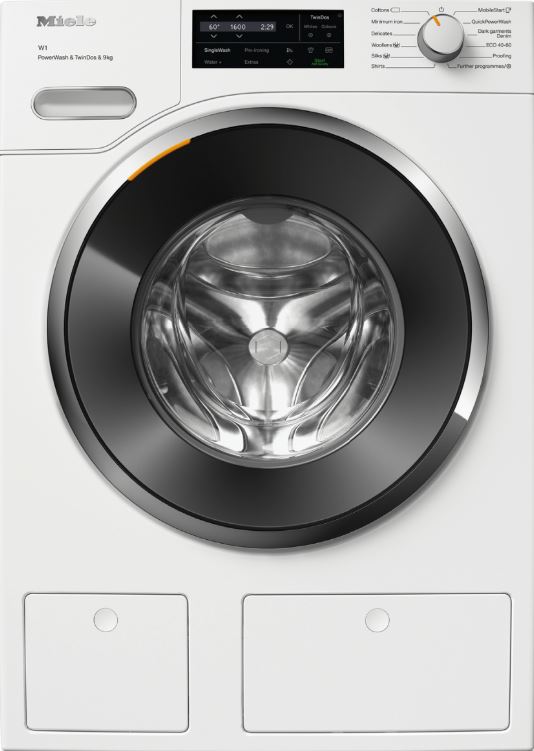
Front view

- Cold and hot water inlet hoses (tested to withstand pressures up to 7000 kPa)
- Electrical connection
- Flexible drain hose (with detachable swivel elbow)
- Control panel
- Detergent dispenser drawer
- Door
- Access to filters, pumps, and emergency release
- Access panel for Twindos cartridges
- Four height-adjustable feet
Rearview

- Drain hose
- Transport clips for inlet and drain hoses and mains connection cable
- Electrical connection
- Protruding lid for holding when moving the machine
- Cold water inlet hose (tested to withstand pressures up to 7000 kPa)
- Hot water inlet hose (tested to withstand pressures up to 7000 kPa)
- Safety caps for transit bars
- Transport clips for inlet and drain hoses and for storing transit bars when not in use
Installation surface
- A concrete floor is the most suitable installation surface. It is far less prone to vibration during the spin cycle than wooden floorboards or a carpeted surface.
Please note
- The machine must be level and securely positioned.
- To avoid vibrations during spinning, the machine should not be installed on soft floor coverings.
If installing on a wooden joist floor
- Install the machine on a plywood base (at least 59 x 52 x 3 cm). The base should span several joists and be bolted to the joists and not only to the floorboards. Check for the presence of pipes and cables first.
Useful tip: If possible, install the machine in a corner. This is usually the most stable part of the floor.
Transporting the washing machine to its installation site
- The danger of injury due to an unsecured lid.
- Make sure the fixings at the back of the lid are secure. They may become brittle due to external circumstances.
- There is a danger of the lid being pulled off when carrying the appliance.
- Before carrying the appliance, check that the lid is secure where it protrudes at the back.
- Carry the washing machine by the front feet and by the lid where it protrudes at the back of the appliance.
Removing the transit bars
Removing the left transit bar

- Push the flap outwards and turn the transit bar 90° using the enclosed spanner.
- Then pull the transit bar out.
Removing the right transit bar

- Push the flap outwards and turn the transit bar 90° using the enclosed spanner.
- Then pull the transit bar out.
Covering the holes
Risk of injury from sharp edges! There is a risk of injury from reaching into holes that are not covered. To avoid the risk of injury, the holes for the transit bars must be covered after the transit bars have been removed.

- Press the flaps firmly shut until they click into place.
Securing the transit bars

- Secure the transit bars to the back of the washing machine. Make sure that the top catch is located above the holder.
warning
- Risk of damage from incorrect transport.
- The washing machine may become damaged if moved without the transit bars in place.
- Keep the transit bars in a safe place. Fit them again if the machine is to be moved (e.g. when moving house).
Fitting the transit bars
Opening the flaps

- Push against the catch with a pointed object, e.g. a narrow screwdriver.
- The flap will open.
Fitting the transit bars
- Install the transit bars in reverse order to their removal.
Useful tip: If you lift the drum slightly, the transit bars can be pushed in more easily.
Leveling the machine
- The washing machine must stand perfectly level on all four feet to ensure safe and proper operation.
- Incorrect installation may increase electricity and water consumption and may cause the machine to move about.
Screwing out and adjusting the feet
- The four adjustable screw feet are used for leveling the washing machine. All four feet are screwed in when the appliance is delivered.

- Using the spanner supplied, turn counter nut 2 in a clockwise direction. Then turn counter nut 2 together with foot 1 to unscrew.

- Use a spirit level to check that the washing machine is standing level.
- Hold foot 1 securely with a pipe wrench. Turn counter nut 2 again using the spanner supplied until it sits firmly up against the housing.
Risk of damage due to the incorrectly aligned washing machine. There is a danger of the washing machine moving about if the feet are not secured. Turn all four counter nuts for the feet until they sit firmly up against the housing. Please also check this for the feet which did not need adjustment.
Installing under a continuous worktop
- Risk of electric shock due to exposed cables.
- There is a risk of coming into contact with live parts while the lid is removed.
- Do not remove the washing machine lid.
- This washing machine (with lid intact) can be pushed under a worktop if there is space to do so.
Washer and dryer stack
A Miele tumble dryer can be stacked with the washing machine. The appropriate “WTV” stacking kit* to match your tumble dryer is required. All parts marked * are available from Miele.
Please note

- a = at least 2 cm
- b = WTV without drawer: 172 cm
- WTV with drawer: 181 cm
- c = 65 cm
The Miele water protection system
The Miele water protection system protects all parts of the washing machine and surrounds from water damage.
The system consists of three main components:
- the inlet hose
- the electronic unit and drainage and overflow protection
- the drain hose
Inlet hoses
- Protection against the hoses bursting
- The inlet hoses are tested to withstand pressures up to 7000 kPa.
Electronic unit and washing machine housing
Sump: Any leaking water is collected in a sump at the base of the machine. Float switches off the water inlet valves, preventing any more water from flowing into the machine and water in the suds container is pumped away.
Overflow protection: This prevents the washing machine from taking in too much water. If the water level exceeds a certain level, the drain pump switches on and pumps the excess water away in a controlled way.
Drain hose
- The drain hose is protected by a ventilation system which prevents the washing machine from being emptied completely.
Connection to the water supply
- Health risk and risk of damage due to contaminated mains water.
- The quality of the water used must correspond to the drinking water specification of the country in which the washing machine is being operated.
- Always connect the washing machine to potable water.
The washing machine must be connected to a mains water supply in accordance with current local and national safety regulations. The water connection pressure needs to be between 100 kPa (1 bar) and 1000 kPa (10 bar). If the water connection pressure exceeds 1000 kPa, a pressure-reducing valve must be installed. A tap with a ¾ inch threaded union is required for the connection.
The screw thread is subject to water connection pressure. Check that the connection is leakproof. Slowly turn on the tap. Correct the position of the seal and screw thread if necessary.
Maintenance
- Only use a genuine Miele hose should you ever need a replacement. These are tested to withstand pressures up to 7000 kPa.
- A filter is located in the open end of the inlet hose and another in the intake point to protect the inlet valve. The filters must remain in place, and be replaced after cleaning.
Hose extension
- Longer hoses 2.5 m or 4.0 m in length are available from Miele as optional accessories (depending on the country).
This washing machine can be operated with cold mains water only or cold and hot water.
WARNING: Damage caused by incorrect water connection
- Connection to hot water only is not permitted. The washing machine requires a cold water connection when operating with hot water in order to control the temperature of the wash water.
- Always connect the washing machine to cold mains water.
Programming the washing machine for hot water operation is described in“Settings – Water intake”.
Markings of water intake hoses
- Cold water (tap water): Blue stripes
- Hot water: Red stripes
Cold water (default setting)
- The washing machine will be operated with cold mains water only.
- The other inlet hose is secured to the back of the washing machine.
Hot water
- The preferred temperature is 55°C.
- The temperature must not exceed 60°C. Consult a qualified plumber if the temperature exceeds 60°C.
- You can heat up your water with cheaper, primary energy sources, e.g. gas, solar power, and oil.
- Before connecting to the mains water tap, check that the outflow of cold water does not exceed 5 liters. Each additional liter of cold water reduces the energy efficiency.
- If the hot water tap is turned off for some time, the washing machine will automatically switch to the cold water connection.
- This safety measure is not intended for the permanent operation of the appliance. The washing machine continues to wash using hot water operation, but washing results are impaired.
Drainage
The suds are drained through a drain pump with a 1 m high delivery head. For the water to drain freely, the hose must be free of kinks. If required, the hose can be extended to a length of up to 5 m. The necessary parts can be ordered from Miele (depending on the country). For a delivery head of more than 1 m (up to a max. of 1.8 m), a replacement drain pump will need to be fitted. Please contact Miele for advice. For a delivery head of 1.8 m, the hose can be extended to a length of up to 2.5 m. The necessary parts can be ordered from Miele (depending on country).
Drain hose connection options
- Directed into a laundry trough or tub or into the sud-saver pipe of a laundry trough or tub.
Please note
- Hook the hose over the edge and secure it.
- Make sure that the water can drain away freely without hindrance. Otherwise, there is a risk of water overflowing or of some of the drained water being sucked back into the machine.
- Connected securely to a trapped waste pipe.
- Connected securely to a floor drain (gully).
Using the elbow
To prevent the drain hose from slipping, use the enclosed elbow.

- Attach elbow 2 to the drain hose 1.
- Hang the drain hose over the sink.
- Secure the elbow from slipping using a strap and the eyelet 1.

Direct connection to a sink drain outlet

- Adapter
- Washbasin nut
- Hose clip
- End of the hose
- Fit adapter 1 to the sink drain outlet using nut 2.
- Attach the end of hose 4 to adapter 1.
- Use a screwdriver to tighten the hose clip 3 up close to the nut.
Electrical connection
The washing machine is supplied with a mains cable with molded plug ready for connection to a switched socket. The socket should be easily accessible after the machine has been installed. If the switch is not accessible after installation, an additional means of disconnection must be provided for all poles.
- Risk of fire from overheating!
- Connecting the washing machine to a multi-socket plug adapter or to an extension lead can overload the cable.
- Do not use an extension lead or multi-socket plug adapter.
All electrical work must be carried out by a suitably qualified and competent person, in strict accordance with national and local safety regulations. For extra safety, it is advisable to install a suitable residual current device (RCD) with a trip current of 30 mA. Ensure power is not supplied to the appliance until after the installation has been completed. If the mains connection cable is damaged, it must only be replaced with a specific mains connection cable of the same type (available from Miele). For safety reasons, such replacement may only be carried out by a suitably qualified and competent technician or by a Miele authorized service technician, in order to avoid a hazard.
The data plate indicates the nominal power consumption and the appropriate fuse rating. Compare this information with the data of the on-site electrical connection. If in any doubt, consult a qualified electrician. Temporary or permanent operation with a self-sufficient or non-mains synchronous energy supply system (e.g. isolated networks, backup systems) is possible. A requirement for the operation is that the energy supply system complies with all current local and national requirements that apply to stand-alone, solar, and/or battery systems. The protective measures provided in the domestic installation and in this Miele product must also be assured in their function and operation in isolated operation or in non-mains synchronous operation, or replaced with equivalent measures in the installation.