Toshiba TL-MC40EZF Toaster Oven Instruction Manual
TOSHIBA TL-MC40EZF Toaster Oven Instruction Manual

IMPORTANT SAFEGUARDS
When using electrical appliances, basic safety precautions should always be followed including the following:
- This appliance is not intended for use by persons (including children) with reduced physical, sensory or mental capabilities, or lack of experience and knowledge, unless they have been given supervision or instruction
concerning use of the appliance by a person responsible for their safety. - Children should be supervised to ensure that they do not play with the appliance.
- If the supply cord is damaged, it must be replaced by the manufacturer, its service agent or similarly qualified persons in order to avoid a hazard.
- WARNING: Ensure that the appliance is switched of before replacing the lamp to avoid the possibility of electric shock.
- The appliances are not intended to be operated by means of an external timer or separate remote-control system.
- The temperature of accessible surfaces may be high when the appliance is operating.
- Accessible parts may become hot during use. Young children should be kept away.
- The appliance is intended to be used freestanding.
- Remove plug from outlet when the appliance is not in use, before putting on or taking of parts, and before cleaning. Allow to cool before handing.
- Ectreme caution should be exercised when using containers constructed of other metal or glass.
- Do not store any materials, other than manufacturers recommended accessories in this oven when not in use.
- Do not place any of the following materials in the oven: paper, carboard, plastic, and the like.
- Avoid contacting moving parts.
- This appliance is intended to be used in household and similar applications such as: -staff kitchen areas in shops, offces and other working environments; -by clients in hotels, motels and other residential type environments; -farm houses; -bed and breakfast type environments.


READ CAREFULLY AND KEEP FOR FUTURE REFERENCE
BEFORE FIRST USE
- Remove all accessories and shipping materials packed inside the oven.
- Wash the rack and grill tray in warm soapy water. Wipe the inside of the oven with a damp cloth or sponge. Blot dry with paper towels to be sure the unit is dry before using.
- Place oven on a flat counter or other stable surface. DO NOT OPERATE ON THE SAME CIRCUIT WITH ANOTHER APPLIANCE.
- Make sure the crumb tray is properly installed before using.
- Before working, place the crumb tray under the bottom heating pipes. For the first time only, set the Temperature Knob to MAX, the function setting on toast and the timer to 15 minutes. This will burn off any oils still on the oven.
NOTE
The oven may smoke during this process. This is normal for a new Oven andwill not last more than 10-15 minutes.
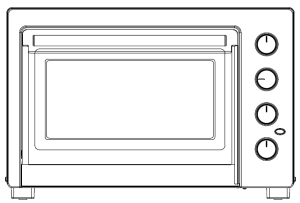
NAME OF PARTS


CONTROL PANEL
TIME SETTING
0-120 MINUTES: The timer can be set up to 120 minutes. The oven will not turn on without the timer being set. When the
Time knob is in the “OFF” position, the oven will not operate. To set the time, turn the knob clockwise to the desired time. Indicator Light is lit only when time has been set. When the Timer has reached the
“OFF” position, a bell sound will be heard. Power supply will be cut of automatically.
ADJUSTING TIME
Timer can be change during cooking cycle. Just turn the timer knob to the desired time and continue cooking.
NOTE: To select the cooking time, first rotate the timer knob more than 90 degrees, and then turn the switch back to he time you require.
TEMPERATURE SETTING
Turn the temperature knob clockwise to the desired temperature setting. The temperature can be set from 70℃ to 230℃
.STAY ON

For use the toaster without time control, turn the timer knob to position” Stay on”. In this case, the toaster will work until the timer knob is set to ” OFF ” position.
Note: the food may catch fire if the cooking time is setting too long. Close supervision is necessary during cooking and the timer do not being set too long.
FUNCTION SETTING
This oven offers six different functions for versatile cooking all in one appliance. Bake: The lower heating elements are working during this function. Broil: The upper heating elements are working during this cycle. Toast: The upper and lower heating elements are working during this function. Rotisserie: The upper straight electric heating elements, along with the Rotisserie Motor is working. Follow Rotisserie instruction for proper use. Fermentation: It is suitable for fermented yogurt and so on. Convection: The upper and lower heating elements, along with the motor fan are working.
HOW TO USE
CAUTION: THE OVEN SURFACES ARE HOT DURING AND AFTER USE GENERAL INSTRUCTIONS
- Place the rack in position that will accommodate the height of the food to be cooked.
- The food must be put into the grill tray to avoid the fire danger that caused by the accumulation of food chipping on the heating pipes.
- Make sure that you always use an ovenproof container in the oven, never use plastic or cardboard containers in the oven.
- Clean the heating pipe periodically.
- Never use glass or ceramic pans or lids.
- DO NOT let juice run to the bottom of the oven. Use the crumb tray when cooking.
- Set the temperature as suggested by the recipe or as desired.
- Securely shut the door and set the cooking time to begin operating the oven.
OPERATION
- Set the function knob to “
- Rotate the lower tube temperature knob to set the lower temperature.
- Rotate the time knob to set cooking time.
- Continuing baking for desired length of time.
- Check food temperatures before moving to ensure that proper internal temperatures have been reached.
- Always remove food with oven mitts. The food and oven are very hot.

BROIL
- Set the function knob to ”
- Rotate the upper tube temperature knob to set the upper temperature.
- Rotate the time knob to set cooking time.
- Continuing broiling for desired length of time.
- Check food temperatures before moving to ensure that proper internal temperatures have been reached.
- Always remove food with oven mitts. The food and oven are very hot.

TOAST
- Set the function knob to “
- Rotate the lower tube temperature knob to set the lower temperature.
- Rotate the upper tube temperature knob to set the upper temperature.
- Rotate the time knob to set cooking time.
- Continuing toasting for desired length of time.
- Check food temperatures before moving to ensure that proper internal temperatures have been reached.
- Always remove food with oven mitts. The food and oven are very hot.

ROTISSERIE FUNCTION:
- Set the function knob to ”
- Rotate the upper tube temperature knob to set the upper temperature.
- Rotate the time knob to set cooking time.
- Continuing cooking for desired length of time.
- Check food temperatures before moving to ensure that proper internal temperatures have been reached.
- Always remove food with oven mitts. The food and oven are very hot.

FERMENTATION FUNCTION:
- Set the function knob to ”
- Rotate the time knob to set cooking time.
- Continuing fermenting for desired length of time.
- Check food temperatures before moving to ensure that proper internal temperatures have been reached.

ROTISSERIE FUNCTION USING THE ROTISSERIE FORK:
- Insert a fork into the rotisserie pole.
- Tighten the screw to x the fork in an appropriate place.
- Put the food into the rotisserie pole and then use the fork to x a side of the food.
- Insert the other fork into the rotisserie pole to x the other side of the food.
- Tighten the screw to x the fork in an appropriate place.
- Use the rotisserie kit to put the food with rotisserie fork in the oven.
- Insert the pointed end of the rotisserie fork into the hole of the right side of the oven.
Then put the other side of the rotisserie fork on the notch of the left side of the oven.
CARE AND CLEANING
- Before cleaning unplug the oven and allow it to cool completely.
- Wash all the attachments with mild, soaped water including the rack and the grill tray.
- Do not use abrasive cleansers, scrubbing brushes and chemical cleaner as this will cause damage to the non-stick coating of grill tray.
- Using a wet cloth to wipe the inner of the oven.
- To clean the door by using a wet cloth saturated with detergent or soap.
- Never immerse the unit in water or other liquid.
- Any other servicing should be performed by an authorized service representative.
CAUTION : HOT SURFACE
Warning: Hot Surface!
SPECIFICATION
| MODEL | TL-MC40EZF(GR) | ||
| VOLTAGE | 230-240V~ | ||
| AC FREQUENCY | 50/60Hz | ||
| POWER | 1650-1800W | ||