Honeywell Thor VM3 Field Replaceable Front Panel Instructions

Front Panel

The front panel of the Thor VM3 is field replaceable. The front panel assembly contains the keyboard and touchscreen. Should either of these components fail, the front panel assembly can easily be replaced to minimize downtime. The replacement front panel is available in several configurations.
Note: The resistive and PCAP touch screens each use a unique stylus. If switching between touch screen types, be sure to swap the stylus as well.
Requirements – User Supplied
- Torquing tool capable of measuring inch pounds
- #2 Phillips screwdriver bit
Replacing Front Panel
- If the Thor VM3 has a Windows Embedded Compact operating system, place the Thor VM3 in Suspend by pressing the Power button on the front of the Thor VM3. For all other operating systems, select Shut Down from the Windows Shut Down menu.
- Remove the Thor VM3 from the Quick Mount Smart Dock by pulling down on the red quick release handle, lifting the bottom of the Thor VM3 away from the dock, and lifting the Thor VM3 up and away from the dock.
- Place the Thor VM3 face down on a clean, well-lit stable surface.
- Use a #2 Phillips bit to loosen the captive M3 screws on the access panel with the mSATA and SIM labels.
- Remove the access panel from the opening and press the UPS battery disconnect button located between the primary mSATA drive and the SIM card/secondary mSATA installation slots.
- Reinstall the access panel cover. Torque the M3 screws to 7.0 ± 0.5 inch-pounds using a #2 Phillips bit.
- Turn the Thor VM3 face up.
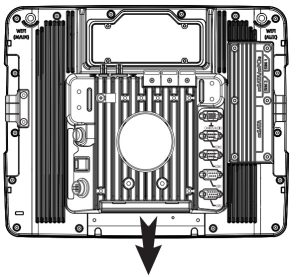
- Use a #2 Phillips bit to loosen the sixteen (16) captive M3 screws that hold on the front panel.
- Carefully lift the front panel away from the device.
- Position the replacement front panel so the wiring connector on the back of the front panel lines up with the wiring connector on the Thor VM3.
- Gently press the front panel into place. Ensure there are no gaps between the front panel and the Thor VM3.
- Tighten the sixteen (16) captive M3 screws in the order shown in the figure for step 8 above. Use a #2 Phillips bit and torque the screws to 7.0 ± 0.5 inch-pounds.
- Reinstall the Thor VM3 in the dock. When the Thor VM3 is placed in the powered dock, the UPS battery automatically reconnects.
- Press the Power button on the front of the Thor VM3.
- If adding or removing a defroster, update the Thor VM3 configuration:
• If the Thor VM3 has a Windows Embedded Compact operating system, select Start > Settings > Control Panel > Peripherals and tap the Test button.
• For all other operating systems, open the Windows control panel and select Screen. It may be necessary to change the control panel to Large Icon or Small Icon view before selecting Screen. Tap the Detect Defroster button and follow any on-screen prompts. - Close any open control panel windows.
- The Thor VM3 is ready for use.


50121800-001 Rev B 6/15
© 2014-2015 Honeywell International Inc. All Rights Reserved.
Was this manual helpful?
Thank you for your feedback!