Daewoo FLR00010 Cyclone Freedom 22.2V Cordless Vacuum User Manual


CYCLONE FREEDOM 22.2V CORDLESS VACUUM
User Manual
*Please refer to the warranty section for the terms of your extended guarantee.

READING AND STORING THE USER MANUAL
Failure to do so may result in personal injury or damage to the product.
Carefully save this instruction manual for future reference. Ensure the user manual is included when passing the product on to any third parties.

IMPORTANT SAFETY INSTRUCTIONS FOR PROPER USE
When using electrical appliances, basic safety precautions should always be followed.
Only use the product as described in this user manual. Any other use is considered improper and may result in damage to property or persons.
The manufacturer or vendor cannot be held liable for damages or injury incurred through improper or incorrect use.
- Read and familiarise yourself with all operating instructions before using this Vacuum Cleaner.
- Before plugging your unit into the mains, visually check that the unit is intact and has not suffered any transit damage.
- Check that the voltage indicated on the data plate corresponds with that of the local network before connecting the appliance to the main power supply.
- This appliance can be used by persons with reduced physical, sensory or mental capabilities or lack of experience and knowledge if they have been given supervision or instruction concerning the use of the appliance in a safe way and understand the hazards involved.
- Children shall not play with the appliance.
- Keep the appliance and its cord out of reach of children less than 8years when it is energized or cooling down.
- DO NOT immerse the appliance or its cord in water or any other liquids.
- DO NOT leave the appliance unattended during use.
- DO NOT leave the appliance unattended whilst connected to the mains supply.
- DO NOT use this appliance outdoors.
- It is imperative to unplug the power cord after the appliance has been used before it is cleaned, and whilst being repaired.
- Repairs to electrical appliances should only be performed by qualified personnel. Improper repairs may place users at serious risk.
- DO NOT operate this appliance with a damaged plug or cord, after a User Manual malfunction or after being dropped or damaged in any way.
- Regular, periodic checks should be carried out on the main cable to ensure no damage is evident. Should there be any signs of damage the appliance should not be used.
- If the power cable is damaged, it should only be replaced by the manufacturer or a suitably qualified after-sales-service in order to avoid a hazard
- DO NOT allow the mains cable to hang over sharp edges or come in contact with hot surfaces.
- Allow the unit to cool before storage.
- Before cleaning, disconnect the appliance from the mains supply and allow it to cool.
- This appliance is intended for household use only and should not be used for industrial purposes.
- DO NOT use any accessories or attachments with this appliance other than those supplied or recommended by the supplier.
- DO NOT use this appliance for anything other than its intended use.
- DO NOT push objects into any openings as damage to the appliance and/or electric shock may occur.
- Unplug after each use. Grasp the plug, not the cord.
- DO NOT pull or carry the Vacuum Cleaner by the electrical cord, use the handle provided.
- Ensure fingers and other objects are never placed in any part of the vacuum cleaner. Clothing or hair may become trapped if the vacuum is used improperly.
- Keep hair, loose clothing, jewelry, fingers, and all parts of the body away from openings and moving parts.
- Keep all air vents clear and free of dust, lint, hair, and anything else that may reduce airflow.
- Avoid directing the appliance towards naked flames as the air discharged may extinguish gas fires or pilot lights and may disturb ashes in open fires.
- DO NOT Vacuum water or any other liquids with this vacuum.
- DO NOT Vacuum hot ashes or lit cigarettes, etc.
- Never use the appliance without the filter in place.
- Do not use the Vacuum with no Dust Tank attached.
- DO NOT vacuum any large or broken objects such as glass.
- DO NOT vacuum anything that is burning or smoking such as cigarettes, matches, or hot ashes.
IMPORTANT – RETAIN THESE INSTRUCTIONS FOR FUTURE REFERENCE
Explanation of Symbols
The following warning symbols or words are used in this instruction manual:


As the end-user, you are required by law to bring all batteries and rechargeable batteries to a collection point run by the Local
Authority or to a retailer, so that they can be disposed of in an environmentally friendly manner.


This designates a hazard with moderate risk, which may result in severe injury or damage to the product if not adhered to.


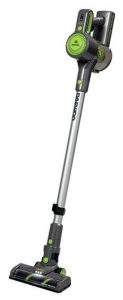
Description of Parts & Accessories


| 1. Air/Dust Inlet 2. Conical Hepa & Cyclonic Filters 3. Dust Release Catch 4. Dust Compartment 5. Charging/Battery Indicators 6. Charging Socket 7. Handle 8. On/Off/Power Button 9. Min/Max Power Indicator 10. Air Outlet Filter Door Release Button 11. Air Outlet Filter Door |
12. Motor Housing 13. Motorise Floor Tool 14. Crevice & Upholstery Tool 15. Small Power Plug 16. Mains Charger 17. Aluminium Tube 18. Carpet Brush 19. Hard Floor Brush 20. Long Reach Crevice Tool 21. Wall Bracket (with Screws & Plugs) |
Before the first time, you use your Cordless Vacuum Cleaner
Please read these operating instructions thoroughly and keep them in a safe place for future reference.
Remove all packing materials and discard them responsibly.
Charging the internal Battery
Before use, please ensure that the internal rechargeable battery is fully charged as follows:
- Insert the Small Power Plug (15) of the Mains Charger (16) into the Charging Socket (6).
- Plug the Mains Charger (16) into the nearest mains socket.
- The Charging/Battery Indicators (5) will light in the sequence as in a, b, c below to show the internal battery is charging.
- Once the battery is fully charged (after approximately 5 hours), the Charging/Battery Indicators (5) will all light as in ‘c’ below showing that the internal battery is fully charged and the Mains Charger (16) can be removed.

The Charging/Battery Indicators will go out one at a time during use, when none of the indicators are illuminated the internal battery will need recharging.
Attaching the Accessories
CAUTION Ensure that the vacuum cleaner is not connected to the main charger before use.
Fitting the Motorised Floor Tool
- Push the Aluminium Tube (17) onto the Air/Dust Inlet (1) until it clicks home as shown below:
- Push the Motorised Floor Tool (13) onto the other end of the Aluminium Tube (17) again until it clicks home.


Using Your Cordless Vacuum Cleaner
The Motorised Floor Tool (13)
1. Before using the Motorised Floor Too(13) the first choose the appropriate brush type for the floor type being cleaned:

Select the Carpet Brush (18) for vacuum cleaning carpets, rugs, etc. Select the Hard Floor Brush (19) for cleaning vinyl, laminate, tiled floors, etc.
| 2. To change the brush type, slide the brush retaining catch (a) right on the underside of the Motorised Floor Tool (13) as shown left. The Hard Floor Brush (19) is currently fitted in this example. 3. Lift out the Hard Floor Brush (19) from the Motorised Floor Tool (13) as shown in (b) left. |


4. Whilst installing the Carpet Brush (18), ensure that the squared end (c.) of the brush is towards the retaining catch and is positioned as shown above left.
5. Once in place, slide back the brush retaining catch and insert the Carpet Floor Brush (18) into the Motorised Floor Tool (13) as shown above right (d.).

6. Finally, push the brush retaining clip left to hold the brush in place as shown arrowed left. The vacuum is now ready to clean carpeted floors.
Using Your Cordless Vacuum Cleaner
1. Grasp the vacuum cleaner firmly by the Handle (7) and press the On/Off/Power Button (8 – arrowed right) to power up the cleaner.

2. During use, press the On/Off/Power Button (8) to select between a minimum or maximum suction power as follows:
| a. The First press of the On/Off/Power Button (8) – the power level will be at a minimum, the Min/Max Power Indicator (9 – arrowed left) will illuminate green. b. A second press of the On/Off/Power Button (8) will select the maximum power setting, the Min/Max Power Indicator (9 – arrowed left) will illuminate red. c. A third press of the On/Off/Power Button (8) will switch the vacuum off. |


3. Place your foot gently on the Motorised Floor Tool (13) and pull the cleaner back by the Handle (7) and start vacuum cleaning.

4. If the Aluminium Tube (17) is not required, the Motorised Floor Tool (13) can be attached directly as shown right for cleaning hard to get at areas such as stairs, car seats, etc.
Using the Crevice & Upholstery Tool (14)
1. Attach the Crevice Tool & Upholstery Tool (14) onto the Aluminium Tube (17) to clean carpet edges and hard to get at areas:

Left: Slide the brush back on the tool to reveal the crevice tool to clean carpet edges, etc. Alternatively use the Long Reach Crevice Tool(20).

Right: Pull the brush down on the Crevice Tool & Upholstery Tool (14) to clean curtains, upholstery, etc.
2. If the Aluminium Tube (17) is not required, attach the Crevice Tool & Upholstery Tool (14) directly to the cleaner, this is useful for cleaning soft furnishings, car seats, stairs, etc.:

Emptying and Cleaning Your Cordless Vacuum Cleaner


1. Once the Dust compartment (4) fills to the level shown arrowed left, it will need emptying and the filters cleaned.
appliance.

2. To empty the cleaner, hold the Dust Compartment (4) over a dust bin and press the Dust Release Catch (3) (arrowed right) and the base of the dust compartment will swing open and allow the collected dust to fall out into the dust bin.

3. After emptying the Dust Compartment (4), insert the top of the Crevice and Upholstery Tool (14) or the Long Reach Crevice Tool (20) into the base of the filter assembly as shown left and rotate anticlockwise to remove the Conical Hepa & Cyclonic Filters (2).

4. Twist the Conical Hepa filter clockwise in the and direction of the ‘UNLOCK’symbol as shown circled right and remove it from the Cyclonic filter.

5. Wash the Conical Hepa and Cyclonic Filters (2) in warm running water until clean. Allow the filters to dry thoroughly for 24 hours before reuse.
Replacing the Filters in Your Cordless Vacuum Cleaner

6. Replace the Conical Hepa Filter (2) inside the Cyclonic Filter, rotate the filter anticlockwise towards the ‘LOCK’ position as shown circled left.

7. Replace Conical Hepa & Cyclonic Filters (2) into the vacuum rotating clockwise as shown right.
Cleaning and Replacing the Outlet Filter

8. Press the Air Outlet Filter Door Release Button (10) to open the Air Outlet Filter Door (11). Remove the air outlet filter and wash in warm running water until clean. Allow the filter to dry thoroughly for 24 hours before reuse.
Replace the filter and push the Air Outlet Filter Door (11) closed.
Care and Use of your Cordless Vacuum Cleaner
- Always disconnect the cleaner from the main charger before cleaning.
- Clean outside of the cleaner with a clean damp cloth. Never clean with harsh or abrasive cleaners.
- Do not submerge the cleaner or its charger in water or any other liquids.
- Empty the Dust Compartment (4) as soon as it has reached maximum capacity (see above).*
- Wash the Conical Hepa, Cyclonic Filters (2), and the Air Outlet Filter (11) regularly – see table below
- Allow the filters to thoroughly dry out for 24 hours before reassembly and reuse.
Recommended filter cleaning intervals
| Filter Type | Recommended cleaning period |
| Conical Hepa Filter |
|
| Cyclonic Filter |
|
| Air Outlet Filter |
|


Fitting the Wall Bracket for Storage of your Vacuum Cleaner
Fit the Wall Bracket (21) to the wall using supplied Wall Plugs and Screws (or alternative appropriate fixings for the wall) as follows:

- Choose a suitable position to mount your vacuum cleaner on the wall.
- Measure 1 meter above the floor and mark the wall with a pencil as shown right
- Hold the Wall Bracket level on the wall in line with the 1-meter mark made and mark the position of the two screw holes through the Wall Bracket using a pencil as shown.
- Remove the Wall Bracket and using the marks, drill holes in the wall using a suitable 6mm masonry drill bit (not supplied).
- After drilling the holes, push the two supplied Wall Plugs into the holes as shown right:
- Screw the Wall Bracket to the wall using the supplied screws:
- Hang your Vacuum cleaner on the WallBracket as shown below:


Left: Close up showing how the vacuum cleaner mounts onto the Wall Bracket
Technical Specification
| Model Number | FLR00010 |
| Mains Charger | Input: AC 100-240V ~ 50/60Hz Output: 27V DC 500mA |
| Rated Power | 150W |
| Battery | 22.2V 2200mAh Li-Ion (6 cells) |
| Unpacked Weight (approx.) Dimensions (approx.) | 2.2 Kgs |
| Dimensions (approx.) | 210mm (l) x 128mm (w) x 290mm (h) |
| Vacuum (max) | 8-11kpa |
| Noise Level (approx.) | 72dB |
| Dust Compartment Capacity | 0.8L |
Customer Support
Should you require any product information, replacement parts, or accessories, please contact our customer care team at or call 0161 831 7879.
• Replacement parts and accessories are guaranteed for 1 year from the date of purchase.
• It is important to note that your warranty becomes invalid should non-Daewoo parts or accessories be used with this appliance
Troubleshooting Guide
| Problem | Possible Cause | Possible Solution |
| Unit fails to turn on. | Internal battery not charged. The charger is not plugged into the main socket. | Charge the internal battery. Ensure the charger is fully inserted into the socket and the socket is switched on. |
| Low suction or poor pick-up. | Dust Compartment is full. Filters are clogged. Low Power Selected |
Empty the cylinder. Check and clean the filters. Press the Min/Max Power Button (8) |
| The vacuum is making a “hissing” sound. | The airflow is restricted | Empty the Dust Compartment. Check and clean the filters. Clear any blockages if necessary. |


WARRANTY
Thank you for purchasing your Daewoo Vacuum.
As part of our commitment to quality, we are offering you an extra 2 years warranty in addition to your 1-year guarantee
Your Daewoo vacuum product is guaranteed for 1 year from the date of original purchase, with proof of purchase or receipt. If any defect should occur due to faulty workmanship or material, your faulty vacuum should be returned to the place of purchase, replacement or refund is at the discretion of the retailer. The guarantee is subject to the following provisions:
- The product must be correctly installed and operated in accordance with the requirements contained in the instruction manual.
- The product must be used solely for domestic purposes.
- It does not cover general wear and tear, damage, misuse, or any consumable parts.
- The guarantee will be rendered invalid if the product is re-sold or has been damaged through inexpert repair.
- The guarantee is only valid within the UK and Eire.
Your standard 1-year guarantee will only be extended to the maximum available for your individual product upon registration. (Note: products must be registered individually and cover the main body and housing). If you do not register your product within 28 days of the original purchase date, your product will only be guaranteed for 1 year.
To validate your extended 2-year warranty*please register your purchase online within 28 days of the original purchase date by registering at www.daewoowarrantyregistration.com/warranty-registration
*Your extended warranty is only valid with proof of purchase receipt and subject to the conditions outlined above.
Daewoo® is a registered trademark.
Produced and imported under license by ESG Ltd
TAIN THESE INSTRUCTIONS FOR FUTURE REFERENCE
Manchester M3 1JS www.esgltd.com