D-Link DWR-2101 5G Wi-Fi 6 Mobile Hotspot Installation Guide
D-Link DWR-2101 5G Wi-Fi 6 Mobile HotspotInstallation Guide

QUICK INSTALLATION GUIDE
Before You Begin
This installation guide provides instructions for installing the DWR-2101. Additional documentation is also available on the D-Link support website.
Package Contents
This DWR-2101 package includes the following items:
- DWR-2101 5G Wi-Fi 6 Mobile Hotspot
- Type-C USB Cable
- Cradle
- Quick Start Guide
If any of the above items are damaged or missing, please contact your local D-Link reseller.
Note: To power the unit, charge it using the Type-C USB cable or use a Type-C 5 V / 2 A adapter (not included in the package).
Hardware Overview
Interface Buttons
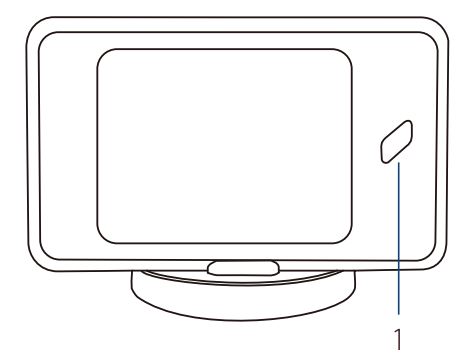

Figure 1: Interface Buttons

Table 1: Interface Description

Figure 2: Interface Buttons

Table 2: Interface Description
Interface Connectors

Figure 3: Bottom Connector

Table 3: Interface Description

Figure 4: Top Connector

Table 3: Interface Description
Installation
Nano SIM Card Installation
Note: The DWR-2101 is only compatible with Nano SIM cards.
1. Make sure the DWR-2101 is powered off.

Figure 4: Lifting the Back Cover
2. Remove the battery cover on the back of the device by gently prying it up from the case using the corner notch.
3. Insert the Nano SIM card into the Nano SIM card slot, following the orientation diagram next to the slot for proper positioning.
4. Replace the back cover. Ensure that the back cover is aligned correctly.
5. Press and hold the power button for three seconds to turn on the device.
Charging
1. Connect the Type-C USB cable to the power connector on the top of the DWR-2101.
2. Connect the other end of the Type-C USB cable to your computer, or connect it to a Type-C 5 V / 2 A power adapter to charge your device.
EZ-Five App Configuration
1. Download the free EZ-Five app from the App Store or Google Play by searching for EZ-Five or by scanning the QR code below.
2. Open the EZ-Five app to configure your device.
Connection
Connecting via Wi-Fi
Connecting via Wi-Fi
1. Swipe your finger on the prompt to unlock the DWR-2101.
2. Connect your device to one of the DWR-2101’s wireless networks. You can find the networks and their passwords by tapping the SSID icon on the homepage.
Tap the SSID password visible toggle to see the password.
Connecting via Ethernet
1. Use an Ethernet cable to connect the DWR-2101 to your Ethernet capable device.
Setting Up an Internet APN Profile
1. Swipe your finger on the prompt to unlock the DWR-2101.

Figure 5: Settings on the Homepage
2. Tap the Settings icon.

Figure 6: Profile Management in Settings
3. Tap Profile Management.

Figure 7: Create a new Profile
4. Tap Create

Figure 8: Profile Name
5. Input a Profile Name for your reference. Tap


Figure 9: Enter APN
6. Different Internet Service Providers (ISP) use different APNs. Please contact your ISP for their details including the username and password that they use (if applicable).
Tap

Figure 10: PdpType
7. Use the default PdpType (IPv4v6). Tap
Figure 11: Confirm Profile Information
8. Confirm your profile information on the screen. Tap
FAQ
Why am I unable to connect to my mobile Internet service?
Check to make sure the SIM card is installed properly, and that your SIM card has data service. Also, make sure that antivirus software is not blocking your connection and you are not connected to other Internet sources.
How do I restore my device to its factory
default settings?
Swipe the screen to find and tap on the Settings icon then scroll down and tap on Restore
Default. Tap the Restore button to restore the device to its default settings, which will erase the current configuration settings.
How do I remove the battery?
Turn the device off, then remove the battery cover on the back of the device by gently prying it up from the case using the corner notch. Then unlock the white latch by sliding the latch switch up. Use the gap next to the battery latch switch as leverage to gently pull the battery out of its compartment. Remember to slide the latch switch down to lock the battery back in place before replacing the battery cover.

Figure 12: Battery Latch
TECHNICAL SUPPORT eu.dlink.com/support


Ver. 1.00(EU)
2020/07/17