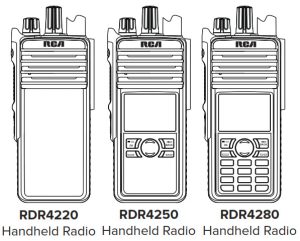
RCA RDR42X0 Series RDR4220 Professional Digital Two-Way Radios User Guide


RDR42x0 Professional
Digital Two-Way Radios
What’s Included:


Attaching the Antenna:

Screw the antenna into the connector at the top of the radio by holding the bottom of the antenna and turning it clockwise until secure.
Attaching the Battery:

- To install the battery, place it into the grooves on the radio chassis. If the radio belt clip is installed, press the clip to raise it and slide the battery into position. Slide battery into place, you will hear the latch click and the battery is installed. (See )
- To remove the battery from the radio, press the battery latch located on the bottom of the radio, and then slide the battery down about 5mm to release the latch. (See )
Note: If the battery is not securely locked, remove it and reattach it.
Complete User Manual at: RCACommunicationsSystems.com
QUICK START GUIDE

| 1 Side Button 1 (Programmable) 2 Push-To-Talk Button (PTT) 3 Side Button 2 (Programmable) 4 Side Button 3 (Programmable) 5 LED Indicator 6 On/Off/ Volume Knob 7 Channel Knob 8 Top Button (Programmable) 9 Speaker 10 Display (RDR4250 / RDR4280) |
11 OK / Menu Button 12 Front Button P1 (Programmable) 13 2-Way Navigation Button 14 Return / Home Button 15 Front Button P2 (Programmable) 16 Keypad 17 Microphone 18 Accessory Connector 19 Antenna 20 Battery |
Setting Up Your Charger:

- Plug the adapter’s AC connector into the AC outlet socket. (see 1 )
- Plug the adapter’s DC connector into the DC socket on the back of the charger. (see 2)
- Place the radio with the battery attached, or the battery alone, in the charger. (see 3)
- Make sure the battery contact is touching the charging terminals. The charging process begins when the red LED light illuminates.
- The green LED light will illuminate approximately two hours later, indicating the battery is fully charged.
Attaching/Removing Belt Clip:

Use the 2 screws (M2.5×8.0) supplied with the radio and insert these screws through the holes in the radio clip and into the holes in the aluminum case. If you want to remove the clip from the radio, just unscrew them, and remove the clip. You can put the screws back into the radio to make sure you do not lose them.
Attaching audio accessory:

Open the cover of the connector for the external speaker/MIC, and then insert the plug of the external speaker or microphone onto the connector socket of the radio. When screwing the accessory plug, make sure it is properly aligned (straight) to ensure the right connection to the connector of the radio.
ATTENTION:
- Remove battery for easy installation
- Do not use power tools, only a screwdriver
NOTE: Please loosen the screw prior to removing the audio accessory.
Function Keypad (RDR4250/RDR4280 model)

Programmable Keys
[P1] key, [P2] key, [P3] key, and Top Button, can be set as function or menu shortcut keys by your RCA dealer. The function keypad is to help navigate the on-screen menu of RDR4250 or RDR4280.
Basic Operations
Turning on/off the radio
Rotate the Radio On-Off/Volume knob clockwise / counter-clockwise until a click is heard to turn on/ off the radio.
Adjust the volume
After turning the radio on, rotate the Radio On-Off/Volume knob clockwise to increase the volume or counterclockwise to decrease the volume.
Selecting a channel
Locate the channel number on the Channel Knob rotate it to select the desired channel. While rotating the knob, there is an automated channel number Voice prompt.
Mode Switch
Through Channel Selector knob. Each channel of the radio can be set as an analog channel or digital channel by the dealer. The user can set them up through CPS software.
Call
Group Call
Talk group can be set by the dealer in advance and the operation methods are the same under DMO mode and TMO mode.
• Transmitting a group call
- Select the desired talk group through Channel Knob.
- Hold down [PTT] key to transmit a group call.
• Receiving and replying to a group call
You can receive the group call without any key operation. If the reply is needed, please hold down [PTT] key after the speech of the other side and then speak to the microphone.
Care and Cleaning
To guarantee optimal performance as well as the long service life of your radio, please follow the tips below.
Radio Care
Keep the radio far away from substances that can corrode the electronic circuit.
Do not hold the radio by its antenna or headset cable directly to prevent damage to its normal use.
Attach the accessory jack cover when the radio is not in use.
Radio Cleaning
Clean up the dust and fine particles on the radio surface and charging piece with a clean and dry lint-free cloth or a brush regularly.
Use a neutral cleaner and non-woven fabric to clean the keys, control knobs, and front case after longtime use. Do not use chemical preparations such as stain removers, alcohol, sprays, or oil preparations, so as to avoid surface case damage. Make sure that the radio is completely dry before use.
NOTE: Turn off the radio and remove the battery before cleaning.
Battery indicator
Battery Usage Status |
Audio Indication (RDR4220 model) | Display Indication (RDR4250/RDR4280) |
| Power ≤ 100% | 4 Beeps | |
| Power ≥ 80% | 3 Beeps | |
| Power ≥ 40% | 2 Beeps | |
| Power ≤ 40% | 1 Beep | |
| Power ≤ 10% | Low Battery Beep Warning |


Charger LED indicator
| LED Indication | Charging Status |
| LED Flashes Red Slowly | Standby (no load) |
| LED Glows Red | Charging |
| LED Glows Green | Fully Charged |
| LED Flashes Red Rapidly | Error |
Radio LED indicator
| LED Indication | Radio Status |
| Blinking Red | Radio is at low battery indication |
| Solid Orange | Powering up |
| Solid Green | Radio is receiving or detecting activity over the air |
| Solid Red | Radio is transmitting |
| Blinking Orange | Radio is scanning, or in the selective call, or emergency state |
| Note: When the LED is solid green, it indicates the radio detects activity over the air. Due to the nature of the digital protocol, this activity may or may not affect the radio’s programmed channel. | |
Display Icons
The LCD display shows radio status, text entries, and menu entries. The following are icons that appear on the radio’s display.
