RCA Front Loading Combo Washer/Dryer RWD270-6COM User Manual
RCA Front Loading Combo Washer/Dryer RWD270-6COM User Manual

This product has been manufactured and sold under the responsibility of Curtis International Ltd. RCA, the RCA logo, the two dogs (Nipper and Chipper) logo, are registered trademarks or trademarks of Technicolor (S.A.) or its affiliates and are used under license by Curtis International Ltd.
Any other product, service, company, trade or product name and logo referenced herein are neither endorsed nor sponsored by Technicolor (S.A.) or its Affiliates.
Important Safety Information
READ AND FOLLOW ALL SAFETY INSTRUCTIONS
SAFETY INSTRUCTIONS
WARNING: To reduce the risk of fi re, electric shock or injury to persons when using this appliance, follow basic safety precautions, including the following:
- Do not wash articles that have been previously cleaned in, washed in, soaked in or spotted with gasoline, dry-cleaning solvents or other
flammable or explosive substances as they give off vapors that could ignite or explode. - Do not add gasoline, dry-cleaning solvents or other flammable or explosive substances to the wash water as they give off vapors that could ignite or explode.
- Under certain conditions, hydrogen gas may be produced in a hot water system that has not been used for 2 weeks or more. HYDROGEN GAS IS EXPLOSIVE. If the hot water system has not been used for such a period, turn on all hot water faucets and let the water fl ow for several minutes before using the washing machine. This will release any accumulated hydrogen gas.
Do not smoke or use an open flame during this process. - Always unplug the washing machine from the power supply before attempting any service.
Disconnect the power cord by grasping the plug, not the cord. - To reduce the risk of fire clothes, cleaning rags, mop heads and similar items which have traces of any flammable substance such as vegetable oil, cooking oil, petroleum based oils or distillates, waxes, fats, etc, must not be placed in the washing machine. These items contain flammable substances which ever after washing may smoke or catch fire.
- Never place items in the washer that have been dampened with gasoline or any combustible or explosive substance. Do not wash or dry anything that has been soaked or spotted with any type of oil including cooking oils. Doing so can result in fire, explosion or death.
- Do not allow children to play on or in the appliance. Close supervision of children is necessary when the appliance is used near children.
- Pets and children may climb into the machine.
Check the appliance before every operation. - The glass door or protector may be very hot during operation. Keep children and pets away from the appliance during operation.
- This appliance is not intended for use by persons (including children) whose physical, sensory or mental capabilities may be different or reduced, or who lack experience or knowledge, unless such persons receive supervision or training to operate the appliance by a person responsible for their safety.
- Children must be supervised to ensure they do not play with the appliance.
- When children become old enough to use the appliance, it is the legal responsibility of the parents or legal guardians to ensure that they are instructed in safe practices by qualified persons.
- Do not machine wash fiberglass materials such as curtains and window coverings that use fiberglass materials. Small particles may remain in the washing machine and stick to fabrics in subsequent wash loads causing skin irritation.
- Before the appliance is removed from service or discarded, remove the door and cut off the power cord.
- Do not reach into the appliance if the tub or agitator is moving.
- Do not install or store this appliance where it will be exposed to the weather.
- Do not tamper with the controls.
- Do not repair or replace any part of the appliance or attempt any servicing unless specifically recommended in the user maintenance instructions or in published user repair instructions that you understand and have the skills to carry out.
- Never stop a tumble dryer before the end of theprogram.
- Make sure that all pockets are emptied.
- Sharp and rigid items such as coins, nails,screws or stones etc, may cause serious damage to the appliance.
- Check whether the water inside the drum has drained before opening the door. Do not open the door is there is water visible.
- Do not disconnect the power cord from the power source with wet hands.
- To reduce the risk of fi re do not dry articles containing foam rubber of similarly textured rubber like materials.
- If connected to a circuit protected by fuses, use time delay fuses with this appliance.
- Do not dry articles that have been previously cleaned in, washed in, soaked in or spotted with gasoline, dry-cleaning solvents or other flammable or explosive substances as they give off vapors that could ignite or explode.
- Do not add fabric softeners or products to eliminate static unless recommended by the manufacturer of the fabric softener or product.
- Do not use heat to dry articles containing foam rubber or similarly textured rubber-like materials.
- The interior of the appliance should be cleaned periodically by qualified service personnel.
- Do not place items exposed to cooking oils in the dryer. Items contaminated with cooking oils may contribute to a chemical reaction that could cause a load to catch fire.
- Packing materials can be dangerous to children.
Keep all packing materials such as plastic bags, foam, etc, away from children. - This appliance should not be installed in rooms that are very wet or likely to accumulate standing water.
- This appliance should not be installed in rooms that may accumulate flammable, explosive or caustic gasses.
- Ensure that the water and electrical devices are connected by a qualified technician in accordance with the manufacturer’s instructions and local safety regulations.
- All packaging and transport bolts must be removed before operating this appliance.
- This appliance is for indoor use only.
- Do not climb or sit on the top of this appliance.
- Do not lean against the appliance door.
- Do not close the door with excessive force.
- Handle the appliance carefully. Do not use the door to lift or grip the appliance.
- Warnings and important safety instructions in this manual DO NOT cover all possible conditions and situations that may occur. It is your responsibility to use common sense, caution and care when installing, maintaining and operating this appliance.
GROUNDING INSTRUCTIONS
This appliance must be grounded. Grounding reduces the risk of electrical shock by providing an escape wire for the electrical current.
This appliance has a cord that has a grounding wire with a 3-prong plug. The power cord must be plugged into an outlet that is properly grounded.
If the outlet is a 2-prong wall outlet, it must be replaced with a properly grounded 3-prong wall outlet. The serial rating plate indicates the voltage and frequency the appliance is designed for.
WARNING – Improper use of the grounding plug can result in a risk of electric shock.
Consult a qualified electrician or service agent if the grounding instructions are not completely understood, or if doubt exists as to whether the appliance is properly grounded.
Do not connect your appliance to extension cords or together with another appliance in the same wall outlet. Do not splice the power cord.
Do not under any circumstances cut or remove the third ground prong from the power cord. Do not use extension cords or ungrounded (two prongs) adapters.
If the power supply cord is damaged, it must be replaced by the manufacturer, its service agent or similar qualified person in order to avoid hazard.
Any questions concerning power or grounding should be directed toward a certified electrician.
STATE OF CALIFORNIA PROP 65 WARNING
The California Safe Drinking Water and Toxic Enforcement Act requires the Governor of California to publish a list of substances known to the State of
California to cause cancer, birth defects and other reproductive harm and requires businesses to warn of potential exposure to such substances.
This product contains copper in the power cord. Copper is a chemical known to the State of California to cause cancer, birth defects or other reproductive harm. This appliance can cause low level exposure to substances including benzene, formaldehyde and carbon monoxide.
INSTALLATION INSTRUCTIONS
REQUIRED TOOLS
- 1/4” nut driver
- 3/8” socket with ratchet
- 3/8” open end wrench
- Adjustable wrench or 7/16” socket with ratchet
- Adjustable wrench or 9/16” open end wrench
- Channel lock adjustable pliers
- Carpenter’s level
LOCATION
- The location must be large enough to allow the appliance door to open fully. The door can open more than 90° and is not reversible.
- It is recommended to allow 2.5 cm of space on all sides of the appliance to reduce noise.
- The floor must be level and strong enough to support the appliance when it is fully loaded.
- It is not recommended to install this appliance on carpeting.
- The appliance must be located within 1.2 m (4 feet) of the water source and a drain.
- The appliance must be located within 1.8 m (6 feet) of a properly grounded power outlet.
- Do not operate this appliance in temperatures below 0°C (32°F) as water inside the hoses or appliance could freeze and damage the appliance.
- Avoid placing the appliance in direct sunlight.
- Do not place the appliance near heat sources.
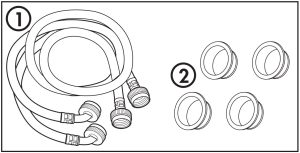
INCLUDED ACCESSORIES
- Two water hoses
- Four transport hole plugs

DIMENSIONS

TRANSPORT BOLTS
Remove all packaging materials from the appliance.
Please dispose of packing materials properly. Do not allow children to play with packing materials.
Before using this appliance, the transport bolts must be removed from the back.
- Loosen the four transport bolts using a wrench and remove them.
- Cover the holes with the provided transport hole plugs.
- The transport bolts secure the inner tub of the appliance during transportation. Keep the transport bolts for future use.

TRANSPORT FOAM
Ensure that the transport foam is removed from the under side of the appliance. This foam holds the motor and tub steady during transportation and must be removed before using the appliance.
If the foam does not come out all in one piece, put the appliance on its side and ensure that all foam is removed from the inside of the appliance before using it for the first time.

LEVEL THE APPLIANCE
There is are four adjustable feet on the four corners of the appliance. If the appliance is not level, follow these instructions.
- Loosen the lock nut securing the adjustable feet.
- Turn the feet until the appliance is level.
- Tighten the lock nuts to ensure the feet stay secure.

INLET HOSE CONNECTION
This appliance can be connected using one hose or two, depending on how many connections are available at the water supply.
If only one faucet is available, use the cold water connection on the back of the appliance. If two faucets are available, then both water connections can be used.
First, connect the provided inlet hoses to the back of the appliance. The hot water connection is on the left and the cold water connection is on the right.

WATER SUPPLY
Connect the inlet hoses to the water supply faucets.
Tighten the connections with a wrench.
Turn on the water supply before using the appliance and ensure that there are no leaks at any water connections.

DRAIN HOSE INSTALLATION
The drain hose will arrive pre-attached to the appliance. When running the drain hose toward a sink, standpipe or drain, ensure that there are no bends in the hose as this can cause a blockage and impede the drain function.
Standpipe drain system
A standpipe drain requires a minimum diameter of 2” (5 cm). The capacity must be at least 17 gallons (64 liters) per minute. The top of the standpipe must be at least 60 cm high and no higher than 100 cm from the bottom of the washer.

Laundry tub drain system
The laundry tub must have a minimum capacity of 20 gallons (76 liters). The top of the laundry tub must be at least 60 cm above the floor

Floor drain system
The floor drain system requires a siphon break that must be purchased separately. The siphon break must be a minimum of 28” (71 cm) from the bottom of the washer.
OPERATING INSTRUCTIONS
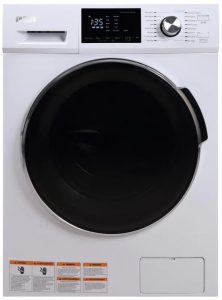
CONTROL PANEL

- Display panel: displays the current program and status.
- Function setting: shows the current function setting.
- Program button: used to select the desired program.
- Power button: used to turn the appliance on or off.
- Start/Pause button: used to start a new program or pause a program already in progress.
AVAILABLE PROGRAMS
- My Cycle: used to set and remember a favourite cycle. Set the desired favourite program and then press and hold Spin 3sec to remember it. Press this button at any time to start the set favourite cycle. The default favourite cycle is Perm Press.
- Quick Wash: Extra short program for lightly soiled items.
- Delicates: for delicate washable materials like silk, satin or synthetic.
- Wool: for wool washable materials. Check the label to ensure it says “machine wash” and choose the wash temperature as per the clothing label.
- Baby Wear: used for baby clothing.
- Sanitary: a high temperature wash suitable for difficult to wash clothes.
- Auto Dry: use to allow the appliance to set the dry time based on the remaining moisture in the wash load.
- Timed Dry: use to set a specific dry time.
- Normal/Cotton: use for hard wearing and heat resistant textiles made of cotton or linen.
- Perm Press: use for normal load of laundry.
- Heavy Duty: use for heavy loads such as towels or leans.
- Bulky/Large: use for bulky or large items such as blankets.
- Sports Wear: use for washing active wear.
- Spin Only: use to add an extra spin cycle to the program.
- Rinse & Spin: use to add an extra rinse & spin cycle to the program.
- Tub Clean: used to clean the inside of the appliance. It applies high temperature sterilization to clean the drum of the washing machine. Do not add any clothing to this cycle, only vinegar or bleach. Use whenever necessary.
WASH AND DRY CYCLE TABLE
The parameters outlined in this table are for reference purposes only. Actual cycle times and temperatures can vary.
Normal/Cotton is the standard wash program and is suitable to clean most normally soiled items. It is the most efficient program in terms of water and energy usage.
| Program | Wash / Dry Load (kg) | Temperature (°C) | Time (hours) | Spin Speed |
| Normal / Cotton | 12 / 8 | Warm | 1:04 | Medium |
| Perm Press | 6 | Warm | 4:58 | High |
| Heavy Duty | 12 / 8 | Hot | 2:36 | Medium |
| Bulky / Large | 6 | Warm | 2:18 | Medium |
| Sport Wear | 6 | Warm | 2:08 | Medium |
| Spin Only | 12 | N/A | 0:12 | High |
| Rinse & Spin | 12 | N/A | 0:20 | High |
| Tub Clean | N/A | Hot | 1:58 | N/A |
| Timed Dry | 0.8 / 1.0 / 3.0 | N/A | 1:28 | Highest |
| Auto Dry | 8 | N/A | 4:18 | Highest |
| Sanitary | 6 | Hot | 3:09 | Medium |
| Baby Wear | 12 | Eco | 1:39 | Medium |
| Wool | 2 | Warm | 1:37 | Low |
| Delicates | 3. | Eco | 1:00 | Low |
| Quick Wash | 2 | Cold | 2:13 | High |
Important: Do not attempt to dry a full load of laundry. A half load is the maximum for all dry cycles.
Note: The default display time is only the wash time. The drying time will display when a drying cycle is chosen.
DETERGENT
This appliance is designed for high efficiency detergent. It is recommended to use 1/4 to 1/2 of the amount of detergent recommended by the detergent manufacturer. Remember to reduce the amount of detergent if the load is small or lightly soiled or if the water supply is very soft water.
There are three compartments in the detergent dispenser on the front of the appliance.
- Main detergent compartment.
- Never exceed the manufacturer’s recommendations when adding detergent.
- Powder or liquid detergent can be used.
- Fabric softener compartment.
- This compartment holds liquid fabric softener that will be dispensed automatically during the final rinse cycle.
- Do not exceed the maximum fi ll line.
- Adding fabric softener is optional.
- Pre-wash detergent compartment.
- Do not use more than 1/2 of the amount that is put into the main detergent compartment.
- Adding pre-wash detergent is optional and should only be used for heavily soiled loads.

FUNCTION INSTRUCTION
Prior to starting the washing machine, check the following:
- The drain hose is in the correct position.
- There are no leaks in the inlet hoses when the faucets are turned on.
- The power cord is properly plugged into a three prong grounded outlet.
- All coins and loose items have been removed from clothing.
- Place clothing into the washing machine. Drop items loosely into the tub. Do not pack items tightly. Items must be able to move freely through the wash water for best cleaning results.
- Follow the instructions to set the desired wash program.
- Add the desired amount of detergent.
- Close the door and press the start/pause button to begin the desired program.
- A wash program can be paused once it is in operation by pressing the start/pause button.
- The appliance will not operate if the lid is open.
- When a program is finished, an alarm will
sound. - During the drying cycle, water removed from the wash load will be drained through the drain hose. Ensure that the drain hose remains in place during the drying cycle.
TIME SAVE FUNCTION
This function can decrease washing time.
Note: The time save function can be used on the following cycles: normal/cotton, perm press, heavy duty, bulky/large and sports wear.
CHILD LOCK FUNCTION
The child lock will lock the control panel so that options cannot be chosen or changed by accident.
Press and hold the function and select buttons at the same time for 3 seconds to engage the child lock.
Repeat this procedure to disengage the child lock.
TIME DELAY FUNCTION
The time delay function can be used to set the appliance to run at a later time.
To set the time delay function:
- Select the desired wash and dry program.
- Press the delay button repeatedly to choose the amount of time before the appliance will run the chosen cycle.
- Press the start/pause button to confirm the selections. The appliance will count down the delay time and will begin the chosen program when the time runs out.
Note: If power to the appliance is lost during the time delay period, the appliance will remember the program when power is restored and will continue the count down.
ADDING AN ITEM
It is possible to add a forgotten item to the appliance when a wash program is already running.
To add a forgotten item:
- Press and hold the start/pause button for 3 seconds to pause the current program.
2 - Wait until the drum stops rotating, the water level is below the bottom of the door and the door is unlocked.
- Add the forgotten item and close the door.
- Press the start/pause button to resume functioning.
Note: Do not add an item when the water level is higher than the bottom of the door as this can cause water to leak out of the appliance.
Caution: The inside of the appliance may be hot.
Use caution when adding a forgotten item to a wash program.
EMERGENCY DOOR RELEASE
In case of a power failure or other circumstances where the door cannot be opened, there is an emergency door release on the front of the appliance. Open the filter door and pull down on the emergency cord to open the door.

CARE & MAINTENANCE
CLEANING
Before performing any cleaning or maintenance, ensure that the water inlet hose has been disconnected and that the power cord has been unplugged.
Clean the outside of the appliance with a warm, damp cloth. Avoid using detergents or chemicals as this can damage or discolor the cabinet.
DETERGENT TRAY
The detergent dispenser may occasionally need to be cleaned of accumulated detergent.
- Press down at the indicated location and pull the dispenser outward.
- Lift the slip and remove the softener cover. Wash the dispenser with warm water.
- Replace the softener cover and replace the dispenser in the appliance.


FAUCET FILTER
There is a filter inside the inlet hose that may need to be cleaned of accumulated debris or hard water scale. Ensure the water supply is turned off before cleaning. Remove the inlet hose from the faucet and rinse with water.
DRAIN PUMP FILTER
The drain pump filter on the front of the appliance should be periodically cleaned of any accumulated debris.
- Open the drain cover.
- Rotate 90° and pull out the lower drain hose.
- Drain any accumulated water in a drain or vessel.
- Open the filter by turning it clockwise.
- Remove any debris and rinse the filter with water.
- Replace the filter and close the drain cover.


TROUBLESHOOTING
| PROBLEM | POSSIBLE CAUSE |
| Washer does not operate | Not plugged in. |
| The circuit breaker tripped or a blown fuse. | |
| The door is not closed. | |
| The water source is not turned on. | |
| No water or insufficient water supply | The water source is not turned on. |
| The water inlet hose is bent. | |
| The filter screen in the water inlet is clogged. | |
| The washing machine does not drain | The drain hose is bent. |
| There is a problem with the drain pump. | |
| Washing machine vibrates or is too noisy | The washer is not level. |
| The washing machine is touching another object. | |
| The laundry load is not balanced. | |
| Washing machine does not spin | The door is not closed. |
| The washer is not level. | |
| Water filling and draining at the same time | Ensure drain hose is elevated 0.7 m to 1.2 m off the |
| floor; if the drain hose is too low it can cause water to siphon out of the appliance as it fills | |
| Cabinet leaking from bottom | Tub is overloaded |
| Water level is too high for the amount of washing | |
| Abnormal noise | Ensure the transport bolts have been removed |
| Ensure the appliance is level |
ERROR CODES
- E30 – Door is not closed properly
- E 10 – Water pressure is too low or drain pump installed incorrectly
- E21 – Water is not draining correctly
- E 12 – Water overflow
- EXX – Other error
WARRANTY CARD
To make a warranty claim, do not return this product to the store. Please email or call 1-800-968-9853.
1 Year Warranty
This product is warranted to be free from defects in material and workmanship for a period of one (1) year from the date of original purchase. During this period, your exclusive remedy is repair or replacement of this product or component found to be defective, at our option; however, you are responsible for all costs associated with returning the product to us. If the product or component is no longer available, we will replace with a similar one of equal or greater value. Prior to a replacement being sent, the product must be rendered inoperable or returned to us.
This warranty does not cover glass, filters, wear from normal use, use not in conformity with the printed directions., or damage to the product resulting from accident, alteration, abuse, or misuse. This warranty extends only to the original consumer purchaser or gift recipient. Keep the original sales receipt, as proof of purchase is required to make a warranty claim. This warranty is void if the product is used for other than single-family household use or subjected to any voltage and waveform other than as on the specified rating on the label (e.g., 120V~60Hz).
We exclude all claims for special, incidental, and consequential damages caused by
breach of express or implied warranty. All liability is limited to the amount of the
purchase price. Every implied warranty, including any statutory warranty or
condition of merchantability or fitness for a particular purpose, is disclaimed
except to the extent prohibited by law, in which case such warranty or condition is limited to the duration of this written warranty. This warranty gives you specific legal rights. You may have other legal rights that vary depending on where you live. Some states or provinces do not allow limitations on implied warranties or special, incidental, or consequential damages, so the foregoing limitations may not apply to you.
For faster service, locate the model, type, and serial numbers on your appliance.