Honeywell T136 Programmable Thermostat Installation Guide


Honeywell T136 Programmable Thermostat

Installation & Wiring
Install the Thermostat
Must be installed by a competent person. To ensure your safety, make sure the mains power is switched OFF before accessing wiring.

Installation Procedure
- Remove the screw holding the control module to the power base.
- Lift the control module to remove it from the power base.
- On the power base, remove the screw holding the wire cover and wire the thermostat.
- Once all wiring is complete, secure wire cover.
- Secure the power base onto the electrical box using the mounting holes.
- Mount the control module onto the power base and secure using the screw.
- Return power to the heating system.

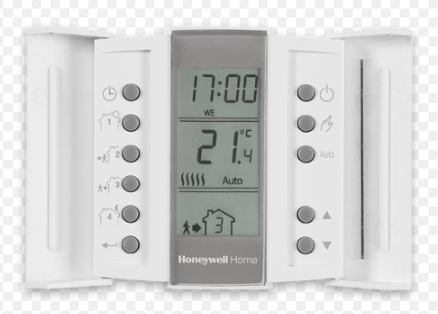
Installation
- Clock/Day settings
- Setpoint is displayed when arrow appears
- Program settings
- Heating is On
- Return/Exit
- Power (On/Off)
- Manual mode
- Auto mode
- Current program
- Adjustment buttons

Remote Input Wiring
The thermostat is equipped with a remote input which allows connection of a telephone controller or a home automation system to switch from normal operating mode to Frost Protection mode, or vice versa.
NOTE: For details on wiring and operating the telephone controller or home automation system, refer to the instruction manual of particular models.

Installing the Batteries
When you first install the batteries, the unit runs a sequence of tests which lasts approximately 5 seconds.
The thermostat will display an icon indicating that the batteries must be replaced. This icon will be displayed for 60 days; after this delay, the thermostat will shut down the heating unit. Once batteries have been replaced, you will have to reprogram the clock & day settings; all other programming is stored in a protected memory.
On/Off Button
The thermostat is equipped with an On/Off button making it possible to put the thermostat in sleep mode when its use is not required (e.g. summer). This will not affect the clock or programming.

Clock and Day Settings
- Press the hour segment flashes.
- Pressto set the hour.
- Press the minutes segment flashes.
- Press to set the minutes.
- Press the day flashes.
- Press to set the day.
- Press to exit.
Operating Modes
Automatic
Executes the schedule. Press Auto to activate the Auto mode.
Manual
Maintains a constant temperature. PressJ to activate the Manual mode and set the temperature using pq.
Frost Protection
Maintains the Frost Protection setpoint during a prolonged absence. The Frost Protection setpoint is pre-programmed to 10°C.

Press J for 1 second to activate the Manual mode. HoldJ for 3 seconds. The icon is displayed. To deactivate the Frost Protection mode, activate the Auto or Manual mode.
Temporary Bypass
When the thermostat is in Auto or Frost Protection mode, you can bypass the mode for two (2) hours. The thermostat will maintain the temperature bypass for two (2) hours, then return to previous operating mode. Set the temperature using these buttons. The icon corresponding to the bypassed mode will flash to indicate the bypass.
Pre-programmed Schedule
The thermostat is pre-programmed with the following schedule:

Programs 1 and 4 are repeated from Monday to Sunday.
Programs 2 and 3 are repeated from Monday to Friday.
Modify the Schedule
- Press the button associated with the program you wish to modify.
- Enter the program start time using the buttons.
- Press the program button again.
- Enter the desired temperature using the pq buttons.
- Press to exit.
The thermostat is equipped with the Early Start function, refer to Advanced Programming.

Advanced Programming
Hold the Auto button for 3 seconds to access the advanced programming. Then, press Auto to select a menu.
| Menus | Default | Options |
| PPd MO | 4 | 0, 2, 4 |
| PPd TU | 4 | 0, 2, 4 |
| PPd WE | 4 | 0, 2, 4 |
| PPd TH | 4 | 0, 2, 4 |
| PPd FR | 4 | 0, 2, 4 |
| PPd SA | 2 | 0, 2, 4 |
| PPd SU | 2 | 0, 2, 4 |
| CPH | 5 | 2, 3, 4, 5, 6 |
| HLd | 10ºC | 5ºC to 28ºC |
| ES | OF (off) | OF/ON |
| PP | OF (off) | OF/ON |
- Press Auto until the desired menu is displayed.
- To modify the default programming, use the buttons and select from the available options.
- Press to exit.
Modify the Number of Programs per Day (PPd)
You can select the number of programs to be executed for each day of the week.
NOTE: When none (0) is selected, the thermostat will maintain the temperature setpoint of the last program.
Modify the Heating Cycles (CPH)
The shorter the cycles, the greater your comfort. However, your system will be activated more often when using shorter cycles.
| Cycles/hour | Length | Installation |
| 2 | 30 min. | Commercial unit |
| 3 | 20 min. | Commercial unit |
| 4 | 15 min. | Fuel, gas & electrical furnace |
| 5 | 12 min. | Direct wiring to circulator |
| 6 | 10 min. | Direct wiring to circulator |
Modify the Frost Protection Setpoint (HLd)
Use this menu to modify the Frost Protection setpoint associated with the Frost Protection mode.
Early Start (ES)
When Early Start is activated, the thermostat calculates the optimum start time to obtain the desired temperature by the programmed set time.
Pump Protection (PP)
For hot water installations, it is recommended that the pump be activated at least 15 seconds every 24 hours to avoid any seizing.
Technical Specifications
Power supply: 2 AAA (LR03) alkaline batteries
Max. resistive load: 5A @ 240 VAC
Max. inductive load: 2A @ 240 VAC
Remote input: 12 VDC / ± 10% / 5 mA
Control device: Electronic
Automatic action: Type 1B
Storage temperature: -20°C to 50°C
Operating temperature: 0°C to 50°C, 95% relative humidity without condensation
Temperature setpoint range: 5°C to 28°C
Temperature setpoint interval: 0.5°C
Temperature display resolution: 0.1°C
Temperature display accuracy: ± 0.3°C
Software: Class A
Protection degree: IP 20
Environment: normally polluted
Environmental Compliance: RoHS-Directive 2011/65/EU
Bk-electronic GmbH
Hardhofweg 40
74821 Mosbach
Germany
For assistance with this product please visit: livewell.honeywellhome.com