Honeywell HY369 TRV Thermostatic Radiator Valve User Manual


HY369 TRV Thermostatic Radiator Valve
User Manual

| Search for ” Smart RM or Smart life ” Download the Wifi App with the following icon. |
After the actuator stroke detection is completed, long-press the key combination “ |


APP need connect to gateway .then connect to the device
Technical Data
| Power: 3*2 AA* 1.5V alkaline batteries Working temperature::-10~60°C The default range of temperature adjustment:5~35°C Range of temperature display::0~70°C Insulating condition: Normal environment Running program: Set per 1 week as a cycle |
Maximum current:90mA Display accuracy::0.5℃ Probe sensor::NTC(10k)1% Thread size: M30*1.5 Size(mm):66*52*82+20mm Maximum route:4.5mm |
Initial Setting
| First-time open thermostat, it displays all icons for 3s then program version NO. | Test One. “ADA” displays. Press. |
Test Two. Finished |


! Adjustment Error(If solved errors restart by pressing


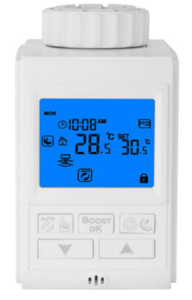
Home Screen


Quick Operation
| Icon | Description |
| |
|
| |
| |
|


Function
1) Time Setting
Long press
2) Holiday Mode
Press
3) Open Window Detection
It is the default that the open window function was closed after being put into batteries , and display – – , And open it on advance setting A2 (once change batteries, should set it again)
When room temperature suddenly drops into temp threshold, valve close for 15 minutes. After finishing, if the room temp is still lower than the temp threshold, it will keep this model.
4) Programmable Mode
P2 5+2 days programmable (Default)
Long press
P0 Manual Programmable(Default):
| Period | Default Period | Default temperature |
| 1 | 6:00-8:00 | 20℃ |
| 2 | 8:00-11:30 | 15℃ |
| 3 | 11:30—12:30 | 15℃ |
| 4 | 12:30—17:30 | 15℃ |
| 5 | 17:30—22:00 | 20℃ |
| 6 | 22:00—6:00 | 15℃ |
Advanced Options
Long press
| NO | Description | Range | Default |
| A1 | Temperature Calibration | -9-+9℃ | 0.5℃ |
| A2 | Open Window Detection | 1 open and setting open window temperature: – – mean closed it ,press |
1 Temp threshold – – ℃( Default:Close ) 2 0:15 mean valve close time |
| A3 | Auto be locked | 0:cancel this function 1:open this function |
0 |
| A4 | Min Temperature | 1-10℃ | 5℃ |
| A5 | Max Temperature | 30-70℃ | 35℃ |
| A6 | BOOST Extension | 100s-900s | 300 |
| A7 | Valve Opening | 100 mean valve opening100% 5 mean valve opening 5% |
2℃ |
| A8 | Temperature Tolerance | 1-9℃ | |
| A9 | Factory Default | Display A o, press |
Please arrange professional technician to install the product according to drawings and instructions.
Disconnect power supply before making any connection. Contact with components carrying hazardous voltage can cause electrical shock.
