Bosch GIC 120 C Professional Cordless Inspection Camera Instruction Manual


GIC 120 C Professional

Original instructions


Safety instructions
The safeguards integrated into the inspection camera may be compromised if the inspection camera is not used in
accordance with these instructions. STORE THESE INSTRUCTIONS IN A SAFE PLACE.

health.


Product Description and Specifications
Please observe the illustrations at the beginning of this operating manual.
Intended Use
The digital inspection camera is suitable for inspecting areas
that are dark or difficult to access. It is also suitable for moving and removing small and light objects (e.g. small screws) after fitting the supplied accessories on the camera head.
The digital inspection camera must not be used for medical purposes. It is likewise not intended for removing pipe blockages or installing cables.
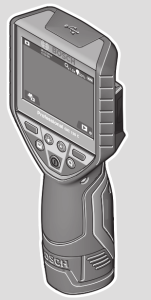
Product Features
The numbering of the product features refers to the representation of the inspection camera on the graphic pages.
(1) Handheld device
(2) Magnification button
(3) On/off button
(4) Gallery/settings button (1st level) OK/delete button (2nd level)
(5) Up is Up™ button (1st level) Button for scrolling forwards (2nd level)
(6) Actuator for photo or video recordings or playing videos (gallery mode)
(7) Lighting/brightness button (1st level) Button for scrolling backward (2nd level)
(8) Button for switching between photo and video mode (1st level) Back button (2nd level)
(9) Display
(10) Top flap
(11) Slot for Micro-SD card
(12) Connection for Micro-USB cable
(13) Camera cable
(14) Camera head
(15) Illumination light in the camera head
(16) Camera lens
(17) Rechargeable battery)
(18) Release button
(19) Micro-USB cable
(20) Micro-SD card
(21) Camera connection
(22) Locking mechanism for the camera cable
(23) Magnet
(24) Hook
(25) Mirror
(26) Battery adapter cover
(27) Battery adapter cap
(28) Port
A) Accessories shown or described are not included with the product as standard. You can find the complete selection of accessories in our accessories range.
Display Elements (Selection)
(a) Selected photo or video mode
(b) Status bar
(c) Selected magnification
(d) Selected lighting/brightness
(e) State of charge of rechargeable batteries/non-rechargeable batteries
(f) Symbol for switching between photo and video mode
(g) Symbol for gallery mode/settings mode
(h) Switching between color rendition/black and white rendition
(i) Brightness of display setting
(j) Date/time setting
(k) Time of automatic switch-off setting (auto-off function)
(l) Setting for lighting duration of the display
(m) Current memory space assignment of a Micro-SD card
Technical Data
| Digital inspection camera | GIC 120 C | |
| Article number | 3 601 B41 2. | |
| Rated voltage | ||
| – With rechargeable battery | V= | 10.8/12 |
| – With non-rechargeable batteries | V= | 6 |
| Non-rechargeable batteries (alkaline manganese) | 4 × 1.5 V LR6 (AA) | |
| Relative air humidity | % | 5–95A) |
| Length of camera cable | m | 1.2 |
| Smallest bend radius of the camera cable |
mm | 25 |
| Camera head diameter | mm | 8.5 |
| Display resolution | 320 × 240 | |
| Approx. operating time | h | 2B)/6C) |
| Weight according to EPTA-Procedure 01:2014 | kg | 0.64 |
| Dimensions (length × width × height) | mm | 217 × 90 × 49 |
| Environmental conditions | ||
| – Recommended ambient temperature during charging | °C | 0 to +35 |
| – Permitted ambient temperature during operation D) | °C | –10 to +50 |
| – Permitted ambient temperature during storage without a rechargeable battery |
°C | –20 to +70 |
| – Permitted ambient temperature during storage with a rechargeable battery |
°C | –20 to +50 |
| Recommended rechargeable batteries | GBA 10,8V… GBA 12V… | |
| Recommended chargers | GAL 12. |
A) Free of condensation
B) With non-rechargeable batteries
C) With the rechargeable battery at 100 % brightness of the light in the camera head
D) Limited performance at temperatures <0 °C
Assembly
Power supply
The inspection camera can be operated either with commercially available non-rechargeable batteries or with a Bosch lithium-ion rechargeable battery.
Operation with battery adapter (see figure A)
The batteries are inserted into the battery adapter.
To insert the non-rechargeable batteries, slide the cover (26) of the battery adapter into the port (28). Place the batteries into the cover as per the illustration on the cap (27). Slide the cap over the cover until you feel it click into place and it is flush with the handle of the inspection camera.
To remove the batteries, press the release buttons (18) on the cap (27) and pull the cap off. Pull out the cover (26) from inside the port (28).
Always replace all the batteries at the same time. Only use batteries from the same manufacturer and which have the same capacity.
Operation with rechargeable battery (see figure B)
Note: The use of rechargeable batteries unsuitable for your inspection camera can lead to malfunctions or damage to the inspection camera.
Note: The battery is supplied partially charged. To ensure full capacity of the battery, completely charge the battery before the first use.
The lithium-ion battery can be charged at any time without reducing its service life. Interrupting the charging process does not damage the battery.
To insert the charged rechargeable battery (17), slide it into the port (28) until you feel it click into place and it is flush with the handle of the inspection camera.
To remove the battery (17), press the release buttons (18) and pull it out of the port (28). Do not use force to do this.
State of charge of rechargeable battery/non-rechargeable battery
If the state of charge of the rechargeable batteries/non-rechargeable batteries is low, the

– Memory space assignment/formatting of Micro-SD card (m)
Status bar
The status bar (b) is shown on the display for approx.
2 seconds each time a button is pressed. It shows:
– The selected recording mode (a)
– Date and time
– The selected magnification (c)
– The selected brightness (i)
– The state of charge of the rechargeable battery/non-rechargeable batteries (e)
Transferring images and videos
Transferring images and videos is only possible with an inserted Micro-SD card (20).
The inspection camera can be connected to a computer using a Micro-USB cable (19), to transfer images and videos.
Note: The USB port cannot be used with Apple products (e.g. MacBooks). Data transfer functions only via the MicroSD card in this case.
A symbol in the display of the inspection camera shows that it is connected to a computer.
The inspection camera is displayed on the computer as an external drive.
The rechargeable battery of the inspection camera cannot be charged via the connection (12).
Connecting a micro USB cable for data transfer
Open the top flap (10) and put the Micro-USB cable (19) into the connection (12) in the correct position.
After the data has been transferred, remove the Micro-USB cable and close the top flap again.
Working Advice
Check the environment that you want to inspect, paying particular attention to obstacles or hazardous areas.
Bend the camera cable (13) so that the camera head can be easily introduced into the environment to be inspected.
Carefully introduce the camera cable.
Adjust the brightness of the camera illumination light (15) so that the image is easily recognizable. When photographing highly reflective objects, for example, you can achieve better results in lower light.
If objects to be inspected look blurred, then reduce or increase the distance between the camera head (14) and the object.
Recommendations for optimal handling of the battery
Protect the battery against moisture and water.
Store the machine only within a temperature range between
−20 °C and 50 °C. As an example, do not leave the battery in the car in summer.
A significantly reduced operating time after charging indicates that the battery has deteriorated and must be replaced.
Follow the instructions on correct disposal.
Errors – causes and corrective measures
| Cause | Corrective measures |
| Error indicator in the display | |
| Fit camera cable. | |
not correctly inserted |
Insert Micro-SD card and push in all the way. |


Maintenance and Service
Maintenance and Cleaning
Do not immerse the handheld device (1) in water or other liquids.
Always keep the inspection camera clean. Clean the inspection camera and all accessories particularly thoroughly after you have worked in areas with substances harmful to health.
Wipe off any dirt using a damp, soft cloth. Do not use any detergents or solvents.
Clean the camera lens (16) in particular regularly and make sure to check for any lint.
After-Sales Service and Application Service
Our after-sales service responds to your questions concerning maintenance and repair of your product as well as spare parts. You can find explosion drawings and information on spare parts at: www.bosch-pt.com
The Bosch product use advice team will be happy to help you with any questions about our products and their accessories.
In all correspondence and spare parts orders, please always include the 10‑digit article number given on the nameplate of the product.
Malaysia
Robert Bosch Sdn. Bhd. (220975-V) PT/SMY
No. 8A, Jalan 13/6
46200 Petaling Jaya
Selangor
Tel.: (03) 79663194
Toll-Free: 1800 880188
Fax: (03) 79583838
E-Mail:
www.bosch-pt.com.my
www.bosch-pt.com.my
You can find further service addresses at: www.bosch-pt.com/serviceaddresses
Transport
The contained lithium-ion batteries are subject to the Dangerous Goods Legislation requirements. The batteries are suitable for road transport by the user without further restrictions.
When shipping by third parties (e.g.: by air transport or forwarding agency), special requirements on packaging and labeling must be observed. For reparation of the item being shipped, consulting an expert for hazardous material is required. Dispatch battery packs only when the housing is undamaged. Tape or mask off open contacts and pack up the battery in such a manner that it cannot move around in the packaging. Please also observe the possibility of more detailed national regulations.
Disposal


Robert Bosch Power Tools GmbH
70538 Stuttgart
GERMANY
www.bosch-pt.com
