Panasonic ES-WD94 Women’s Electric Epilator Instruction Manual


Operating Instructions

Before operating this unit, please read these instructions completely and save them for future use.
Thank you for choosing a Panasonic WET/DRY epilator.
With our WET/DRY technology, you can enjoy using your Panasonic epilator dry or in the shower or bath for gentle and easy epilation.
Please read all instructions before use.
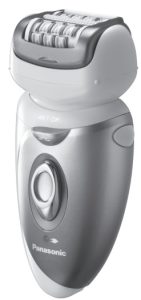
Parts identification
A Protection cap
B Epilation head for underarms/bikini‑line
- Epilation discs (inside)
- Skin protector (metal part on the outside)
- Frame release rib
- Frame
C Fast cap
D Gentle cap ( > Page 5)
E Beginner cap ( > Page 5) - Foam wiper
- Skin protector
- Cap release rib
F Epilation head for legs/arms - Epilation discs G Bikini comb ( Page 6)
H Shaver head - Pop-up trimmer switch
- Outer foil
- Trimmer
- Frame release button
- Frame
I Protection cap
J Foot care head - File
- Frame release button
- Frame
K Main body - Head release button
- LED light
- OFF/ON switch
- Charging light
- Socket
Accessories:
L AC adaptor (RE7‑76)
(Do not use AC adaptors other than the one provided.)
M Cleaning brush
N Pouch
Attachments |
ES-WD94 | ES-WD24 |
Epilation head for legs/arms |
V |
V |
Epilation head for underarms/ bikini-line |
V | – |
Bikini comb & Shaver head |
V | – |
Foot care head |
V | – |
Fast cap |
V |
V |
Gentle cap |
V | V |
Beginner cap |
V |
– |

- Make sure skin is clean before and after use.
- In the following cases, please consult your physician.
– Having eczema, rashes, sensitive skin, proneness to infections, varicose veins, diabetes, hemophilia, poor blood clotting or other skin conditions - The following might result in bacteria entering the skin and causing damage and inflammation.
– Using just before swimming and sports activities
– Sharing with other persons - Always attach an epilation/foot care head and its frame/cap or a shaver head and its frame to the epilator when turning on.
Failure to do so might cause finger injury, hair entanglement in the spinning gears, or mechanical malfunction. - The following might cause sensitive skin damage, injury, inflammation, pain, bleeding, and severe pain.
– Using the appliance if the epilation discs, the skin protector, the frame, the fast cap, the gentle cap, the beginner cap, the outer foil, or the file have been damaged.
– Using on or near your face, genitals, warts, pimples, bruises, rashes, wounds, or loose skin.
– Using around moles.
– Applying strong pressure to the skin, repeatedly moving over the same area, or using a jabbing motion.
– Using before or during menstruation, pregnancy, about one month after giving birth.
– Using when ill, sunburned, etc.
►Charging the epilator
- Never use the AC adaptor in a bathroom.
- Always ensure the appliance is used on an electric power source matched to its rated voltage.
- The charging light may not turn on after a few minutes in some cases. However, it will turn on eventually if you continue charging.
- The appliance can be left plugged in after it is fully charged without deteriorating the battery life.
- The life of the battery is 3 years if charged approximately once every week. The battery in this epilator is not intended to be replaced by consumers. Has the battery been replaced by an authorized service center?
►Using the epilation head

The appliance can be used for wet or dry epilation.
The following is the symbol for a wet epilator. It means that the epilation/shaver head can be used in a bath or shower.
- Never use the appliance if the cord or the AC adaptor is damaged, overly hot or if the plug fits loosely in a household outlet.
- Do not drop or hit the appliance as the skin protector, the frame, the fast cap, the gentle cap, the beginner cap or the epilation discs can be damaged.
- This appliance is not intended for use by persons (including children) with reduced physical, sensory or mental capabilities, or lack of experience and knowledge unless they have been given supervision or instruction concerning the use of the appliance by a person responsible for their safety.
Children should be supervised to ensure that they do not play with the appliance. - The recommended use temperature is 5-35 °C.
If you use the appliance at a temperature outside of the recommended range, it may stop functioning or might reduce the operating time. - Do not use the epilation head for legs/arms to epilate your underarms and bikini-line.
►Using the foot care head
Do not use the foot care head-on wet feet.

The following is the symbol for a washable foot care head. The symbol means the hand-held part may be cleaned underwater.
WARNING: Detach the hand-held part from the supply cord before cleaning it in water.
- If skin appears abnormal after filing, stop using the foot care head and consult a dermatologist.
- People suffering from diabetes; poor circulation in the feet; or swelling, itchiness, pain, or excessive warmth in the feet should consult their doctor before using the foot care head.
- Do not file excessively during a single session.
File a little at a time over several days to avoid soreness and injury to the skin. - Do not use the foot care head for filing anything other than calluses and hardened skin on the feet.
- Do not use the foot care head if you suffer from ailments affecting the skin on your feet, your toenails, or the area around your toenails.
- The file rotates at high speed. Do not use it on soft skin and nails. Do not file too deeply.
- Do not use the foot care head in the bath.
Cleaning the epilator
- Regularly clean the cord connector to prevent dust.
- Do not use nail polish remover, benzine, alcohol, etc. to clean the appliance.
- Always unplug the AC adaptor from a household outlet and from the epilator before cleaning the appliance.
- Wipe the main body only with a dry cloth. The use of alcohol etc. might cause discoloration or deformation of the main body.
- Take care not to damage the skin protector, the frame, the fast cap, the gentle cap and the beginner cap during cleaning.
►Storing the epilator
- Do not bend, twist, pull, or modify the cord.
- Do not wrap the cord tightly around the appliance.
- Keep the appliance out of the reach of children or invalids.
- Keep the appliance away from sinks, bathrooms, or other high-humidity areas where it could be exposed to water and moisture after use.
- Keep the appliance away from where it will be exposed to high temperatures or direct sunlight.
- When storing the epilator, always attach the protective cap for the epilation/foot care head and the bikini comb for the shaver head.

- Please refer to “Quick User Card” as well.
- The hair removal is not permanent, so after the 2nd use, we recommend that you epilate the underarms about once a week and the arms and legs about once every two weeks.
<For beginners/those with sensitive skin>
When epilating for the first time, or using it for the first time in a while, we recommend using the beginner cap. (ES-WD94) The beginner cap narrows the epilating area thus reducing the number of hairs removed at one time. It provides a more gentle epilation for beginners and those with sensitive skin.
• We also recommend warming the skin to soften the skin before use.
<For gentle epilation>
The gentle cap has a skin protector for a gentler epilation. So it can remove hairs by holding the skin down to reduce pain.
- Remove the fast cap [C].
- Attach the gentle cap [D]/the beginner cap [E (ES‑WD94)].

- Apply the epilator at a 90˚ angle to your skin. Always make sure that the appliance is in contact with your skin and press gently while moving it slowly against the hair growth.
- Massaging with a body puff may help to prevent ingrown hairs.
- Reddening might appear after use. A cool towel will help if you feel pain or there is a rash.
- If your skin gets dry after epilation, we recommend applying a moisture lotion two days after epilation.

Before use
Charging the appliance
For best performance, fully charge the appliance before use.
You cannot operate the appliance while charging.
Charging time = Approx. 1 hour
The epilator can be used for approximately 30 minutes (40 minutes when using the beginner cap/gentle cap) after 1 hour of charging. (This will differ depending on the temperature.)
Plug the AC adaptor into the epilator (a) and a household outlet (b).

- The recommended charge temperature is 15-35 °C.

Changing the head
- Remove the head while holding the head release button.
- Push the head until it clicks.

Trim your hair before epilating for the first time or if you have not epilated for a long time. Hair removal is easier and less painful when the hair is short.

Legs/arms
Cut your hair to between 2 mm and 3 mm long.

You can shave hair leaving the length of 2-3 mm by using the bikini comb attached. (ES-WD94)
Underarms/bikini‑line
Cut your hair to between 1 mm and 2 mm long.

We recommend that you shave 3 to 5 days before using the epilator.
Using the bikini comb ES‑WD94
Place the bikini comb onto the shaver head and slide the trimmer up.

- When the bikini comb is in place, make sure the comb is in close contact with the skin.
<LED light>
The LED light comes on when the power is turned on. The light will remain on while the power is ON.

- Do not continuously aim the light directly into your eyes. Doing so may cause dizziness.
Epilating
Areas suitable for epilation


The epilator can be used on
Before epilating the bikini line, be sure to put on your swimming costume or panties, etc. and check the areas you wish to epilate.


- Using the epilator on areas other than those marked
- In the case of dry epilation, spread out paper, etc. to catch the falling hairs.
Areas not suitable for epilation

Dry epilation
Before epilating, wipe away water or sweat on your skin.
Press the OFF/ON switch to turn on the power.
Wet/foam epilation
WET epilation (epilating after wetting the skin and epilator and then applying foam) makes the skin softer so is gentler to your skin when epilating.
- Wet your skin.
- Wet the discs and place a small quantity of liquid body soap on the discs.
• Rinse any body soap out of your hands. - Press the OFF/ON switch to turn on the power.


<Epilating legs or arms>

<Epilating underarms or bikini‑line> ES‑WD94


Shaving ES‑WD94
Dry shaving
Before shaving, wipe away water or sweat on your skin.
- Attach the shaver head [H].
- Remove the bikini comb [G].
- Check that the outer foil is not deformed or damaged.
- Press the OFF/ON switch [K 19] to turn on the power.
• Press gently so that the whole blade is in close contact with the skin and the surface of the blade does not move up and down.
Wet/foam shaving
Shaving with soap lather makes the skin slippery for a closer shave.
- Attach the shaver head [H].
- Remove the bikini comb [G].
- Check that the outer foil is not deformed or damaged.
- Wet your skin and put soap lather on your skin.
• Do not use shaving cream, skin cream, or skin lotion as it will clog the blades. - Press the OFF/ON switch [K 19] to turn on the power.
Foot care ES‑WD94
The basics of foot care
Do not use the product for filing anything other than calluses and hardened skin on the feet.
<Use on>
Callus

A callus is a hardened layer that forms through repeated pressure or abrasion.
a Hardened layer
b Epidermis
c Derma
<Avoid using on>
Blister

A blister is a fluid-filled, bean-sized bulge caused by shoes rubbing against the skin or horizontal bar exercises, etc. It is caused by a sudden stimulus to the skin. d Fluid
Corns

A corn forms when a hardened layer thickens and extends deep into the derma. Applying pressure to corn stimulates the nerves and can be very painful. e Core
Wart

A wart is a raised area caused by a virus entering a wound and causing cells to multiply. Darkly-colored bumps may be visible and the affected area may be slightly painful.
Things to be careful of when filing

a Hardened layer
b Epidermis
c Derma
d Portion to be removed
e Leave some of the hardened layers.
- Filing an area too deeply can cause it to become sore or inflamed.
- Filing too large an area can result in even larger calluses forming. Therefore, be sure to leave some of the hardened layer.
Using the foot care head
- The foot care head cannot be used in a bath or shower.
- Before use, be sure to fully charge the appliance.
- We recommend using the product within 30 minutes after bathing or showering. With the feet clean, wipe any water on the skin. (Each use should be approximately 10 minutes (5 minutes on each foot, 10 minutes total for both feet))
- Spread a newspaper or the like to catch field particles.
- Attach the foot care head [J].
• Push down firmly until you hear a “click”. - Switch on the power, bring the foot care head into contact with the skin, and begin filing.
To avoid this, be sure to make small changes in the filing position while filing.
• Filing should be performed about once every two weeks.

Rotation of the file may cause the main body to move in an unexpected direction and cause injury to the skin. When using the appliance for filing, be careful of the direction in which the main body moves.


Sides of the foot

Toes and small areas
Use your free hand to support filing.

Cleaning
Always clean the frames, fast/gentle/beginner caps, and discs after use to keep them in a hygienic state.
Switch off and unplug the appliance before cleaning.
Dry cleaning
Epilation head/Shaver head
- Lift the frame, fast/ gentle/beginner caps upward while holding the frame release rib [B 3]/the cap release rib [CDE 7], or remove the frame by pushing the frame release button [H 12].
- Clean the epilation head [B, F] and the shaver head [H] with the cleaning brush [M].


Wet cleaning
Epilation head/Shaver head
- Lift the frame, fast/gentle/beginner caps upward while holding the frame release rib [B 3]/the cap release rib [CDE 7] or remove the frame by pushing the frame
release button [H 12]. - Apply liquid hand soap to the discs and the blades.
- Turn the switch on and then wet the discs and the blades to create foam.
- Wash the head with water to wash out hair.
• If soap is not completely washed away, then a white deposit can accumulate and prevent the discs and the blades from moving smoothly.
5. Turn the switch off, wipe the appliance with a dry cloth and dry it well.


Foot care head
- Apply liquid hand soap to the central part of the file.
- Pour a small amount of water on the file and turn the switch on.
- Rinse any debris thoroughly with water or lukewarm water.
- After turning the switch off, remove the frame and rinse it inside.
- Wipe with a dry cloth and dry in a well-ventilated location.


Replacing the outer foil
We recommend replacing the outer foil [H 10] every year and the inner blade every two years. Remove the outer foil of the shaver head [H] only when replacing it.
- While pushing the outer foil gently with the fingers, use a fingernail to release the plastic panel (b) on the blade from the hooks (a) on the inside of the frame.
- The new outer foil should be slightly bent and pushed in until it is hooked in the frame.

Replacing the file
The file lifetime is approximately 1 year (assuming a single-use every 2 weeks with approximately 10 minutes per use). We recommend replacing the file about once a year.
- Press down with your finger and release the file.
- Align the


Removing the built‑in rechargeable battery
Remove the built-in battery when disposing of the epilator.
Do not dismantle or replace the battery so that you can use the epilator again.
Perform steps 1 to 7 to disassemble the epilator using a screwdriver.

- Unplug the AC adaptor from the epilator before disassembling it.
- Press the OFF/ON switch to turn on the power and then keep the power on until the battery is completely discharged.
- Please take care not to short-circuit the battery.
For environmental protection and recycling of materials
This epilator contains a Li-ion battery.
Please make sure that the battery is disposed of at an officially assigned location if there is one in your country.
Specifications
Power supply: See the rating plate on the product. (Automatic voltage conversion)
You can see the voltage, manufacturer, country of origin, etc. by detaching the head attachment.
Charging time: Approx. 1 hour
This product is intended for household use only.