Dell SE2422HX 23.8 Inch FHD 16:9 Computer Monitor Owner’s Manual
DELL SE2422HX 23.8 Inch FHD 16:9 Computer Monitor Owner’s Manual

General Safety Instructions
Use the following safety guidelines to help ensure your own personal safety and to help protect your equipment and working environment from potential damage.
NOTE: In this section, equipment refers to monitors.
IMPORTANT NOTICE FOR USE IN HEALTHCARE ENVIRONMENTS:
Dell products are not medical devices and are not listed under UL or IEC 60601 (or equivalent). As a result, they must not be used within 6 feet of a patient or in a manner that directly or indirectly contacts a patient
SAFETY: General Safety
WARNING: To prevent the spread of fire, keep candles or other open flames away from this product at all times.
When setting up the equipment for use:
- Place the equipment on a hard, level surface. Leave 10.2 cm (4 in) minimum of clearance on all vented sides of the computer to permit the airflow required for proper ventilation.
- Restricting airflow can damage the computer or cause a fire.
- Do not stack equipment or place equipment so close together that it is subject to recalculated or preheated air.
- NOTE: Review the weight limits referenced in your computer documentation before placing a monitor or other devices on top of your computer.
- Ensure that nothing rests on your equipment’s cables and that the cables are not located where they can be stepped on or tripped over.
- Ensure that all cables are connected to the appropriate connectors. Some connectors have a similar appearance and may be easily confused (for example, do not plug a telephone cable into the network connector).
- Do not place your equipment in a closed-in wall unit or on a bed, sofa, or rug.
- Keep your device away from radiators and heat sources.
- Keep your equipment away from extremely hot or cold temperatures to ensure that it is used within the specified operating range.
- Do not push any objects into the air vents or openings of your equipment. Doing so can cause fire or electric shock by shorting out interior components.
- Avoid placing loose papers underneath your device. Do not place your device in a closed-in wall unit, or on a soft, fabric surface such as a bed, sofa, carpet, or a rug.
When operating your equipment:
- Do not use your equipment in a wet environment, for example, near a bath tub, sink, or swimming pool or in a wet basement.
- Do not use AC powered equipment during an electrical storm. Battery powered devices may be used if all cables have been disconnected.
- Do not spill food or liquids on your equipment.
- Before you clean your equipment, disconnect it from the electrical outlet. Clean your device with a soft cloth dampened with water. Do not use liquids or aerosol cleaners, which may contain flammable substances.
- Clean the monitor display with a soft, clean cloth and water. Apply the water to the cloth, then stroke the cloth across the display in one direction, moving from the top of the display to the bottom. Remove moisture from the display quickly and keep the display dry.
- Long-term exposure to moisture can damage the display. Do not use a commercial window cleaner to clean your display.
- If your equipment does not operate normally – in particular, if there are any unusual sounds or smells coming from it – unplug it immediately and contact an authorized dealer or service center.
Protecting Against Electrostatic Discharge
Electrostatic discharge (ESD) events can harm electronic components inside your equipment. Under certain conditions, ESD may build up on your body or an object, such as a peripheral, and then discharge into another object, such as your computer. To prevent ESD damage, you should discharge static electricity from your body before you interact with any of your equipment’s internal electronic components, such as a memory module. You can protect against ESD by touching a metal grounded object (such as an unpainted metal surface on your computer’s I/O panel) before you interact with anything electronic. When connecting a peripheral (including handheld digital assistants) to your equipment, you should always ground both yourself and the peripheral before connecting it. In addition, as you work inside the equipment, periodically discharge any static charge your body may have accumulated.
You can also take the following steps to prevent damage from electrostatic discharge:
- When unpacking a static-sensitive component from its shipping carton, do not remove the component from the antistatic packing material until you are ready to install the component.
Just before un wrapping the antistatic package, be sure to discharge static electricity from your body. - When transporting a sensitive component, first place it in an antistatic container or packaging.
- Handle all electrostatic sensitive components in a static-safe area. If possible, use antistatic floor pads and work bench pads.
SAFETY: General Power Safety
Observe the following guidelines when connecting your equipment to a power source:
- Check the voltage rating before you connect the equipment to an electrical outlet to ensure that the required voltage and frequency match the available power source.
- Do not plug the equipment power cables into an electrical outlet if the power cable is damaged
- Norway and Sweden: If this product is provided with a 3-prong power cable, connect the power cable to a grounded electrical outlet only.
- If you use an extension power cable, ensure that the total ampere rating of the products plugged in to the extension power cable does not exceed the ampere rating of the extension cable.
- If you must use an extension cable or power strip, ensure the extension cable or power strip is connected to a wall power outlet and not to another extension cable or power strip. The extension cable or power strip must be designed for grounded plugs and plugged into a grounded wall outlet.
- If you are using a multiple-outlet power strip, use caution when plugging the power cable into the power strip. Some power strips may allow you to insert a plug incorrectly. Incorrect insertion of the power plug could result in permanent damage to your equipment, as well as risk of electric shock and/or fire. Ensure that the ground prong of the power plug is inserted into the mating ground contact of the power strip.
- Be sure to grasp the plug, not the cable, when disconnecting equipment from an electric socket.
If your equipment uses an AC adapter:
- Use only the Dell provided AC adapter approved for use with this device. Use of another AC adapter may cause a fire or explosion.
- NOTE: Refer to your system rating label for information on the proper adapter model approved for use with your device.
- Place the AC adapter in a ventilated area, such as a desk top or on the floor, when you use it to run the computer or to charge the battery. Do not cover the AC adapter with papers or other items that will reduce cooling; also, do not use the AC adapter inside a carrying case.
- The AC adapter may become hot during normal operation of your computer. Use care when handling the adapter during or immediately after operation.
- It is recommended that you lay the adapter on the floor or desk so that the green light is visible. This will alert you if the adapter should accidentally go off due to external effects. If for any reason the green light goes off, disconnect the AC power cord from the wall for a period of ten seconds, and then reconnect the power cord.
- Japan Only: Use only the Dell-provided AC power cable with the AC adapter. Use of any other power cable may damage the device or AC adapter or may present risk of fire or electric shock.
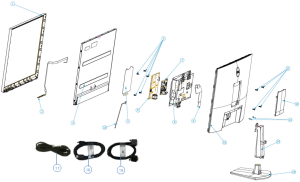
Exploded view diagram with list of items

Item |
Description |
Q’ty |
| 1 | ASSY BZL | 1 |
| 2 | PCBA CTRL BD | 1 |
| 3 | Panel | 1 |
| 4 | MYLAR PWR | 1 |
| 5 | SCRW PH INT/TOO M3*9TP-S C-ZN | 5 |
| 6 | PCBA SPS BD | 1 |
| 7 | PCBA I/F BD | 1 |
| 8 | ASSY SHD | 1 |
| 9 | FFC LVDS 30P/30 P1 265MM | 1 |
| 10 | ASSY RC | 1 |
| 11 | SCRW FPHM4*10L(7.7/1.6)B-ZNNY | 4 |
| 12 | COVER VESA | 1 |
| 13 | SCRW M FPH M3*6L(6/1.10)B-ZN | 2 |
| 14 | ASSY CLMN | 1 |
| 15 | ASSY BASE | 1 |
| 16 | WIRE 6/6P | 1 |
| 17 | Power cable | 1 |
| 18 | HDMI cable | 1 |
| 19 | VGA cable | 1 |
Wiring connectivity diagram

Disassembly and Assembly Procedures
Disassembly SOP
Preparation before disassembly
- Clean the room for work
Identify the area for material - Prepare the implement, equipment, materials as bellow:
- Working table
- Philips-head screwdriver
- Hex-head screwdriver
- Gloves
- Cleaning cloth
- ESD protection
| Item | Picture | Operation | Tool | Notes |
| 1 | To remove the stand:
|
Philips-head screwdriver | ||
| 2 |
|
Philips-head screwdriver Torsion of RC screw: 8.5±1.0Kg | ||
| 3 |
|
Philips-head screwdriver Torsion of Bracket screw: 5.0±1.0Kg | ||
| 4 |
|
|||
| 5 |
|
|||
| 6 |
|
|||
| 7 |
|
|||
| 8 |
|
1. Philips-head screwdriver Torsion of PCB screw: 8.5±1.0Kg 2. Hex-head screwdriver Torsion of hex screw: 5.0±0.6Kg |


Assembly SOP
Preparation before assembly
- Clean the room for work
- Identify the area for material
- Prepare the implement, equipment, materials as bellow:
- Working table
- Philips-head screwdriver
- Hex-head screwdriver
- Gloves
- Cleaning cloth
- ESD protection
| Item | Picture | Operation | Tool | Notes |
| 1 |
|
1. Philips-head screwdriver Torsion of PCB screw: 8.5±1.0Kg 2. Hex-head screwdriver Torsion of hex screw: 5.0±0.6Kg | ||
| 2 |
|
|||
| 3 |
|
|||
| 4 |
|
|||
| 5 |
|
|||
| 6 |
|
Philips-head screwdriver Torsion of Bracket screw: 5.0±1.0Kg | ||
| 7 |
|
Philips-head screwdriver Torsion of RC screw: 8.5±1.0Kg | ||
| 8 |
|
|||
| 9 | To attach the monitor stand:
|


Trouble shooting instructions
Troubleshooting

Self-test
Your monitor provides a self-test feature that allows you to check whether your monitor is functioning properly. If your monitor and computer are properly connected but the monitor screen remains dark, run the monitor self-test by performing the following steps:
- Turn off both your computer and the monitor.
- Unplug the video cable from the back of the computer. To ensure proper Self-Test operation, remove all video cables from the back of computer.
- Turn on the monitor.
If the monitor is working correctly and detects no input signal, depending on the connectivity, one of the following dialog appears. While in self-test mode, the power LED remains white. - Turn off your monitor and reconnect the video cable: then turn on both your computer and the monitor. If your monitor screen remains blank after performing the previous step. check your video controller and computer for any possible issues.


Built-in diagnostics
Your monitor has a built-in diagnostic tool that helps you determine if the screen abnormality you are experiencing is an inherent problem with your monitor, or with your computer and video card.
To run the built-in diagnostics:

- Ensure that the screen is clean (no dust particles on the surface of the screen).
- Press and hold button 4 for four seconds and a menu appears on the screen.
- Select the built-in diagnostics
- Carefully inspect the screen for abnormalities.
- Press Button 1 on the front panel again. The color of the screen changes to red. 6. Inspect the display for any abnormalities.
- Repeat steps 5 to 6 to inspect the display when it changes to green, blue, black, white, and text screens.

The test is complete when the text screen appears. To exit, press button 1 again. If you do not detect any screen abnormalities during the built-in diagnostic tool, the monitor is functioning properly. Check the video card and computer for any possible issues.
Common problems
The following table contains general information about common monitor problems you might encounter and the possible soulutions.
| Common symptoms | What you experience | Possible solutions
|
| Missing pixels
|
LCD screen has spots
|
|
| Stuck-on pixels
|
LCD screen has bright spots
|
|
| Brightness problems
|
Picture too dim or too bright
|
|
| Geometric Distortion
|
Screen not centered correctly |
|
| HorizontaV Vertical Lines
|
Screen has one or more lines
|
|
| Synchronization Problems
|
Screen is scrambled or appears torn
|
|
| Safety related issues. |
| |
| Intermittent problems
|
Monitor malfunctions on & off
|
|
| Missing color
|
Picture missing color
|
|
| Wrong color
|
Picture color not good
|
|
| Image retention from a static image left on the monitor for a long period of time
|
Faint shadow from the static image displayed appears on the screen
|
|
| Screen image is too small | Image is centered on screen, but does not cover the entire viewing area |
|
| Cannot adjust the monitor with the buttons on the front panel
|
OSD does not appear on the screen
|
|
| No Input Signal when user controls are pressed
|
No picture, the LED light is white
|
|
| The picture does not fill the entire screen | The picture cannot fill the height or width of the screen
|
|