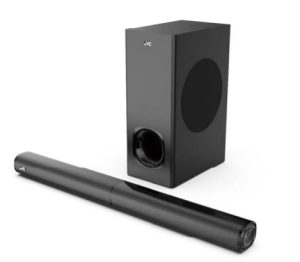
JVC TH-S331B 2.1 CH Detachable Soundbar With Wireless Subwoofer User Manual
JVC TH-S331B 2.1 CH Detachable Soundbar With Wireless Subwoofer User Manual

FCC Warning
This device complies with part 15 of the FCC Rules. Operation is subject to the following two conditions:
- This device may not cause harmful interference, and
- this device must accept any interference received, including interference that may cause undesired operation.
Note: This equipment has been tested and found to comply with the limits for a Class B digital device, pursuant to part 15 of the FCC Rules. These limits are designed to provide reasonable protection against harmful interference in a residential installation. This equipment g<mates, uses and can radiate radio frequency energy and, if not installed and used in accordance with the instruction, s, may cause harmful interference to radio communications.
However, there is no guarantee that interference will not coccus in a particular installation. If this equipment does cause harmful interference to radio or television reception, which can be determined by turning the equipment off and on, the user is encouraged to try to correct the interference b\f one or more of the following measures:
– Reorient or relocate the receiving antenna.
– Increase the separation between the equipment and reeve.
-Connect the equipment into an outlet on a circuit different from that to which the receiver is connected.
-Consult the dealer or an experienced radio/TV technician for help.
Note: The Grantee is not responsible for any changes or modifications not expressly approved by the party responsible for compliance. such modifications could void the user’s authority to operate the equipment.
The device has been evaluated to meet general RF exposure requirement.
To maintain compliance with FCC’s RF exposure guidelines, the distance must be at least 20 cm between the radiator and your body, and fully supported by the operating and installation
configurations of the transmitter and its antenna(s).
Thank you for purchasing the TH-S331 B Soundbar. Please read this user manual carefully and keep for future reference.
Warning
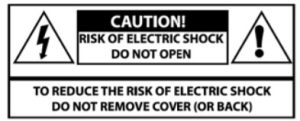

Caution:
To reduce the risk of electric shock, do not dismantle the product and do not expose the apparatus lo rain or moisture. No user-serviceable parts inside.
Refer servicing to qualified personnel only
sufficient magnitude to constitute an eledric shock to a person or persons.


Notice:
this appliance is not intended for use by persons including children) with reduced physical sensory or mental capabilities, or lack of experience and knowledge, unless they have been given supervision or instruction concerning use of the appliance by a person responsible for their safety.
Children should be supervised to ensure that they do not play with the appliance.
- To prevent possible hearing damage, do not listen at high A . . . •I)~ volume levels for long time pends or a sudden h11~h volume level.
- Never use the device unsupervised! Switch off the device whenever you are not using ~. even if not using it only for a short while.
- The appliance is not intended to be operated by· means of an external timer or separate remote control system.
- If the supply cord is damaged, ~ must be replaced by the manufacturer, its service agent or similarly qualified persons in order to avoid a hazard.
- Before operating this system, check the voltage of this system to see if it is identical to the voltage of your local power supply.
- The unit should not be impeded by covering the ventilation opening with items such as newspaper, table-cloths, curtains etc. Make sure that there are at least 20 cm of space above and at least 5 cm of space on each side of the unit.
- The apparatus must not be exposed to dripping •Jr splashing and that objects filled with liquids, such as vases, must not be placed on the apparatus.
- To prevent fire or shock hazard, do not expose this equipment to direct heat, rain, moisture or dust.
- Do not locate this unit near any water sources e.g. taps, bathtubs, washing machines or swimming pools. Ensure that you place the unit on a dry, stable surface.
- Do not place this unit close to a strong magnetic field.
- Do not place the unit on a amplifier or receiver.
- Do not place this unit in a damp area as the miniature will affect the life of electric components.
- Do not attempt to clean the unit with chemical solvents as this might damage the finish. Wipe with a clean, dry or slightly damp cloth.
- When removing the power plug from the wall outlet, always pull directly on the plug, never pull on the cord.
- Depending on the electromagnetic waves used by a television broadcast, if a TV is turned on near this unit while it is also on, lines might appear on the LED TV. Neither this unit nor the TV is malfunctioning. If you see such lines, keep this unit well away from the TV set.
- The mains plug is used to disconnect the device, the disconnected device should remain readily operable.
Important Safety Instructions
- Read these instructions. Keep these instructions. Follow all instructions. Heed all warnings.
- Do not use this apparatus near water.
- Clean only with dry cloth.
- Do not block any ventilation openings. Install in accordance with the manufacturer’s instructions.
- Do not install near any heat sources such as radiators, heaters, stoves, or other apparatus (including amplifiers) that produce heat.
- Protect the power cord from being walked on or pinched particularly at plugs, convenience receptacles or at the point where they exit from the apparatus.
- Only use attachments/accessories specified by the manufacturer.
- Unplug this apparatus during lightning storms or when unused for long periods of time.
- Refer all servicing to qualified service personal. -Servicing is required when the apparatus has been damage in any way, for example, when the power-supply cord or plug is damaged, liquid has
been spilled or objects have fallen into the apparatus, the apparatus has been exposed to rain or moisture, does not operate normally, or has been dropped. - The AC plug is used lo disconnect the device, lathe disconnected device should remain readily operable. In order to disconnect the apparatus frond the AC power completely, the AC plug must be
removed from the AC outlet completely.
Preparation for Use
Unpacking and Set Up
- Remove the Sound bar from the carton and remove all packing material from the Sound bar. Save the packing material, if possible, in case the Sound bar ever needs to be serviced or transported.
The original carton and packing material is the only safe way to pack your Sound bar to protect it from damage in transit. - Remove any descriptive labels or stickers on the ·front or top of the cabinet. Do not remove any labels or stickers from the back or bottom of the cabinet.
- Place your Sound bar on a level surface such as a table, desk or shelf, convenient to an AC outlet, out of direct sunlight, and away from sources of e):cess heat, dirt, dust, moisture, humidity, or vibration.
- Unwind the Line cord connecting the AC adapter and extend it to its full length.
Protect Your Furniture
This model is equipped with non-skid rubber ‘feet’ to prevent the product from moving when you operate the controls. These ‘feet’ arc made from non-migrating rubber material specially formulated
to avoid leaving any marks or stains on your furnit1ure. However certain types of oil based furniture polishes, wood preservatives, or cleaning sprays rnay cause the rubber ‘feet’ to soften, and leave
marks or a rubber residue on the furniture. To prevent any damage to your furniture we strongly recommend that you purchase small self-adhesive, felt pads, available at hardware stores and home
improvement center everywhere, and apply these pads to the bottom of the rubber ‘feet’ before you place the unit.
Power Source
This sound bar is designed to operate on normal /.~C Power source. For Europe, it works only under SMPS 110V-240V- 50hz/60Hz. Do not attempt to operate the Sound bar on any other power
source. You could cause damage to the Sound bar that is not covered by your warranty.
Important Notes
- This sound bar was especially developed for LED/LCD/Plasma 1V’s: It should not be used in combination with CRT1V’s (Cathode Ray Tube TV’s) in order to avoid image interference.
- Safety and operating instruction manual should be retained for future reference.
- The apparatus should not be exposed to dripping, splashing or placed in a humid atmosphere such as a bathroom.
- Do not install the product in the following areas:
- Places exposed to direct sunlight or close to radiators.
- On top of other stereo equipment that radiate too much heat -Blocking ventilation or in a dusty area .
- Areas where there is constant vibration.
- Humid or moist places.
- Do not place near candles or other flames.
- Operate the product only as instructed in this manual.
- Before turning on the power for the first time, mafe sure the sound bar is plugged to power outlet.
- For safety reasons, do not remove any covers or attempt to gain access to the inside of the product. Refer any servicing to qualified personnel ..
- Do not attempt to remove any screws, or open that casing of the unit; there are no user serviceable parts inside. Refer all servicing to qualified service personnel.
Specifications

Product Diagram

- LED Volume Indicator
- LED Mode Indicator
- AUX
- OPTICAL
- HDMl(ARC)
- USB
- DC IN
- Power/Standby
- VOL·-
- VOL+

- LED indicator: It indicates pairing between the soundbar and the subwoofer.
- USB Port (CAN”T PLAY MP3 MUSIC, FOR SOFTWARE UPGRADE ONLY)
- WPS Button: It automatically pairs the sound bar with subwoofer.
- DCIN
Pair up with the subwoofer
Plug the soundbar and the subwoofer into the mains sockets at the same time
- Press “STANDBY” to turn the sound bar on after it has b(ien connected the the AC. Then press “INPUT’ to select Bluetooth (BT) as the input mode. This will cause the sound bar to enter into pairing mode with the wireless subwoofer.
- Switch the subwoofer on. The blue LED will blink slowly indicating the unit have power but need to be paired with the soundbar. Press and hold the WPS (AUTO PAIR BUTTON), the blue LED will flash quickly indicating they are now in pairing mode.
- After about 20-30 seconds, the blue LED of the subwoof,cr will stop flashing and remain blue to confirm
a successful pairing with the soundbar. - The units will now be able to pair automatically after this initial successful pair, even if they are switched off and on.
- If you want to pair your wireless subwoofer with another sound bar, please repeat step 1 to step 4 above. Ensure the soundbar you want to pair the subwoofer with is tu med on and in range and any other pairing devices are switched off or on standby.

Software upgrading
Soundbar Upgrade
Upgrade the soundbar software: Unzip the sound bar software folder in the root directory of the USB disk. Firstly plug the adaptor into main socket, then insert the USB disk into the USB port on soundbar. Software upgrade will commence once the sound bar is switched on, and the curmntly selected mode indicator will show. Such as, if it is in BT mode, the mode indicator show blue in upgrading process. If it is in AUX mode, the mode indicator show green in upgrading process. Until it is enter into standby and mode indicator will turn red, it is indicated that the upgrade
is completed.
Subwoofer upgrade
Upgrade subwoofer software: unzip the subwoofer software folder in the root directory of the USB disk.
Firstly plug the adaptor into main socket, then insert the USB disk into the USB port on subwoofer. Software upgrade will commence once the subwoofer is sv,,•itched on, a blue LED will indicate power
and the red LED indicates upgrade is in progress The red LED will stop when upgrade is complete.
After upgrade is complete, unplug the adapters, wait 30 seconds, re-plug the power to switch the unit on.
Note: The software of the soundbar and subwoofer cannot be decompressed to the same USB disk at the same time, so as not lo confuse the upgrade software.
Tips
Tho maximum Bluetooth connection distance<> in anopon space, boxwood two sound bar and subwoofer should not exceed 1 Om.
.. To avoid sound quality interference caused by wireless sign,al interference, when you are playing this soundbar, please ensure it is kepi at an appropriate distance from other WIFI devices to avoid wireless signal interference.
Remote Control

REMOTE CONTROL BATTERY RE LACEMENT
Please insert the batteries as indicated below

A: Remove the battery cover
B: Insert 2’AM batteries according to the markings inside battery slot
C: Close the battery cover

Risk of explosion if the battery is replaced by an incorrect type
Handling the battery
- Improper or incorrect use of batteries may cause corrosiion or battery leakage, which could cause fire, personal injury or damage to property.
- Only use the battery type indicated in this manual.
- Do not install new batteries with used ones and do not nnix different types of batteries.
- Do not dispose of used batteries as domestic waste. □ ;;;pose of them in accordance with local regulations.
Handling the Remote Control
- Do not drop the remote control.
- Do not allow anything to impact the remote control.
- Do not spill water or any liquid on the remote control.
- Do not place the remote control on a wet object.
- Do not place the remote control under direct sunlight or near sources of excessive heat.
- Remove the battery from the remote control when not in use for a long period of time , as corrosion or battery leakage may occur and result in physical injury. And /or property damage, and /or fire.
- When the battery is exhausted, the remote control will not be functional l.
Operating range of the remote control
- When the unrt is mounted on a wall, point the remote control at the remote control sensor on the bellowed panel.
The provided Remote Control allows the unrt to be operated from a distance. - Even if the Remote Control is operated within the effective range 26.2 feet (8m), remote control operation may be impossible if there are any obstacles between the unit a1nd the remote control.
- If the Remote Control is operated near other products which generate infrared rays, or if other remote control device using infra-red rays are used near the unit, ii may operate incorrectly. Conversely, the other products may operate incorrectly.

Positioning the Sound Bar
Table Placement

- Place the sound bar horizontally on a solid surface such as a TV unit or shelves and align it centrally with the TV screen.
- For best sound output and good airflow around th,::i soundbar ,place your soundbar as shown on the right.
Follow below steps to mount th e sound bar on the wall
Step 1: Paste 2 pieces of EVA foam (with holes) on th•~ two wall brackets aligning at the hole position of wall brackets.
Step 2: Remove 4 screws from the rear housing of soL1nd bar, then insert the 4 screws over the wall bracket screw holes aligning (on the side of EVA foam pasted), and then fasten the screws again.
Step 3: According to the two hanging wall positions on the rear of soundbar, calibrate and mark the two hanging brackets hole position on the wall. ThE,n drill two holes on the wall. firstly insert two expansion plastic screws on the wall, then fast,~n the hanging screws into expansion screw holes.
Step 4: Then Paste the 2 pieces of EVA foam (without holes) on the two wall brackets downward. Then place the hollow cross in the center of the bracket against the screws on the wall and hang the
sound bar on the wall finally.
Please note
- Wipe off any dirt such as oil on the adhesive surface of the sound bar before adhering.
- Make sure that the adhesive is securely attached.
- 1/vhen peeling off the release paper of the double-sided tape, be careful not to get dirt such as finger oil on the adhesive surface.
- Be careful of deterioration of double-sided tape due to storage conditions.

Mount the unit on a wall

- When mounting the soundbar on a wall, all installation musted be performed in right way. The customer must never attempt to install it without authorization. Improper or inadequate installation may cause the sound bar to fall so as to result in personal injury.
- To prevent the sound bar from falling, attach it to a wall constructed of drywall (plasterboard)
- Make sure that commercially available screws are used so that can support the weight of the installation.
- Fix the cables in place where they will not become loose. If your foot or hand accidentally gets caught on a loose cable, the sound bar may fall.
- Do not lean on the sound bar or apply excessive force to the top of the sound bar, which may cause it to fall.
Soundbar assemble details
- Please connect the left audio cable with the right audio input.
- Hold the convex interface of the soundbar with one hand and turn the other interface to the right about 20 degrees until locks securely.
- Place the soundbar on a furniture. It is ready to be used.


OPERATE INSTRUCT!ON
Setting the Soundbar
- Plug the adapter cord in and the LED will light up.
- Input mode can be changed by pressing the STANDBY button or by using the INPUT button on remote. And BT/Optical /HDMI (ARC)/Aux connection mode c:an be switched; The mode indicator can change into 5 different colors, representing different states:
Blue = BT Mode
Green = AUX Mode
Cyan= HDMl(ARC) Mode
Orange = Optical mode
Red = Standby Mode - When mode indicator light on, press Standby or Power button button to turn off; when the indicator light off, press any button on the remote control to turn on it.
- Volume value : the volume value is 00-32. and the facto1ry set value is “1 O”. It has last volume memory function. When pressing the Vol- or Vol+ on the soundbar or remote, the volume indicator will be flickering and scrolling.
- When pressing the Treb/Bass/EQ mode on the remote, the mode indicator will be flickering once.
Auto Standby
- The unit will automatically switch to standby mode when no audio input is received for 20 minutes. The soundbar will wake up from standby mode when any button is pre,ssed or source input is received.
- If the TV or the external un~ is disconnected, switch it off
• To switch the unit off completely, remove the adapter from the mains socket.
• Please turn the unit off completely to save energy when not in use. - During operation, the volume indicator and mode indicator light will be on. When there is no operation, the volume indicator will automatically go off after 3-5 condos. The mode indicator will dim.
Powering On/Off
- Plug the adapter cord of the soundbar into a wall outlet , it will automatically enter standby mode; The LED indicator will turn on red.
- Press the STANDBY button on the soundbar or POWER button on the remote control to turn the soundbar on. Make your selection of the desmid input modes by pressing the INPUT button on the
remote control or the standby button on the soundbar. - To turn off, press and hold the STANDBY button or POWER button on remote control for about 2 seconds, the soundbar will enter standby mode and LED indicator will turn on red, and then unplug it from the wall outlet.

Playing Audio via BT Connection
- Use either Power/standby button on the SoundBar or the ‘”INPUT” button on the remote to activate BT mode.
A Blue LED indicator will indicate that BT mode has been selected. - Turn on Bluetooth of your device, search for'” TH-S33113″ on your Bluetooth list, and then select Bluetooth connection.
- When successfully paired, you will hear a tone and the lblue LED mode indicator will stay on.
- Use the volume buttons on the sound bar or on the remote controller to adjust the volume.
- The remote controller includes Bluetooth mode playback controls. Press and hold PAIR button on the remote controller more than two seconds to disconnect paired Bluetooth device or connect back last disconnected Bluetooth device.
- If you wish, you can change the audio settings by using the relevant buttons on the remote controller.
Notes:
- In Bluetooth mode, the remote can control music play/pause or select previous or next track. PREV/NEXT/ PLAY & PAUSE button only work in Bluetooth mode; they have no function in other modes.
- The above pairing procedure doesn’t need lo be repeated with the same connected device once paired .
- If the connected device is switched off or manually disconnected, the sound bar will automatically enter pairing mode.
- If the connected device is moved away from wireless range (up to 10 meters) of the sound bar, then it will get disconnected, and it will successfully connect to th-e device once you re-enter Bluetooth range. To connect to other devices, repeat the above pairing :steps.
- If a Bluetooth device has been connected before, the sound bar will connect to the last connected device. Unpair this connection to connect a new device.
- There is no automatic shutdown in pairing mode. The ,;ound bar will remain in pairing mode even if no device

Audio input(Aux)Connection
- Use a 3.5mm lo 3.5mm audio cable (not included) to connect the PC , tablet, smartphone, TV’s headphone socket to the AUX socket on the soundbar.
Use a RCA to 3.5mm audio cable {included) to conned the Blue Ray DVD Player / TV’s audio output sockets to the AUX socket on the soundbar. - Use either the POWER/STANDBY button on the Soundbar or the “INPUT’ button on the remote to activate AUX mode. A green LED indicator will indicate that ALIX mode has been selected.
- Playback functions {play/pause , tracks, pair) cannot bii adjusted through the SoundBar remote when in
AUX mode.Others playback functions can be controlled from the buttons on the SoundBar. In this mode, playback can only be controlled on your connected device.

Optical Mode
-Remove the cap of optical cable (keep the cap for the future use): check the direction of the plug. Connect the sound bar and lV with the optical cable.
-Use this mode to play music from a lV with optical digital output on the sound bar. In lV sound settings, select the sound bar optical connection (output for audio). When the <Jptical cable is connected, the TV audio output is set to PCM format.
-The lV must have an optical digital output. Use the supplied optical cable to make the connection as follows:
- Connect the optical cable to the optical digrtal output of 1Iour lV.
- Connect the optical cable to the optical digrtal input of yc,ur sound bar.
- Switch on the TV set and the sound bar. Set the connected TV to “PCM Stereo”. Set the audio output mode as <automatic> or <decoded output as PCM state>.
- Start playing on the TV.
- Press “INPUT’ button on the remote control or “STANDBY’ button on the sound bar to select OPTICAL mode and the LED mode indicator will turn on orange.
- Use the volume buttons to adjust the volume to your requi rements.
- You can also change the audio settings by using the relt!vant buttons on the remote control.
Please Note:
- When connecting a device such as a lV/Set-top box/ DVD/ game console with optical cable, set the audio output mode of the device to PCM mode (digital optical output).
- Do not bend the optical cable, otherwise the cable inside will be damaged.

HDMI (ARC) Mode
- The sound bar supports HDMl(ARC) with audio return channel (ARC). You can hear the TV audio through your sound bar by using a single HDMl(ARC} cable. But on condition that your TV is ARC compliant.
- Using a high speed HDMl(ARC} cable, connect the HDMl(A.RC) connector on the sound bar lo the
HDMl(ARC} connector on the 1V. The HDMl(ARC} connector on the TV might be labeled differently. For details, see the user manual of your 1V. - II/hen HDMl(ARC) is connected, TV sound setting in “sound output” mode should be set as <external PCM Stereo>, in addttion, digital audio output mode should be set as <automatic> or <decoded output as PCM state>. 1/Vhen the HDMl(ARC} cable is connected, the 1V digttal audio output is set as PCM format. Then start playing music on the TV.
- Press “INPUT’ button on the remote control or “STANDBY” button on sound bar lo select HDMI (ARC) mode and the LED mode indicator will turn on Cyan. Different TV might be different setting, please refer lo your TV User Manual.
- Use the volume buttons to adjust the volume to your require,ments.
- You can also change the audio settings by using the relevant buttons on the remote control.
Note:
- Vhen connecting a device such as a TV/Set-top box/DVD/ game console wtth HDMl(ARC) cable, set the audio output mode of the device to PCM mode <digital HDMI (ARC) output> .
- The TV is connected to a HDMl{ARC} port wrth sound bar. Different TVs might have different setup menus, but the operation approach is the same.
- If needs to connect set-up box meanwhile, please firstly connect the HDMI (ARC) connector and paired to the sound bar. Then connect the set-lop box.

TROUBLE SHOOTING

