Makita DML813 Cordless Worklight Instruction Manual


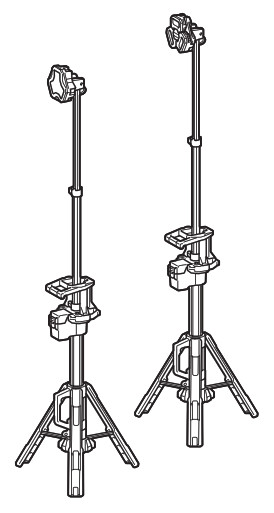
DML813
DML814
Original instructions

IMPORTANT: Read Before Using.
SPECIFICATIONS
| Model: | DML813 | DML814 | |
| Rated wattage | 12pcs, 27 W | ||
| Rated voltage | D.C. 18 V / 14.4 V | ||
| Luminous flux | 3,000 lm / 1,700 lm / 900 lm | ||
| Operating time (with BL1850B) |
3 hours ( 3,000 lm) / 5.5 hours ( 1,700 lm) / 10 hours ( 900 lm) | ||
| Dimensions(L x W x H) | Folding position | 260 mm x 216 mm x 1,000 mm ( 10-1/4” x 8-1/2” x 39-3/8” ) | |
| Operating position (Maximum height) |
573 mm x 658 mm x 2,240 mm ( 22-1/2” x 26” x 88” ) | ||
| Net weight (without battery cartridge) | 7.2 kg ( 15.9 lbs ) | 7.4 kg ( 16.3 lbs) | |
- Due to our continuing program of research and development, the specifications herein are subject to change without notice.
- Specifications may differ from country to country.
- Operating times are approximate and may differ depending on battery type, charging status, and usage condition.
Applicable battery cartridge and charger
| Battery cartridge ( Makita ) | D.C.14.4 V Model | BL1430B |
| D.C.18 V Model | BL1815N / BL1820B / BL1830 / BL1830B / BL1840B / BL1850B / BL1860B | |
| Charger ( Makita ) | DC18RC / DC18RD / DC18RE / DC18SD / DC18SE / DC18SF / DC18SH | |
- Some of the battery cartridges and chargers listed above may not be available depending on your region of residence.

Symbols
The followings show the symbols which may be used for the equipment. Be sure that you understand their meaning before use.
| Read the instruction manual. | |
V |
volts |
| direct current | |
| Be careful not to press your hands when retracting the extension pole. | |
| Do not stare at the operating lamp. | |
| Open the tripod legs before pulling out from the extension pole. |


SAFETY WARNINGS
READ AND FOLLOW ALL SAFETY INSTRUCTIONS.
WARNING – When using this appliance, the following precautions should always be followed:
- To reduce the risk of injury, close supervision is necessary when a product is used near children.
- Do not contact hot parts to reduce the risk of burns. The lens may be extremely hot during use and soon after use.
- Only use attachments recommended or sold by the manufacturer.
- Do not use the appliance in the rain or the snow.
- To reduce the risk of electrical shock, do not put the appliance in water or other liquid. Do not place or store the appliance where it can fall or be pulled into a tub or sink.
- WARNING: To reduce the risk of injury, do stare at the operating lamp, or do not expose the light to the eyes. Serious eye injury may occur
- To reduce the risk of fire, keep away from combustible materials while in operation.
- Only use attachments recommended or sold by the manufacturer.
- Do not allow anything to cover or clog the vents of the appliance. Always keep clean the vent for cooling. Otherwise, it may cause a flame.
- Do not use the carrying handle for any other purpose than carrying the appliance, such as hoisting.
- When carrying the appliance, always fold the tripod legs. Otherwise, a falling accident may occur.
- Place the appliance out of the reach of children.
- Place the appliance on a level and stable place. Otherwise, a falling accident may occur.
- Do not use the appliance in strong winds. Otherwise, a falling accident may occur.
- Do not use the appliance in explosive atmospheres, such as in the presence of flammable liquids, gases, or dust.
- Do not expose the appliance to sparks or corrosive atmosphere, etc.
- When the appliance is not in use, always remove the battery cartridge from the appliance.
- Store the appliance indoors.
- Do not wash the appliance in water.
- Keep the tags and nameplate on the product, which contains important information. If it cannot be read or lost, please contact MAKITA Service Center for a free replacement.
- Disconnect the battery pack from the appliance before making any adjustments, changing accessories, or storing the appliance. Such preventive safety measures reduce the risk of starting the appliance accidentally.
- Do not modify or attempt to repair the appliance or the battery pack except as indicated in the instructions for use and care.
- Do not handle the appliance roughly, such as dropping or hitting. Doing so may cause malfunction or injury.
- Do not handle chargers, including charger plug, and charger terminals with wet hands.
- Do not charge the battery outdoors.
- When the appliance is not in use, always fold the tripod legs and shrink the pole to reduce injury and damage.
- The light source contained in this luminaire shall only be replaced by the manufacturer or his service agent or a similarly qualified person.
- When the appliance is used outdoors, screws can be used for the holes in the tripod legs as auxiliary fixation. When moving the appliance, loosen and remove the screws.
Battery tool use and care
- Prevent unintentional starting. Ensure the switch is in the off-position before connecting to the battery pack, picking up, or carrying the appliance. Carrying the appliance with your finger on the switch or energizing an appliance that has the switch on invites accidents.
- Disconnect the battery pack from the appliance before making any adjustments, changing accessories, or storing the appliance. Such preventive safety measures reduce the risk of starting the appliance accidentally.
Recharge only with the charger specified by the manufacturer. A charger that is suitable for one type of battery pack may create a risk of fire when used with another battery pack.
- Use power tools only with specifically designated battery packs. Use of any other battery packs may create a risk of injury and fire.
- When the battery pack is not in use, keep it away from other metal objects, like paper clips, coins, keys, nails, screws, or other small metal objects, that can make a connection from one terminal to another. Shorting the battery terminals together may cause burns or a fire.
- Under abusive conditions, liquid may be ejected from the battery; avoid contact. If contact accidentally occurs, flush with water. If liquid contacts eyes, additionally seek medical help. Liquid ejected from the battery may cause irritation or burns.
- Do not use a battery pack or tool that is damaged or modified. Damaged or modified batteries may exhibit unpredictable behavior resulting in fire, explosion, or risk of injury.
- Do not expose a battery pack or tool to fire or excessive temperature. Exposure to fire or temperature above 130 °C may cause an explosion.
- Follow all charging instructions and do not charge the battery pack or tool outside the temperature range specified in the instructions. Charging improperly or at temperatures outside the specified range may damage the battery and increase the risk of fire.
- Have servicing performed by a qualified repair person using only identical replacement parts. This will ensure that the safety of the product is maintained.
- Do not modify or attempt to repair the appliance or the battery pack except as indicated in the instructions for use and care.
SERVICE
- This appliance service must be performed only by qualified repair personnel. Service or maintenance performed by unqualified personnel could result in a risk of injury.
- When servicing this appliance, use only identical replacement parts. Use of unauthorized parts or failure to follow maintenance instructions may create a risk of electric shock or injury.
- Do not incinerate this appliance, even if it is severely damaged. The batteries can explode in a fire. Dispose of the appliance in accordance with the local regulations.
Important safety instructions for battery cartridge
- Before using the battery cartridge, read all instructions and cautionary markings on (1) battery charger, (2) battery, and (3) product using a battery.
- Do not disassemble or tamper the battery cartridge. It may result in a fire, excessive heat, or explosion.
- If the operating time has become excessively shorter, stop operating immediately. It may result in a risk of overheating, possible burns, and even an explosion.
- If electrolyte gets into your eyes, rinse them out with clear water and seek medical attention right away. It may result in loss of your eyesight.
- Do not short the battery cartridge:
(1) Do not touch the terminals with any conductive material.
(2) Avoid storing battery cartridge in a con- 4. trainer with other metal objects such as nails, coins, etc.
(3) Do not expose the battery cartridge to water or rain. A battery short can cause a large current flow, overheating, possible burns, and even a breakdown. - Do not store and use the tool and battery cartridge in locations where the temperature may reach or exceed 50 °C (122 °F).
- Do not incinerate the battery cartridge even if it is severely damaged or is completely worn out. The battery cartridge can explode in a fire.
- Do not nail, cut, crush, throw, drop the battery cartridge, or hit against a hard object to the battery cartridge. Such conduct may result in a fire, excessive heat, or explosion.
- Do not use a damaged battery.
- The contained lithium-ion batteries are subject to the Dangerous Goods Legislation requirements. For commercial transports e.g. by third parties, forwarding agents, the special requirements on packaging and labeling must be observed. For the preparation of the item being shipped, consulting an expert for hazardous material is required. Please also observe possibly more detailed national regulations. Tape or mask off open contacts and pack up the battery in such a manner that it cannot move around in the packaging.
- When disposing of the battery cartridge, remove it from the tool and dispose of it in a safe place. Follow your local regulations relating to the disposal of batteries.
- Use the batteries only with the products specified by Makita. Installing the batteries to non-compliant products may result in a fire, excessive heat, explosion, or leak of electrolyte.
- If the tool is not used for a long period of time, the battery must be removed from the tool.
- During and after use, the battery cartridge may take on heat which can cause burns or low-temperature burns. Pay attention to the handling of hot battery cartridges.
- Do not touch the terminal of the tool immediately after use as it may get hot enough to cause burns.
- Do not allow chips, dust, or soil stuck into the terminals, holes, and grooves of the battery cartridge. It may result in poor performance or breakdown of the tool or battery cartridge.
- Unless the tool supports the use of near high-voltage electrical power lines, do not use the battery cartridge near high-voltage electrical power lines. It may result in a malfunction or breakdown of the tool or battery cartridge.
- Keep the battery away from children.
Use of non-genuine Makita batteries, or batteries that have been altered, may result in the battery bursting causing fires, personal injury, and damage. It will also void the Makita warranty for the Makita tool and charger.
Tips for maintaining maximum battery life
- Charge the battery cartridge before completely discharging. Always stop tool operation and charge the battery cartridge when you notice less tool power.
- Never recharge a fully charged battery cartridge. Overcharging shortens the battery service life.
- Charge the battery cartridge with room temperature at 10 °C – 40 °C (50 °F – 104 °F). Let a hot battery cartridge cool down before charging it.
- When not using the battery cartridge, remove it from the tool or the charger.
- Charge the battery cartridge if you do not use it for a long period (more than six months).
FCC caution
For the United States,
This device complies with Part 15 of the FCC Rules. Operation is subject to the following two conditions:
(1) this device may not cause harmful interference, and
(2) this device must accept any interference received, including interference that may cause undesired operation. Changes or modifications not expressly approved by the party responsible for compliance could void the user’s authority to operate the equipment.
Note: This equipment has been tested and found to comply with the limits for a Class B digital device, pursuant to part 15 of the FCC Rules. These limits are designed to provide reasonable protection against harmful interference in a residential installation. This equipment generates, uses, and can radiate radio frequency energy and, if not installed and used in accordance with the instructions, may cause harmful interference to radio communications. However, there is no guarantee that interference will not occur in a particular installation. If this equipment does cause harmful interference to radio or television reception, which can be determined by turning the equipment off and on, the user is encouraged to try to correct the interference by one or more of the following measures:
— Reorient or relocate the receiving antenna.
— Increase the separation between the equipment and receiver.
— Connect the equipment into an outlet on a circuit different from that to which the receiver is connected.
— Consult the dealer or an experienced radio/TV technician for help.
ICES-005 standard
For Canada
CAN ICES-005(B)/NMB-005(B)
PARTS DESCRIPTION

| 1 | Light head | 2 | Lens | 3 | Upper extension pole |
| 4 | Upper extension latch | 5 | Lower extension pole | 6 | Horizontal handle |
| 7 | Lower extension latch | 8 | Power switch button | 9 | Brightness change button |
| 10 | Battery bay | 11 | Shoulder belt hole | 12 | Tripod release button |
| 13 | Carrying handle | 14 | Tripod legs | 15 | Hole for fixing |
FUNCTIONAL DESCRIPTION
Installing or removing battery cartridge
To install the battery cartridge, release the cover lock, and open the battery cover.

- Cover lock
- Battery cover
To install the battery cartridge, align the tongue on the battery cartridge with the groove in the housing and slip it into place. Insert it all the way until it locks in place with a little click.
Then close the battery cover.

- Button
- Battery cartridge
To remove the battery cartridge, slide it from the appliance while sliding the button on the front of the cartridge.
Indicating the remaining battery capacity
Only for battery cartridges with the indicator

- Indicator lamps
- Check button
Press the check button on the battery cartridge to indicate the remaining battery capacity. The indicator lamps light up for a few seconds.
| Indicator lamps | Remaining capacity | ||
| 75% to 100% | |||
| 50% to 75% | |||
| 25% to 50% | |||
| 0% to 25% | |||
| Charge the battery. | |||
| The battery may have malfunctioned. | |||


NOTE: Depending on the conditions of use and the ambient temperature, the indication may differ slightly from the actual capacity.
NOTE: The first (far left) indicator lamp will blink when the battery protection system works.
Appliance/battery protection system
The appliance is equipped with a protection system. This system automatically cuts off power to extend appliance and battery life. The appliance will automatically stop during operation if the appliance or battery is placed under one of the following conditions.
Over-discharge protection
When the battery capacity becomes low, the LED lights go out except for a part of the LEDs. Later, the system automatically cuts off power. In this situation, remove the battery cartridge from the appliance and charge it.
Hole for padlock
For the anti-theft of the battery cartridge, the hole for the padlock is provided.

- Hole for padlock
ASSEMBLY
Spreading/folding the tripod legs
CAUTION: Keep hands away from the tripod legs and be careful not to pinch your fingers when spreading or folding the tripod legs.
- Hold the horizontal handle and carrying handle with both hands firmly.
- Slide the carrying handle in the direction of the arrow as illustrated while pushing the tripod release button.
- Release the tripod release button and make sure the carrying handle is secured in the bottom position.

- Horizontal handle
- Carrying handle
- Tripod release button
- To fold the tripod, slide the carrying handle in the opposite direction while pushing the tripod release button.
Positioning of the light head
Adjusting the height of the light head
- Open the upper extension latch.
- Adjust the length of the upper extension pole by pulling or retracting the upper extension pole.
- Close the upper extension latch and make sure the upper extension pole is fixed firmly.
- If more height is required, adjust the length of the lower extension pole in the same way as above.

- Upper extension latch
- Upper extension pole
- Lower extension latch
- Lower extension pole
NOTE: If the grip force of the latch is declined, tighten the screws of the extension latch. (Refer to the section for screw tightening.)
Retracting the extension pole
NOTICE: If the extension pole cannot be retracted smoothly, do not force the extension pole to retract. In this case, expand the extension pole again, and then retract the lower extension pole first.
When retracting the extension pole, align the light head as shown in the illustration, and then retract the extension pole.

- Light head
- Horizontal handle
Adjusting the angle of the light head
Turn the light head as illustrated to the desired angle.

For DML814 only
The lighting area can be adjusted by turning the individual lamp units.

► 1. Lamp unit
NOTE: If the grip force of the light head or lamp unit is decline, tighten the screws. (Refer to the section for screw tightening.)
Screw tightening
NOTICE: Do not over-tighten the screw.
Otherwise, the joint parts may be broken.
NOTICE: Do not use electric tools to tighten the screw. Otherwise, the screw may get over-tightened.
If the grip force of some joint parts is declined, tighten the screw shown in the figure.
For the extension latches

- Screw
For the light head

- Screw
For the individual lamp units (DML814 only)

- Screw
Shoulder belt
Optional accessory
Attach the hooks of the shoulder belt onto the mounts as shown in the figure certainly.

- Shoulder belt
- Hook
- Mount
NOTE: You can also attach the shoulder belt to the tool bag (optional accessory) as illustrated.

- Shoulder belt
- Toolbag
OPERATION
NOTICE: Do not press the buttons forcibly.
Otherwise, a malfunction may occur.
Switch action

- Power switch button
- Brightness change button
Turning on / off the appliance
Press the power switch button to turn on the appliance.
Press the power switch button again to turn off the appliance.
NOTE: The appliance turns on at the same brightness as the last setting.
Changing brightness
Press the brightness change button while the appliance is operating. The brightness decreases every time you press the brightness change button. The brightness will return to the highest when operating in the lowest brightness.
When the battery capacity becomes low, the LED lights go out except for a part of LEDs as illustrated. (Then a few minutes later, the system automatically cuts off power.)
In this situation, remove the battery cartridge from the appliance and charge it.

MAINTENANCE
NOTICE: Never use gasoline, benzene, thinner, alcohol, or the like. Discoloration, deformation, or cracks may result.
To maintain product SAFETY and RELIABILITY, repairs, any other maintenance or adjustment should be performed by Makita Authorized or Factory Service Centers, always using Makita replacement parts.
Cleaning
From time to time, wipe off the outside (appliance body) of the appliance using a cloth dampened in soapy water.
OPTIONAL ACCESSORIES
If you need any assistance for more details regarding these accessories, ask your local Makita Service Center.
- Shoulder belt
- Toolbag
- Makita genuine battery and charger
NOTE: Some items in the list may be included in the tool package as standard accessories. They may differ from country to country.
MAKITA LIMITED WARRANTY
Please refer to the annexed warranty sheet for the most current warranty terms applicable to this product.
If an annexed warranty sheet is not available, refer to the warranty details set forth on the below website for your respective country.
United States of America: www.makitatools.com
Canada: www.makita.ca
Other countries: www.makita.com
Makita Corporation
3-11-8, Sumiyoshi-cho,
Anjo, Aichi 446-8502 Japan
www.makita.com
DML813NA3-BZ-2104
20200610